

Introduction: Redneck (Ladder) Golf - Outdoor Game


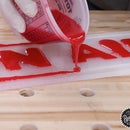
Recently I took a trip to Nashville,TN to visit my buddy and podcast co-host, Brad Rodriguez, from Fixthisbuildthat.com. We wanted to do something cool to debut our new podcast logo, and I thought what better way than to make a set of cornhole boards with the new logo on them. So we jumped on it, and that got me to thinking about what else we could do with the cut offs. So I drew up the plan real fast for a set of Redneck Golf, and we're offering both game plans for FREE.
Outdoor games are something I absolutely love, so when i took my trip I was hoping to get Brad to get competitive, and jump on board with this idea. I'm stoked he was game, and we got to use our brand new logo from our Podcast, Made For Profit.
These are super easy weekend projects that kids, friends, and family will thoroughly enjoy.
Step 1: Breakdown Stock


This project starts off like most, break down the stock according to the cut list in the FREE Plan. This build is super simple and only requires a table saw and miter saw!
Step 2: Layout & Cut Joinery


- Layout the joinery on the parts according to the cut list on the FREE plan.
- I use a bandsaw to cut the laps for the ends of the uprights and a table saw with a cross cut sled to cut the relief cuts for the foot joint
- then use a hammer and chisel to clean up the cuts for a nice tight joint
Step 3: Attach Risers


- I rip down a set of risers for the feet according to the FREE Plan
- I then countersink some holes to attach the feet with screws. I reinforce them with glue.
Step 4: Cut Leg Taper, Mounting Holes, & Foot Taper.


- I move on to cutting the taper on the feet according to the Free Plan
- I then cut all the holes for the ladder rungs using a forestner bit on the drill press
- we then cut the taper for the sides using a tapering jig on the table saw.
Step 5: Assemble!


- Pre sand the parts before assembly and round over the edges
- then assemble the upright to the feet first.
- Then cut the dowels to size and use glue to assemble the two sides and dowels
Step 6: Drill & Finish Golf Balls!


- I create a jig to hold the gold balls and then drill them using a 1/4" twist bit on the drill press.
- I layout the balls and paint them opposite colors!
- I then string them up 13" apart using paracord and I am ready to play!


