

Introduction: Scratch Game Development With Sensorian


Scratch is a visual programming language created by MIT Media Lab for teaching computer programming to beginners. We have developed our Sensorian shield to integrate with Scratch. Developers can read sensors and control outputs on the Sensorian board all from within Scratch.
Step 1: Setting Up Your Raspberry Pi
The Raspberry Pi's operating system must be configured to communicate with the Sensorian shield. The simplest way to do this is to use our image created specifically for using Sensorian on Raspberry Pi. Download an image from http://sensorian.io/downloads/ and burn it to an SD card or alternatively, build your own with our build script.
Step 2: Beginning Scratch Development


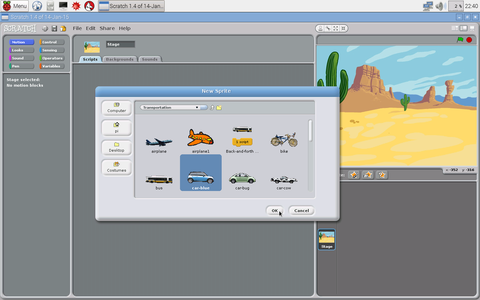

Open Scratch on the Raspberry Pi by clicking on Menu-->Programming-->Scratch. Once Scratch opens, right-click the default cat sprite and click delete. Add a background by clicking on the Backgrounds tab and then import. Click Nature, then desert, then OK. Click on the choose new sprite from file icon, click Transportation, car-blue, then click OK. Right-click the car and click resize this sprite. Scale down the car.
Step 3: Starting Mesh


While holding down Shift, click the Share menu. Then click Host Mesh. Now, open a terminal and type:
cd Sensorian/Handler_Scratch
Press Enter.
Type:
sudo python run_server.py --touchpad --magnetometer
Press Enter. If the above command returns to a command prompt, run it again.
Step 4: Basic Car Program


Click on Control and add a when green flag clicked block to the scripts window. Add a forever block to the when green flag clicked block. Add two if blocks to the inside of the forever block. Click on Operators and add an = block to the conditional part of both if blocks. Set the right side of the first = block to 3 and the right side of the second = block to 1. Click on Sensing and add a sensor value block to the left sides of both = blocks, set the sensor to sensorian-touchpad. Click on Motion and add a change x by block to the body of both if blocks. Set the value of the first one to 5 and the value of the second one to -5. Now, click the green flag. Pressing Sensorian B1 should cause the car to reverse and pressing B3 should cause the car to drive forward.
Step 5: Rotation


Add two more if blocks to the body of the forever block. Click on Operators and add a < block to the conditional part of the first if block and a > block to the conditional part of the second if block. Set the right side of the < block to -5000 and right side of the > block to 5000. Add a sensor value block to the left sides of both the < block and the > block. Set its sensor to sensorian-magnetometer.x. Click on Motion, and add a turn counterclockwise block to the body of the first newly added if block and add a turn clockwise block to the body of the second newly added if block. Set the value of both turn blocks to 0.25. Click the green flag. Turning the Sensorian counterclockwise will cause the car to flip counterclockwise while turning the Sensorian clockwise will cause the car to flip clockwise. You may wish to lower the value of the change x by blocks so that it is easier to manipulate the car. Did you notice any problem? Whenever you press Sensorian buttons B1 or B3 the car always moves along the horizontal and not in the direction in which it points. To fix this problem, replace the change x by blocks with move blocks. Set the value of the first one to 1 and the value of the second one to -1. Now, whenever buttons B1 or B3 are pressed, the car will move in the direction in which it points.
Step 6: A Simple Game


Add another sprite by clicking on the Choose new sprite from file button and click Things, rock, OK. Drag the rock to the middle of the scene. Add another if block to the body of the forever block. Add an = block to the conditional part of this block and set the right side of it to 2. Add a sensor value block to the left side of the = block and set its sensor to sensorian-touchpad. Click on Motion and add a point in direction block to the body of this if block. Set the direction to 90. Add another if block to the body of the forever block. Click on Sensing and add a touching block to the conditional part of the most recently added if block. Set its object to Sprite2. Inside the body of the ifblock add a forever block and inside that click on Looks and add a say block. Set it to "Game Over!". In between the when green flag clicked block and the main forever block add these three Motion blocks; set x to -180, set y to -140, and point in direction 90. Now click the green flag. Use B1 to reverse, B2 to level the car, and B3 to drive forward. Turn the Sensorian about its Z-axis to drive over the rock. It you hit the rock the game will be over. Press the stop button, and then the green flag to restart.
Step 7: About Sensorian

To learn more about the Sensorian shield please visit, http://www.sensorian.io


