

Introduction: Snow Fairy Jacket


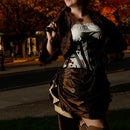
Here's a little tutorial on how to make yourself
a snow themed jacket. I made this one to go with a
costume a client requested for a snow shoot.
Check out my other tutorial, Runway on fire and please vote for me!
https://www.instructables.com/id/Runway-On-Fire/
to see more of my work visit my website
http://www.littlewingsdesign.com/costume.html
or my store
http://www.etsy.com/shop/fairystitchfactory/
photo by Matt Norris
http://www.MGNorris.com
Step 1: Inspiration

I like to start all of my designs with a sketch.
Here is the color version of the design for this outfit.
I unfortunately don't have the step by step for every piece,
just the jacket.
Step 2: Pick Your Patters

I don't tend to make things from a stock pattern.
I prefer to design my own costumes and take several patterns and mash
them together to make something new.
For this one I started with
http://www.simplicity.com/p-3651-misses-jackets.aspx
as a basic shape.
I wanted a really cool high collar so I modified the collar with this pattern
http://voguepatterns.mccall.com/v8686-products-13210.php?page_id=857
For the sleeves you can use any old sleeve patter, but here's an example.
http://www.simplicity.com/p-2080-misses-jackets-and-vests.aspx
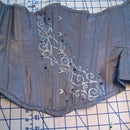
Step 3: Vest


Start by cutting out your vest pattern pieces.
You are going to want to cut out a lining also
and interfacing for both the lining and the outer layer.
You really want the collar to stand straight so make sure it's a good quality interfacing.
Fuze the interfacing together, and then sew the front sides to the back matching right sides.
Then sew the lining together at the neck and around. Turn right side out and press with an iron on steam.
The collar pattern has a few darts in it, so make sure you remember not to back stitch at the points.
Instead leave the strings long and tie them at the ends and trim, this helps the darts to lay flat.
Step 4: Vest 2


Now this part is just about eyeballing it.
Just place your feathers around the neckline and stitch them down with
white thread, don't worry about the thread on the inside, because you will
be putting a layer of feathers on the inside too.
Make sure you get a mic of pointed feathers and fluffy feathers so you can
get some nice shapes, and cover all of the ends.
When I was done adding the feathers I sewed 2 of the snowflakes on 1 side.
Step 5: Snowflakes


I made a ton of swarovski crystal snowflakes for this jacket.
I bought the tutorials on etsy for $5 a piece
http://www.etsy.com/listing/75481122/tutorial-swarovski-snowflake?ref=sr_gallery_8&ga_search_submit=&ga_search_query=snowflake+tutorial&ga_search_type=handmade&ga_facet=handmade
http://www.etsy.com/listing/64795124/tutorial-fluffy-swarovski-snowflake?ref=sr_gallery_11&ga_search_submit=&ga_search_query=snowflake+tutorial&ga_search_type=handmade&ga_facet=handmade
You can get the necessary beads and thread for them pretty cheap at http://www.firemountaingems.com/
I warn you they do eat up beads, I spent about $100 on beads for this jacket.
Step 6: Sleeves 1


When you cut out your sleeve pieces, make sure to at a bell shape by sloping
the bottom of the sleeve outward.
I also cut the sleeves down a little at the top of the sleeve because the top is a separate piece.
Cut 4 of the sleeve so you will have a lining to hide all of the beading knots.
Then I laid out all of my snowflakes and sewed them down with clear thread.
After that I sewed on some loose swarovski crystals in wavy lines so they looked
like they were floating down with the snowflakes. Remember to knot the thread after
each bead to increase stability.
Step 7: Sleeves 2

Once you have all of your beads and snowflakes on, sew up the side seam.
Cut out just the shoulder part of the sleeve, and make it wider than the pattern.
Sew a loose stitch along the bottom and pull one thread to gather. Do the same with
lining and sew to vest.
Sew outside of bell sleeve to bell sleeve lining at the bottom.
Pin right side of bell sleeve to right side of sleeve top and stitch.
Next I put some snowflakes over the bottom of the sleeve gather where the two sleeve pieces meet,
then I sewed down the lining of the bell sleeve to top sleeve. and you have your snow jacket!
Step 8:

Modeled by my friend Mary
For more of my work visit my website
http://www.littlewingsdesign.com/costume.html
or my store
http://www.etsy.com/shop/fairystitchfactory
Photo by my husband Matt Norris
http://www.MGNorris.com
Step 9:

Modeled by my friend Mary
For more of my work visit my website
http://www.littlewingsdesign.com/costume.html
or my store
http://www.etsy.com/shop/ibukij
Photo by my husband Matt Norris
http://www.MGNorris.com
Step 10:

Modeled by my friend Mary
For more of my work visit my website
http://www.littlewingsdesign.com/costume.html
or my store
http://www.etsy.com/shop/ibukij
Photo by my husband Matt Norris
http://www.MGNorris.com

Participated in the
Halloween Epic Costumes Challenge


