

Introduction: Stem Mount From a PVC T Connector


Recently while I was at the local hardware store I heard one of the sales assistants say "Don't people use PVC tubing for plumbing anymore?". I think they do, but I wasn't one of them, I was picking up a PVC "T" connector for an Instructables project. This project was to create a custom mounting system for my Garmin Forerunner 305. I was out of handlebar real-estate after switching out my standard handlebar with a new aero-carbonfiber handlebar.
Step 1: Parts and Tools List

You'll need the following parts in order to build this project.
1 - 1-3/8" PVC T Connector
1 - length of 5/8" wooden dowel
2 - flat washers
1 - 1/8" x 2" #6 machine screw
3 - #6 hex nuts
1 - Package of assorted tie wraps
(black paint - if desired)
(epoxy - optional)
Hack saw
Dremel moto-tool
screwdriver
wrench
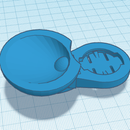
Step 2: Shaping the T Connector


My stem is ~1.4" in diameter, so a 1-3/8" PVC "T" connector was just the right size to fit over the top of the stem. I started by first cutting off the ends next to the "T", so that they fit the available space on the stem.
Once that was completed, I cut half of the length-wise section (opposite to the "T" protrusion). This provided the base section that is needed for the mount.
Next, cut a "slice" of the 5/8" dowel about 3/4" wide, this will be place in the top of the "T". It will be our extra "handlebar" space for mounting the Forerunner 305 bracket (See drawing in this Step).
Now you can drill the 1/8" holes in the dowel section and the PVC "T" (see drawing) to attached the dowel to the "T".
The last modification to the T connector are cutting two notches (~3/4) in the "T" protrusion for the Forerunner mounting bracket.
With the holes drilled, you'll insert the 1/8" bolt thru one side of the PVC, place a nut on the bolt, then a washer, the dowel, the other washer, another nut, then thru the other side of the PVC with a last nut on the end (see "top-down" drawing). Using the screwdriver and wrench to tighten the bolt and nuts against the dowel and sides of the PVC.
Once the parts are assembled, (including attaching the FR305 bracket to the dowel section of the mount with tie wraps) - you can use some epoxy to further secure the dowel to the PVC. I placed tape over the top of the "T" along side of the dowel and FR305 bracket. Then turned it upside down and applied the epoxy through the "bottom" inside of the "T". Allow the epoxy to cure completely before painting.
Step 3: Assembling the Parts
Here's the resulting stem mount painted flat black and ready to be attached to the bike.
Step 4: Mounting the GPS
Place the mount over the stem, I used a small piece of rubber between the stem and the mount to prevent it from slipping. Then secure it with a single ~1/8" tie wrap. I've used this for over a year without ever having the stem mount come loose or fall off.

Participated in the
Hack It! Contest


