

Introduction: Sweet PC Speakers W/ SubWoofer for Cheap


This is a great fun project to get started with electronics and sound systems.
Total cost for this system to me, was about $20.
The speakers I got pre-mounted to the particle board from an old projection TV that I got for free from a friend. Projection TVs are a dime a dozen. I've picked them up off the sidewalk, bought them at good will for $1, and gotten 2 from friends. They are cheap, and they all have speakers ready to go, and mounted on a board of some kind.
The Amplifier came from Amazon. There are LOTS of options for cheap: http://www.amazon.com/s/ref=nb_sb_noss_2?url=sear... I bought this one: http://www.amazon.com/s/ref=nb_sb_noss_2?url=sear... but I wouldn't recommend it. While it works, and is better then a cheap pair of PC speakers, the Audio Quality isn't that great. It DOES come with a built in low-pass filter and a sub-woofer port if that is valuable to you. Other sources include Pawn Shops, Pull-A-Part / Junk Yards, A old car stereo that has an Auxiliary In, Craigslist, A Cheap Walmart Stereo, etc...
The Power Supply came from an old PC they were throwing out at work. See my other instructable: https://www.instructables.com/id/Super-USB-Charger... for details on how to convert the computer power supply for this, it's incredibly easy, and is a great starter electronics project.
The Sub Woofer - I picked this one up from a thrift store for $5. It needs a box still sometime to really work right, but it works okish as is. The better components you pick up, the better it will sound, but my setup isn't bad for $20.
Step 1: The Speakers

Projection TVs are a lot of fun to take apart, just be sure you discharge the tubes before fiddling with the tubes, or the high voltage power supply. They contain HUGE frenel lenses that can be used to melt concrete, a slew of individual lenses in 3 seperate assemblies for each color (unless it's a newer projection tv that only has a single bulb, and not tubes).
All TVs have speakers, and projection TVs are no exception. They are usually mounted behind the fabric beneath the screen. They are usually conveniently pre-mounted and can be removed easily.
You can use any speakers for this. My speaker set came with small tweeters and a simple high-pass filter between the tweeter and the main speaker. Honestly, the speakers aren't so awesome that I used. But, they are way better then any PC speakers you can get for $20.
**Note: It is likely if you get your speakers from a TV that the negative side of both speakers will be tied together. Most amps do not like this at all (it's bad), so you may need to cut the wire connecting the two speakers and run a new wire from one of the speakers to the amp.
Step 2: The Subwoofer

Subwoofers work a lot better with a "tuned" enclosure. But, they work ok without one too. Subwoofers are a piece of cake to wire. It has 2 wires, connect them to the sub-woofer port on your amp. (Just like speakers, but bigger, for lower sounds).
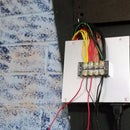
Step 3: Amplifier Wiring

The amplifier has a place for line-in from your computer. (I used a short 3.5mm to 3.5mm cable to attach my computers headphone port to the amps front "mp3" in port).
The amplifier needs 12v. Depending upon what kind you buy, the wiring will be different. Mine needed a special plug, I dug into my parts bin till I found a wall-wart with the right connector on it. Cut it off, and attached it directly to my power supply.
Most amps have 2 or 4 channels. You can use just about any kind of wire for speaker wire. On the back of my amp, there are your usual house hold speaker wire connectors. I think most car amps use screw terminals, which would be better. Regardless, 2 wires go to each speaker. Unlike most things, remember you should NOT connect the speakers "grounds" or "black" wires together. So, you'll need 2 pairs of wires, for a total of 4 conductors not just 3.
Then there is the Sub-Woofer plug on the amp. That needs to be wired as well.
Step 4: Mount the Amp, Power It On, and Enjoy Some Tunes

My Amp is small, and fits great between two monitors. This is also nice because I can change the volume, turn power on and off, etc... from my chair. Most high quality car audio amps don't have an easy to use volume knob. They are made to get mounted in the trunk out of sight and use the car stereo volume to change the volume, which you can do with your amp as well. You'll just turn the volume up or down on the computer instead of the Amp like I do. My Amp isn't mounted, it's just sitting on my desk.
That's all there is to it. You can tweak things, upgrade components until you get the sound you like. The possibilities are almost literally endless.
Have Fun!


