

Introduction: The Shaanduino Arduino Box


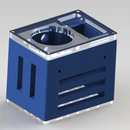
This is a protective casing meant for an Arduino UNO R3. It has pin accessibility through a plexi top. It does a great job protecting the arduino from static shortages and just wear and tear from everyday use. The box is currently being used in my school's robotic class to protect an arduino. It is is nicknamed, "The Shaanduino". I am just going to post the files instead of a step-by-step instructable to make it easy for you guys.
Step 1: Plexy Glass TOP


So the top part is see through so you can see what is going on in the arduino. It has easy acces to all of the input and output ports. i am attaching 2 files of the same thing. 1 is a .STL and the other is .SLDPRT. I cut my part on a cnc laser blaster. You have to export the file and you may have to convert the file to a different format to print on a laser cutter.


Step 2: The Shaanduino Base


The base is the main casing. It is what really keeps you from damaging the arduino inside. It consistently has good prints on the makerbot. Again I am posting an .STL file and a .SLDPRT file. The only downside is the print time is very long. It took my base about 3.5 hours to print but the turnout was great.

Step 3: Putting the Arduino in the Box


Placing the arduino in the Shaanduino can be challenging. when placing it in make sure the arduino and the base are parallel.
WARNING: DO NOT TOUCH THE THE CIRCUIT BOARD ON THE ARDUINO.
You could short the board from the static electricity from your hands. Once you have the arduino parallel to the base just let go and drop it in. Then just screw in the top and your arduino is now protected.
Step 4: Epilog Contest
If i win the zing 16 i will donate it to my school so the rest of my school can use it.

Participated in the
Epilog Challenge V


