

Introduction: Timelapse Photography With a DSLR Camera


This all started because I wanted to take a video of my 3D printer in action. I had set up my phone in a roll of tape so that I could capture video of my prints going through, and that was fine for the shorter prints, but I needed something better for the long 4+ hour prints that I've been trying to do. I knew I couldn't sit there snapping photos every 30 seconds so I really wanted to figure out an automated way to let my camera and computer do the work for me. I happen to have a nice Nikon D3300 camera (DSLR) and I really wanted to be able to utilize it for this purpose. So I set out to find out how to set up my camera for an awesome timelapse photo shoot!
Step 1: What's a Timelapse?

Great question! A timelapse is a filming technique that takes an action (in my case, a 3D printer) that can take a long time, records it, and plays it back in high speed. You have probably seen tons of timelapses of the sun and clouds moving across the sky. It would be pretty boring to watch this happen all in one go (maybe not that boring, but it would definitely take a while!), so making a timelapse is a cool way to showcase a longer event in a shorter period of time.
Generally speaking, most videos are shot at at least 24 frames per second. So depending on what you are filming, if you want a smooth video of the sun rising and setting, you would want to adjust your photos so that they match this setting (24 frames / 1 second = 1/24th of a second per frame, or a length of .04 seconds per photo). Also, the more frequent photos you take, the smoother your timelapse will be. However, if you want the block-y feel that some timelapses can provide (in a good way!), go ahead and take less photos. So you will want to think about how much time you want between photos, and how long your timelapse will last. If you timelapse is going to last all day, there is no need to take a photo every ten seconds! However, if your timelapse is only going to be an hour or so, definitely err on the side of more photos.
Some techniques that others use involve tripods and intervalometers. I personally don't have either and wanted to try and see how much I could do with as little equipment as possible. It was nice to push myself and see what I could find about about the capabilities of my camera! I see myself investing in a tripod soon (or making one!). I didn't really know what an intervalometer was before I started learning how to do this process, so I don't really foresee myself needing to get one as long as my camera can be tethered to my laptop. (An intervalometer is a type of remote control that you can set to make your camera take photos at certain time intervals) Basically, it does what the free software I found does, but without the aid of a laptop. It would be cool to make one in the future!
Step 2: Materials


In order to be able to finish this instructable, you will need a few things:
- DSLR Camera
- Computer
- You will need to download digiCamControl (the "stable version will give you the best results)
In order to turn all of my photos into a timelapse video, I just used Movie Maker which was already on my laptop. Of course, you can use more complicated software but this got the job done just fine.
- Cable connecting camera to USB port in computer (my camera came with one!)
- tripod, or somewhere to put your camera
- a subject
- It is best to choose a moving subject, in my case I did my 3D printer completing a print!
And away we go!
Step 3: Set Up Your Photo Shoot!


The first thing that I did was dig through my camera's settings. Many Nikon cameras happen to have a handy built-in timelapse setting that's as easy as clicking Menu > Shooting Menu > Interval Timer Shooting, and then fiddling with the settings until you have the time between intervals, length of timelapse, and photos per interval that you would like.
Unfortunately I didn't have this luxury and dug a bit deeper. I learned about tethering your camera to a computer in order to use a software that would be able to remotely control your camera. There are some other ways to do this, but because my computer was already going to be controlling my printer I would rather have the photos go directly there and kill two birds with one stone!
So I downloaded digiCamControl. This program ended up being one of the only ones that supported my camera, and should work with most Nikon Cameras as well. You can download it at this link:
http://digicamcontrol.com/download
Did you download it? Good! Now go ahead and turn your camera on and connect it to your computer via USB. I believe you can also connect over wifi if you camera supports that, but as of now mine does not. It should register the camera automatically. Then, click on the timelapse button in the menu (it's the clapperboard, fifth button from the left). This will prompt the timelapse menu, in which you can select your options!
- Start Schedule: This is when you want the timelapse to start, I select "Start now."
- Timelapse Settings: here I select "Capture with selected camera", and set the time to wait between each capture. Depending on what you are doing, this can vary greatly. I set it anywhere between 10 and 20 seconds for taking photos of my 3D printer, depending on the time of the print. Some trial and error is good for this, just to see what you like.
- Stop Schedule: This is how I generally time how long I want the photo sessions to be for. I set this for the duration of the print (plus some, just because the timer isn't completely reliable). So if I know that a print will take 3 hours, i'll add an extra 10 minutes just in case.
Step 4: Start Your Timelapse!

Now comes the really exciting part: click on the button on the far right side of the timelapse window that says "Start Timelapse". Your camera will start taking photos! Try not to move it during this process in order to get a really smooth set of photos, and make sure that it is in focus on the subject. I caught my camera out of focus pretty early on which definitely helped me in the long run!
And now you wait! If you aren't comfortable leaving your subject (or camera) unsupervised, then stay close. If you are, then this is a great time to accomplish stuff! Go grocery shopping, ride a bike, make some tea, and wait for your timelapse to finish.
I ended up running into a major problem and my camera ran out of battery. Since I decided to go the latter route noted above I ended up not realizing that my camera had died mid-timelapse until it was too late. If you look at my final timelapse video or gif, you can see that there is a noticeable jump in completeness of the part I printed. I ended letting the print continue but charged my camera battery for an hour or so until it was charged enough to finish the job.
It is for this reason that I HIGHLY RECOMMEND plugging your camera into a power source while doing your timelapse. My camera does not have a way to charge it while taking photos at the same time (if you know how to make this happen please comment below and tell me!!). Until then, I personally have to stick to shorter timelapse subjects.
Regardless, before your camera dies you should be seeing photos coming into digiCamControl, which is very exciting!
Step 5: Turning Your Photos Into a Video


Once your subject has completed it's action and you are done taking photos, it's time to compile all of those photos into an awesome timelapse video!
digiCamControl automatically saves your photos in a folder in your photos drive, but you can also export all of the photos into a specific area by clicking Session > Export Session.
Now you are going to need to open up Movie Maker. Click on "Add videos and photos", and then ... you guessed it... add the photos you just took! To save you some time, you can easily select them all by highlighting the first photo, and then scrolling to the bottom, holding shift, and clicking the last photo. Then click "open" to import them into Movie Maker.
Now go ahead and right click on any of the photos and click "Select All". This will highlight all of the photos, and you can then adjust the duration of time that Movie Maker will display each photo for. I did a lot of trial and error here, so feel free to experiment! Find a duration that you like, but make a mental note that a shorter duration will make a smoother movie, and a longer duration will make a choppier/blockier movie.
It's also fun to note that if you want your timelapse to look like a real movie, you can adjust your photos so that there are 24 frames per second (fps), the same as most movies! If you do some quick calculations, you can figure out the seconds per frame (the duration that each photo has to be in order to reach this number):
24 frames / 1 second = .04 seconds per frame
This would be a good baseline number to go by, and adjust accordingly. Definitely use your instinct here at this step!
Once you have found a duration you like, move to the next step.
Step 6: Saving Your Movie

Now that you've found a duration that suits your taste, we are finished! I made the last frame longer by clicking on just the one frame (not selecting all), and setting the duration to 1.5 ish seconds. This way the audience could see my finished 3D printed part. This is totally optional though.
To save your movie, click file (the top left hand tab. It doesn't actually say "file") > Save Movie > For Computer
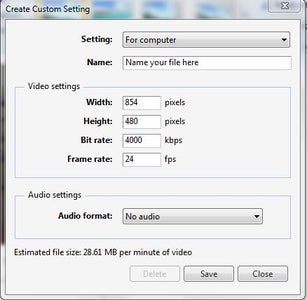
Name your file, and choose a place to save it! I had some issues with the file being too large. If this happens to you, you might need to change the bit rate to make the file a bit smaller (pun intended). Click file > Save Movie > Create Custom Setting (it's all the way at the bottom of the selections, you have to scroll all the way down).
In the window that comes up change the setting to "for computer" and name your file. You can change the width and height, but I didn't. Change the bit rate to 4000 or so. The bit rate is the number of bits per second that can be processed in a certain period of time, so by lowering your bit rate you are lowering the quality of the file, thus lowering the size of the file. You can also change your frame rate to 24 fps, and choose your audio option (I had no audio). Click Save, and then once again navigate through file > Save Movie > [name of the setting you just created].
Step 7: OPTIONAL: Make a GIF!


If your timelapse is short enough, you can even turn it into a GIF! "GIF" is short for Graphics Interchange Format, which is basically compressed photos to make a short animation...(I hope that sounds familiar, because it's basically the same thing as a timelapse video, just in an even smaller format!)
Lucky for us, we live in a day and age where almost everything we need is on the internet. I like to do this online using ezgif (http://ezgif.com/video-to-gif). Simply go to their website, and upload your video by clicking the "Choose file" button. Then browse through your computer to select the video you have just made. Then click "upload". This can take a some time depending on the size or frame rate of your video, so be patient. When your video is uploaded, it will appear in a "video to GIF converter."
Choose your start and end time. If your video is pretty long, you can choose a small segment of it, but because my video was so short (about 15 seconds!) I was able to make a gif using all of my footage. You can change the size and frame rate of the gif, but I kept it the same as the defaults.
Now click on "Convert to GIF!" and wait for your GIF to magically appear below! Wow!
Step 8: That's All!

Now you have successfully made your timelapse video (and optional GIF!). I hope that this was helpful in showing you a cool new photography technique, and there are so many potential timelapse options out there for you! Be sure to post some videos/GIFs of what you made!
Thanks for reading!

Third Prize in the
Makerspace Contest

Participated in the
3D Printing Contest 2016

Participated in the
Automation Contest 2016


