

Introduction: Tiny Security Using ATtiny85:


More by the author:


About: I'm a B.E.Mechatronics Engineering Student. I love to make things with microcontroller development boards and single board computers.
Today we are gonna make a "Tiny Security" using Atmel ATtiny85. Our final system will consists of
• ATtiny85.
• ESP8266-01.
• PIR sensor.
• Other electronic components(capacitors,resistors,voltage regulators,battery).
How does this "Tiny Security" works?
• The PIR sensor in the system detects human in its surrounding and sends data to ATtiny.
• ATtiny85 commands ESP8266-01 to send data to cloud through internet.
• From cloud we get sms alert to our mobile and also we get sound alert via webpage from browser.
Advantages:
• Cheapest Security system.
• You are updated with the status of your place every 10sec from any where in the world through a webpage.
• You get a sms when your place in not private.
Step 1: Required Components:


Components:
•
1 Atmel ATtiny85 (microcontroller)
•
1 ESP8266-01 (Wi-Fi module)
•
1 PIR Sensor
•
1 7805 IC (5v regulator)
•
1 LD33V IC (3.3v regulator)
•
1 Resistor 2.2KOhm
•
4 Capacitors 100uF
•
Female Headers
•
1 Single side copper PCB
*Important: You must have your own website hosted on server with FTP(File Transfer Protocol) and SQL database features .
Additional things required:
To program Atmel ATtiny85 (microcontroller) we will require,
•
1 Arduino UNO (microcontroller)
•
1 Breadboard
•
a few Jumper wires (M-M,M-F)
•
a Laptop
•
1 USB cable A to B
To print our custom PCB we will require:
• Ferrous Chloride
• OHP sheet / glossy sheet
• OHP marker
• Laser printer
• Iron box
• Hand driller
• 0.8mm drill bit
• Soldering iron kit
•
1 Atmel ATtiny85 (microcontroller)
•
1 ESP8266-01 (Wi-Fi module)
•
1 PIR Sensor
•
1 7805 IC (5v regulator)
•
1 LD33V IC (3.3v regulator)
•
1 Resistor 2.2KOhm
•
4 Capacitors 100uF
•
Female Headers
•
1 Single side copper PCB
*Important: You must have your own website hosted on server with FTP(File Transfer Protocol) and SQL database features .
Additional things required:
To program Atmel ATtiny85 (microcontroller) we will require,
•
1 Arduino UNO (microcontroller)
•
1 Breadboard
•
a few Jumper wires (M-M,M-F)
•
a Laptop
•
1 USB cable A to B
To print our custom PCB we will require:
• Ferrous Chloride
• OHP sheet / glossy sheet
• OHP marker
• Laser printer
• Iron box
• Hand driller
• 0.8mm drill bit
• Soldering iron kit
Step 2: Setting Up Arduino As a Programmer for ATtiny85:


• Let us setup Arduino as the programmer for ATtiny85. So for next few steps we will require,
- Laptop
- Arduino UNO
- USB cable A to B
• Download Arduino IDE from the following link Arduino IDE download link (my version is 1.6.14)
• Install and open the IDE
• Connect Arduino to your laptop via USB cable.
• Open Tools->Board, select "Arduino Uno"Open Tools->Port, select the COM port of Arduino. In Windows OS we can get the COM port of Arduino from "Device Manager". Click Windows Icon-> search for "device manager"->open Device Manager ->under "Ports" note the COM port of your Arduino and select it in the IDE
• Open Tools->Programmer, select "AVRISP mkll"
• Open File->Examples->ArduinoISP->ArduinoISP
• Upload "ArduinoISP" program to your Arduino Uno
• Disconnect the Arduino Uno from your laptop
Now we have turned Arduino Uno as a programmer for ATtiny85!
Step 3: Setting Up Arduino IDE to Program ATtiny85:


• By default Arduino IDE doesn't support ATtiny85 so we should add ATtiny boards to Arduino IDE.
• Open File -> Preferences , in the Additional Boards Manager URLs give this URL .Click "OK".
• Oopen Tools -> Board -> Board Manager ,scroll down to "attiny by Davis A. Mellis" and install it.
• Now ATtiny boards will be added to Tools->Board.
Now Arduino IDE can be used to program ATtiny85!
Before programming ATtiny85, you have to create a SQL database and upload some PHP files to your web server.
Step 4: Creating SQL Database:


• Login to you account provided by your web hosting company(in my case it is "hostinger.in")
• Dashboards of most of the hosting companies looks similar.
• In the dashboard search for "My SQL database", click on it.(pic 1)
• You will be taken to a webpage where you have to enter, (pic 2)
-your SQL database name
-user name(the one who can access the database)
-user password(password for the user)
• Go back to your dashboard and click on "phpMyAdmin"(pic 3)
• In the next page select the SQL database you have created now.
• You will be taken to 'phpMyAdmin' page.Initially your database will be empty,now let's create a table.click on "create table".(pic 4)
• enter the table name,column name,column type and save the table(pic 4)
• Now an empty table will be created.Click on the table name "t1" which appears on the left of the webpage(pic 5)
• Click "Insert" tab (pic 5)
• Enter id value as "1" and click "go"(pic 5)
• Click on "Browse" tab, you may able to see the table data appears on the screen
Why are we creating this tabe in the database?
When the data in the column "c1" becomes "001" we get alert sms and alert sound in the web page.This is achieved by the 2 PHP files which you are gonna upload to you server in the following step. The column value is changed by the ESP8266-01 present in our system through internet.
Step 5: Uploading PHP Files to Server:
• Open file manager in your dashboard.
• Unzip upload files.zip and upload the files in the "upload files" folder to your public folder in the server.
• I usually don't upload files to the server using brower,instead I use a software called "FileZilla",you can download it in the following link FileZilla download link .
• Now you can't use the uploaded php files as such,some lines have to be edited .
Before editing the php files you have to create a "Twilio account" to receive sms via internet,refer the following link to create a Twilio account and to get a phone number from which you can receive sms Link .
Attachments

Step 6: Editing the PHP Files:


• Open esp8266.php file in editing mode, replace the details in the line 15 as mentioned in the comment section and save the file in the server.
• Open browser.php file in editing mode,replace the details in the lines 8,9,12 and 34 as mentioned in the comment section
PHP files are now ready! Let's program the ATtiny85.
Step 7: Programming ATtiny85:


In this step we will require,
-ATtiny85
-Arduino Uno
-1 capacitor 10uf
-Laptop
-Breadboard
-Jumper wires(M-M,M-F)
Before programming ATtiny you have edit some line in the arduino program,
• Download ATiny_Security.zip and unzip the file.
• Open Tiny_Security.ino file in Arduino IDE.
• Edit the lines 13,19,33,36,and 39 as mentioned in the comment section.
• If you are confused about the 36th line refer the following step or else skip it.
Attachments
Step 8: Editing the Attiny_Security.ino File

• If you don't know the size of the GET request,download the GET_request_size.zip and unzip it.
• Open GET_request_size.ino file in Arduino IDE.
• Edit the 4th line as mentioned in the comment section.
• Connect the Arduino Uno to your laptop (set the Arduino IDE settings as mentioned in step 3) and upload the program.
• Once it gets uploaded open the Serial monitor, the size of the GET request will be displayed.(make sure that the baud rate is 9600)
• Copy the length(ie. the 2 digit number) and replace it in the place of xxx in the 36th line of Attiny_Security.ino file
• Upload ArduinoISP program to Arduino Uno as mentioned in the step 3.
Attachments
Step 9: Programming ATtiny85(contd.):


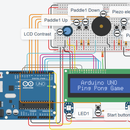
Connection b/w Arduino Uno loaded with ArduinoISP program and ATtiny85:
Arduino Uno – ATtiny85
5V – Pin 8 (Vcc)
Gnd – Pin 4 (Gnd)
Pin 13 – Pin 7
Pin 12 – Pin 6
Pin 11 – Pin 5
Pin 10 – Pin 1 (Reset)
• Connect a 10uf resistor b/w the reset and Gnd of Arduino uno.
• Connect Arduino Uno to your laptop via usb cable.
• Open Tiny_Security.ino file in Arduino IDE.
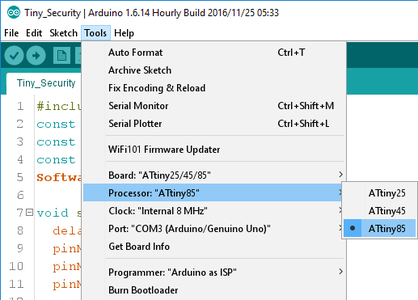
• Setup Arduino IDE Tools tab as shown in the above screenshots.
• Open Tools->click on "Burn bootloader",wait untill it gets loaded.
• Then click upload.(the program gets uploaded to attiny via Arduino Uno).
Now the ATtiny85 is loaded with Tiny_Security.ino!
Arduino Uno – ATtiny85
5V – Pin 8 (Vcc)
Gnd – Pin 4 (Gnd)
Pin 13 – Pin 7
Pin 12 – Pin 6
Pin 11 – Pin 5
Pin 10 – Pin 1 (Reset)
• Connect a 10uf resistor b/w the reset and Gnd of Arduino uno.
• Connect Arduino Uno to your laptop via usb cable.
• Open Tiny_Security.ino file in Arduino IDE.
• Setup Arduino IDE Tools tab as shown in the above screenshots.
• Open Tools->click on "Burn bootloader",wait untill it gets loaded.
• Then click upload.(the program gets uploaded to attiny via Arduino Uno).
Now the ATtiny85 is loaded with Tiny_Security.ino!
Step 10: Making Custom PCB:

In this step we will require,
-Ferrous Chloride
-OHP sheet / glossy sheet
-OHP marker
-Laser printer
-Iron box
-Hand driller
-0.8mm
-drill bit
-Soldering iron kit
• Download the pdf files given below.
• Refer the following link to know the procedure to make a PCB Link .
• Solder the components on the PCB.
• Use female headers to place ESP8266-01 and for power input pins.
Your Tiny Security is ready for work!

Step 11: Giving Work to Your Tiny Security:


• Place the Tiny Security in you desired area.
• Turn on your Wi-Fi.
• Power the PCB b/w 6v to 12 v with adaptor.
• Leave the place within a minute.
• If any motion is detected in the area, you will receive an sms alert to your mobile and from anywhere in the world to can check the status of your area by visiting the site yourwebsite.com/browser.php
• If you are working in office,just open the site in your computer and continue your work. When your area is occupied by someone else,your "Tiny Security" sends the status as "1" to the cloud which get updated to your web page yourwebsite.com/browser.php every 10secs. If the status becomes 1 you get a sound alert from the browser.
• When the status is "0" you won't get any sms alert or sound alert. When the status turns to "1" you get sms alert to your mobile and sound alert from your website.The status turn to "1" only when any motion is detected in front of the Tiny Security.
Make multiple "Tiny Securities" and have fun!
