

Introduction: Turn Off Any Electric Lamp by Your Mouth Blowing


Can you imagine, you can turn off a light bulb by mouth blowing just like you blow out a candle? In this instructables I will show you how you can do this very easily. I think you will enjoy it.
How it works: I will use humidity sensor to implement the project. Humidity of mouth blowing is greater than normal air. If you blow air to the humidity sensor from your mouth then sensor reading will increase. I will set a threshold value generally the maximum reading from the air where it is set. If the value is greater than the threshold than it will trigger the relay. This is the secret behind the project.
I just used humidity sensor in a uncommon way.
Step 1: List of Materials


Step 2: Connect Humidity Sensor


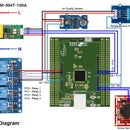
Connect the humidity sensor to an analog pin of Arduino board. Used Grove Base Shield which has many Grove connectors, making it convenient for you to use Grove products together. I connected DHT11 sensor to A0 of base shield.
Step 3: Find the Threshold


Before final programming you need to find the threshold value for the humidity. Download Grove_Temperature_And_Humidity_Sensor library from Github and then upload the following sketch to your Arduino board.
#include "DHT.h"

#define DHTPIN A0     // what pin we're connected to

// Uncomment whatever type you're using!
#define DHTTYPE DHT11   // DHT 11
//#define DHTTYPE DHT22   // DHT 22  (AM2302)
//#define DHTTYPE DHT21   // DHT 21 (AM2301)

// Connect pin 1 (on the left) of the sensor to +5V
// Connect pin 2 of the sensor to whatever your DHTPIN is
// Connect pin 4 (on the right) of the sensor to GROUND
// Connect a 10K resistor from pin 2 (data) to pin 1 (power) of the sensor

DHT dht(DHTPIN, DHTTYPE);

void setup()
{
    Serial.begin(9600);
    Serial.println("DHTxx test!");

    dht.begin();
}

void loop()
{
    // Reading temperature or humidity takes about 250 milliseconds!
    // Sensor readings may also be up to 2 seconds 'old' (its a very slow sensor)
    float h = dht.readHumidity();
    float t = dht.readTemperature();

    // check if returns are valid, if they are NaN (not a number) then something went wrong!
    if (isnan(t) || isnan(h))
    {
        Serial.println("Failed to read from DHT");
    }
    else
    {
        Serial.print("Humidity: ");
        Serial.print(h);
        Serial.print(" %\t");
        Serial.print("Temperature: ");
        Serial.print(t);
        Serial.println(" *C");
    }
}
Open terminal monitor and observe the value of %humidity for a minute. Note down the maximum value you got. It will be the threshold for our next program. I found maximum 84 in my room which is marked as red box in the image.
Attachments

Step 4: Connect Relay & Button


Now, you need to connect Grove relay and Grove button. Relay is required because I will run a 220 V CFL Lamp for the demonstration. I want to turn on the lamp with a switch after blow it out and for that I added a button. Connect Relay to D4 connector of the base shield and button to the D8 connector of the base shield. It is arbitrary and you may use other digital pins but don't forget to change in the program accordingly.
Step 5: Connect a Lamp


Connect a CFL lamp to the relay you connected earlier to the base shield. You have to connect two wires, one from relay and another from lamp to the ac source. Be careful! There is a risk of electric shock. Do it on your own risk.
Step 6: Enjoy


We are on the final stage. Upload the following program into Arduino board and test. You may use an LED to get visual indication. Do not forget to change the threshold value with your own you got from the previous experiment.
// Example testing sketch for various DHT humidity/temperature sensors
// Written by ladyada, public domain

#include "DHT.h"

#define DHTPIN A0     // what pin we're connected to
#define BUTTON 8
#define LIGHT 4

// Uncomment whatever type you're using!
#define DHTTYPE DHT11   // DHT 11
//#define DHTTYPE DHT22   // DHT 22  (AM2302)
//#define DHTTYPE DHT21   // DHT 21 (AM2301)

// Connect pin 1 (on the left) of the sensor to +5V
// Connect pin 2 of the sensor to whatever your DHTPIN is
// Connect pin 4 (on the right) of the sensor to GROUND
// Connect a 10K resistor from pin 2 (data) to pin 1 (power) of the sensor

DHT dht(DHTPIN, DHTTYPE);
int threshold = 85;
int state = 1;

void setup()
{
    Serial.begin(9600);
    Serial.println("DHTxx test!");
    pinMode(BUTTON, INPUT);
    pinMode(LIGHT, OUTPUT);
    dht.begin();
}

void loop()
{
    // Reading temperature or humidity takes about 250 milliseconds!
    // Sensor readings may also be up to 2 seconds 'old' (its a very slow sensor)
    float h = dht.readHumidity();


    // check if returns are valid, if they are NaN (not a number) then something went wrong!
    if (isnan(h))
    {
        Serial.println("Failed to read from DHT");
    }
    else
    {
        Serial.print("Humidity: ");
        Serial.print(h);
        Serial.print(" %\t");
        // check threshold is exceeded
        if(h>threshold){
          digitalWrite(LIGHT, LOW);
          state = 0;
          }
        // check button is pressed and lamp is off
        if(digitalRead(BUTTON) && !state){
          digitalWrite(LIGHT, HIGH);
          delay(50); // remove switch debounce
          state = 1;
          }
    }
}
Power on the circuit. Probably your light is on. Blow on the humidity sensor. Light is turn off!! Congratulation!!!
Attachments

Participated in the
Sensors Contest 2016


