

Introduction: Plane Down a Large Wood Slab


If you have a large wood slab that won't fit into a planer, you can use a CNC router table to accomplish a thickness planing. I did this at TechShop in Pittsburgh. www.techshop.com
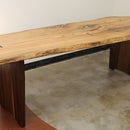
I made a cocktail table with my slab.
Step 1: Secure Your Wood Slab
To first plane down your slab you need to set it on the table and secure it so it won't slide around. Some CNC router tables use a vacuum table to hold down the work piece, but ours doesn't. I used plywood retainers (just scrap bits) fastened to the sacrifice board with plastic nails. Also remember, the slab itself might have a lot of weight and a lot of surface area creating friction between it and the table which also adds to stability.
Step 2: Simple CAD/CAM and Planing Operation

In your CAD or even CAM package of choice, draw a simple rectangle which will cover the entire area of the wood slab. I drew my rectangle directly in VCarve pro then selected the rectangle to create a pocket toolpath that would cut down 1/8th inch. I used a 1.5-inch diameter planing cutter (similar to this http://goo.gl/TSpzK1).
Do your feeds and speeds for hardwoods: http://goo.gl/GIaFXb
Save your file as a ShopBot file and load it into the ShopBot software.
Step 3: Plane Down One Side, Then Wait
For best results, plane down one side of your slab. Do this by running your rectangle toolpath over the slab, then lowering the Z height and beginning again. You'll soon see the slab planed down to a uniform height on this face.
Then you should wait. Stand your slab against a wall and leave it there. If you set it laying down on one of the faces, be sure to prop it up on some scrap 2x4s or other bits of wood. If you leave a slab face down the moisture difference between it and the table its on may cause the slab to "cup" and distort.
Let your slab stand for a few days or even a week. The fibers of the wood lose a lot of tension in a large cutting operation such as this. The slab will move and grow a bit. Take a quick finishing pass at the machined face after it has rested.
Step 4: Machine the Other Side Then Wait
Just as the first side, plane down the other side till the surface is uniform height. Then wait (a few days or a week). Then take a finishing pass.
After this step, you'll have two co-planer faces.
Step 5: Sanding, Etc.

I sanded this slab with grits 80, 150, and 220.
I then used the bowtie method to fasten and secure the cracks that ran all the way through the slab. And I filled the cracks with resin.
To finish it I used three coats of General Finish "Arm-R-Seal" which is an oil and polyurethane in one, lightly sanding with Scotch-Brite gray or white sanding pads between coats.
Step 6: I Made a Table From My Slab
I welded some steel legs then attached them. This table stands higher than a coffee table, in what I like to call "cocktail table" height. After finishing the table, rub with orange-oil and beeswax product every few months to preserve the moisture of the wood and to keep it smelling nice too.
Thanks for reading.

Participated in the
Woodworking Contest


