

Introduction: Vega - the LED-lit Christmas Star


With Creative Tools 3D-printable Vega Xmas Star we want to honor the winners of The Nobel Prize in Physics 2014.
Without the hard and tenacious work of Isamu Akasaki, Hiroshi Amano and Shuji Nakamura, today we wouldn't have efficient LED lights or HD flatscreen television sets, computers and mobile devices. The 3D-files for Creative Tools 3D-printable Vega Xmas Star are therefore designed to enclose a standard and commonly available LED light strip.
FEATURES
- Modular five-pointed star made of 5 identical parts
- Short segments of 1.75 mm filament hold the parts together (no glue required!)
- Ventilation holes provide cooling airflow
- Wall-mount included for horizontal or vertical attachment
- Wall-mount allows cable rotation adjustment to easily align star parallel to wall or window.
- Adapted for LED strips 8 x 3 x 1000 mm (12 V, 0.5 A).
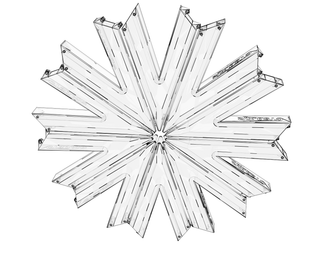
Step 1: Modular Design


The five tips
The star is made of five identical tips which fit together by a male-female joint. The joint is secured with short segments of 1,75 mm plastic filament. The same kind as used by commonly available 3D printers. No glue or screws are necessary to assemble this star.
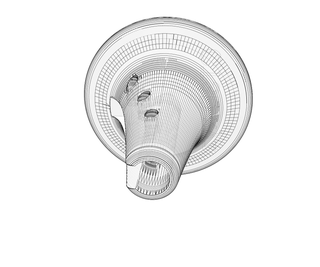
Cable mount for wall or ceiling
We also supply mounting brackets for hanging the star from a horizontal surface (ceiling) or a vertical surface (wall). The cone-shaped part which guides the cable can be rotated so that perfect parallell orientation of the star to the wall can be easily achieved.
Just let the star hang from it's cable for some time until it finds it resting orientation. Then just twist the cable holder gently until it is parallelle to your wall or window.
Step 2: Download the STL Files for 3D-print
We provide all the necessary parts for you to 3D print this LED Christmas star and its wall mount. Just download the correspondent files below and start 3D printing.
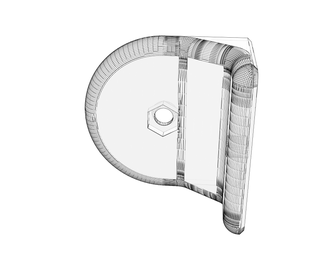
Cable wall mount (assembly).stl
This 3D file shows how the cable mount looks like in both horizontal and vertical postion.
Cable wall mount (horizontal).stl
The STL file for 3D-printing the horizontal cable mount.
Cable wall mount (vertical).stl
The STL-file for 3D-printing the vertical cable mount.
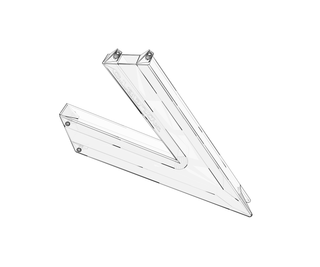
Vega - The LED-lit Christmas Star (assembly - Joint).stl
This 3D-file shows how two tips are joined with segments of filament
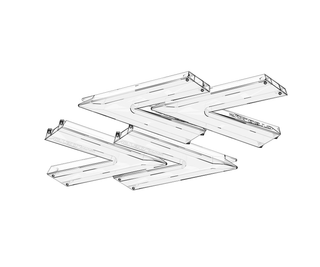
Vega - The LED-lit Christmas Star (Build plate - Polar - 10pcs).stl
Use this STL file if you have a large 3D printer with a build plate of 320 x 320 mm or larger. The file contains 10 separate star tips.
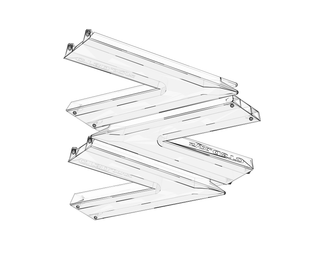
Vega - The LED-lit Christmas Star (Build plate - Replicator 2 - 4pcs).stl
Use this STL file if you have a 3D printer with a build plate of 285 x 150 mm or larger. The file contains 4 separate star tips.
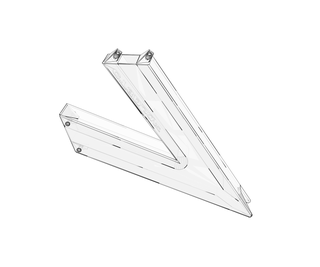
Vega - The LED-lit Christmas Star (Build plate - RepRap.s 200x200mm - 3pcs).stl
Use this STL file if you have a 3D printer with a build plate of 200 x 200 mm or larger. The file contains 3 separate star tips.
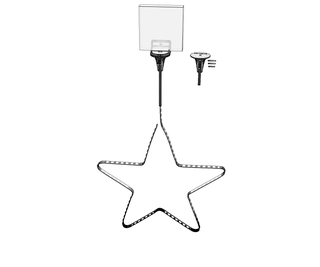
Vega - The LED-lit Christmas Star (complete assembly).stl
This file shows how the complete Christmas star is assembled - including LED strip, cable and mount.
Vega - The LED-lit Christmas Star (Electric assembly).stl
This file shows how the LED strip is assembled inside the star as well as the electrical cord from which the star hangs.
Vega - The LED-lit Christmas Star (printed parts assembly).stl
This file shows how the complete 3D-printed Christmas star is assembled.
Vega_The LED-lit Christmas_Star v04.stl
The STL file for 3D-printing a single tip of the star.
Attachments
 Cable wall mount (assembly).stl
- Cable wall mount (horizontal).stl
- Cable wall mount (vertical).stl
- Vega - The LED-lit Christmas Star (assembly - Joint).stl
- Vega - The LED-lit Christmas Star (Build plate - Polar - 10pcs).stl
- Vega - The LED-lit Christmas Star (Build plate - Replicator 2 - 4pcs).stl
- Vega - The LED-lit Christmas Star (Build plate - RepRap.s 200x200mm - 3pcs).stl
- Vega - The LED-lit Christmas Star (complete assembly).stl
- Vega - The LED-lit Christmas Star (Electric assembly).stl
- Vega - The LED-lit Christmas Star (printed parts assembly).stl
- Vega_The LED-lit Christmas_Star v04.stl
- Vega_The LED-lit Christmas_Star v04.stl


Step 3: Place All the Parts on a Flat Surface


- Place all the parts on a flat surface. Make sure they are all oriented with the small filament-entry holes pointing upwards.
Step 4: Insert the LED-strip Into the First Segment

- Hold one segment and insert the loose end of the LED strip into the hole at the tip of the star segment. Make sure the LED diods point as seen in the image of this step. This will make the star shine outwards.
- Push the LED strip all the way through until it sticks out from the other end.
Step 5: Insert the LED Strip Into the Rest of the Star Tips


- Grab the loose end of the LED strip and thread it through the remaining four star tips.
- Don't remove the adhesive protection film from the LED-strip. This makes the strip slide easily through the star.
- Note that the LED strip should exit each tip of the star segments and then be turned back in again through the same hole.
- Refer to the images in this step to see the correct LED strip loop.
Step 6: Fix the Segments in Place With Filament


- Press two segments tightly together and insert two pieces of 1.75 mm filament. One into each hole.
- Use pliers to firmly grip the filament and press it down until it reaches the bottom of each hole.
- Use a sharp knife to make a small cut on each filament segment flush to the top surface of the star.
- Bend the filament until it breaks off.
DO NOT try to cut the filament completely with a knife. You will hurt yourself! Just make an indentation and then bend the filament. It will snap easily.
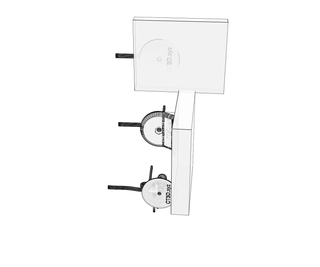
Step 7: Attach the Cable Mount


The cable mount parts allow for vertical and horizontal hanging of the Christmas star.
Horizontal mount
- Use a small screw (aprox. 3 mm in diameter) to attach the cone-shaped part to a flat surface, such as a ceiling.
- Tighten the screw enough to allow friction but also let you freely rotate the cone. This will help you to adjust the star's orientation and make it parallel to a wall or window.
Vertical mount
- Use an M3 screw and nut to attach the cone-shaped part to the angled bracket.
- Use a small screw (aprox. 3 mm in diameter) to attach the bracket to a vertical surface, such as a wall.
Step 8: Insert the Cable


- Hold the star by hand and mark the point on the cable where you wish the wall mount to be.
- Bend the cable into a loop and insert it into the groove of the cone.
- Make sure it passes the lower hole of the cone and then insert a piece of filament to fix it in place.
- Insert another piece of filament into the middle hole.
- Bend the cable into the groove as deeply as you can.
- Insert another piece of filament into the top hole.
- The cable is not fixed into its position.
---
For more information and questions please comment this instructables or visit http://Creative-Tools.com
Instructable by Creative Tools
Homepage - GooglePlus - Twitter - Facebook - Youtube - Instructables - Instagram - Flickr - Pinterest - Vimeo - Sketchfab - Linkedin


