Introduction: Vinyl-Cut Heat Transfer T-Shirt
Goal: Use Adobe Illustrator to create a heat transfer vinyl sticker to adhere to a t-shirt using a heat press. This process can also be used to make decorative stickers and laptop decals.
Materials & Tools:
- Vinyl cutter
- Heat Transfer Vinyl
- 100% cotton, 100% polyester, or 50/50 cotton-polyester blend t-shirt
- Weeding tools (tweezers, exacto knife, etc.)
- Scissors
- Sharpies
- Paper
Step 1: Brainstorm Symbol and Text

For participants of the Inspire Summer Institute, the front of the t-shirt has a logo so you will be designing a symbol and text for the back of the shirt.
Using a sharpie and paper, sketch a design for the back of the shirt. You may want to include a nickname, a favorite word, or a quote. Limit text to about 30 words in order to ensure a large font size later. Long text will require additional time to "weed" the vinyl. Include a symbol or shape that you like or that represents you. Silhouettes or simple outlines are recommended as they are easier to create digitally (or find online) and also easier to weed.
Step 2: Digital Design
Note: I use the notation Menu-->Item as in File-->New to represent clicking on the File menu at the top of the screen and choosing New.
Using your sketch as a guide, create a digital version of your design in Adobe Illustrator or another vector drawing program (e.g. InkPad on an iPad).
Create a new document in Adobe Illustrator CS6:
1. Open Adobe Illustrator.
2. Click File-->New. Make sure the Units are set to Inches. Change the Width to 12 and the Height to 12 (see figure 2) and click OK:
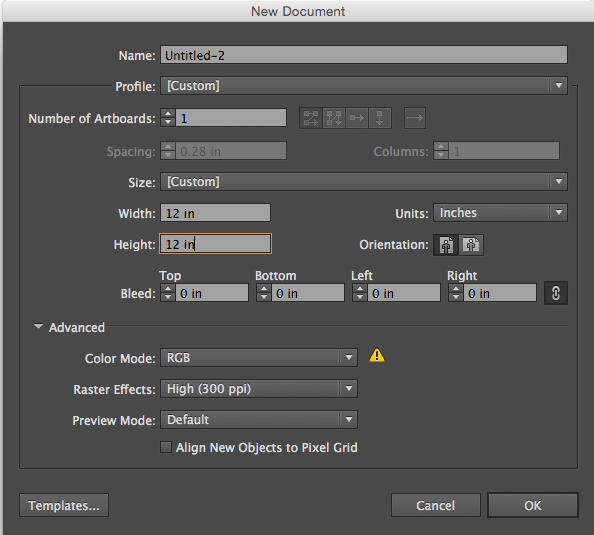
You may want to click View-->Zoom Out (or Zoom In) to adjust the viewable area of the white "art board."
Create a shape:
1. Use the shape tool to create an outline. Click and hold on the Rectangle Tool to access other shapes:

Click and drag to create a shape. Use the Selection Tool (black arrow) to move or resize a shape by clicking on the shape and then dragging one of the "anchor" points that appears.
Download an image:
1. Download an image from the Internet:
- For the sake of simplicity, include the word "silhouette" with any Google Image search (example) or specify Clip Art by clicking on Search Tools, clicking on Type and then clicking on Clip Art:

- PNG (Portable Network Graphics) images are recommended because of their transparent backgrounds. To limit searches to PNGs, append the search term filetype:png (e.g. instead of searching for sun, search for sun filetype:png).
- To save the image, right-click (on a Mac, hold down the control key and click) and choose Save Image As:

- Type in a name (e.g. "sun"), choose a location to save to and then click Save.
- In Illustrator, click File-->Place..., click on the file you downloaded (e.g. "sun") and click Place. The image will most likely be very large. To reduce the size, click on Object-->Transform-->Scale. Change the Uniform percentage to something small (e.g. 10% or 25%) and then click OK:
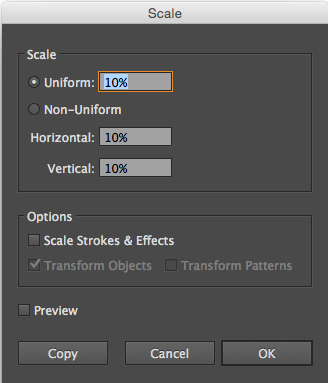
- You may need to resize the image further by using the Selection Tool to click an "anchor point" at the corner of the image and drag to resize.
- Because the vinyl cutter requires vector lines for cutting, you will need to convert any images to vectors:
- Select the image with the Selection Tool. Click Window-->Image Trace. Change the Mode to Color. Click on the triangle next to Advanced to show more options. Click the checkbox next to Ignore White. Click Trace. Click Object-->Image Trace-->Expand. Click Window-->Pathfinder. Click Merge under Pathfinders and then click Unite under Shape Modes.

Add Text:
1. Use the Type tool to add text:
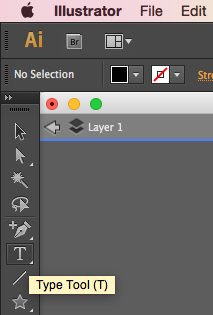
- To change the font and size, click Type-->Font or Type-->Size. When you are happy with the look of the text, use the Selection Tool to click on the text and then click Type-->Create Outlines. This will convert editable text to vector lines for cutting.
Save your file before moving on to the next step
- Include your name in the filename if you are participating in the Summer Institute.
- Include your vinyl color choice in the filename.
Step 3: Transfer Digital File to Vinyl Cutter Computer
In our Lab, the vinyl cutter connects to a computer via a USB cable. You will need to email the Illustrator file that contains your design to that computer or use a flash drive to transfer it.
Step 4: Prepare the File for Cutting


On the computer connected to the vinyl cutter, open Sure Cuts A Lot 3 Pro and click File-->Import... Click on the file you saved in Illustrator and then click Open.
You will need to mirror the design so that it is cut correctly on heat-transfer vinyl. Click on the design and click Transform-->Flip Horizontal (Mirror).
Adding a bounding box around your design will make weeding (removing extraneous vinyl) easier. Click Object-->Weeding... and click OK.
Step 5: Cut Out Your Design
Make sure the vinyl cutter is on. Load vinyl into the vinyl cutter. Set the origin point of the blade near the bottom-right of the vinyl to minimize wasted material.
The t-shirt heat press takes about 10 minutes to heat up so make sure the heat press is on and set to the correct temperature (for the heat transfer vinyl we are using, the heat press should be set to 305°).
In Sure Cuts A Lot 3 Pro, click Cutter-->Cut with... and then click Cut.
When the vinyl cutter is finished cutting out your design, advance the vinyl and use scissors to cut the design off of the vinyl roll. Double-check that the design is mirrored (e.g. text and symbols should appear backwards) before moving on to the next step.
Step 6: Weeding


Using weeding tools (e.g. hooked weeding pick, curved tweezers, exacto knife), lift and remove the border around the design, leaving the text and symbol attached to the backing paper. When starting weeding, it is usually possible to gently but firmly pull a large piece starting at one edge and moving across the design.
Then remove any filler pieces (e.g. the center of an "O", top of an "A", etc.). Visually inspect the full design before moving on to the next step.
Step 7: Place Stickers on T-shirt

Lay the t-shirt flat with the back side facing up and smooth it out.
Depending on how you positioned your design, you may want to cut out the symbol to be able to place it separately from the text.
Place the vinyl onto the shirt with the sticky side down and press with your fingers to smooth it out.
Step 8: Press
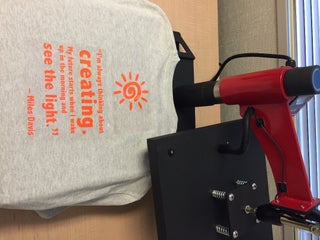
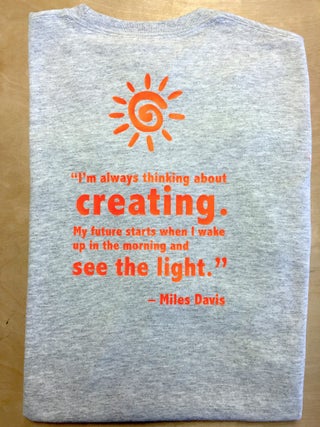
Open the heat press carefully and place the t-shirt onto the platform with the vinyl stickers facing up. Close the heat press and wait the required amount of time (for the heat transfer vinyl I am using, it takes 15 seconds at medium pressure). Open the heat press and carefully (the shirt will be hot!) remove the plastic sticker backing from the top of the vinyl.
Enjoy your new t-shirt!
Step 9: Washing Instructions
- Turn garment inside out.
- Machine wash COLD with mild detergent.
- NO bleach.
- Dry at a normal dryer setting on household machines.
- Do not dry clean.
- Instructions apply to the material only, please follow garment washing instructions as well.


