Introduction: Voice Controlled 3D Printed Tricopter
This is a fully 3D printed Tricopter drone that can be flown and controlled with voice control using Amazon's Alexa through a ground station controlled by the Raspberry Pi. This Voice Controlled Tricopter is also known as Oliver the Tri.
A Tricopter unlike the more commonly drone configuration of a Quadcopter only has 3 propellers. To make up for one less degree of control, one of the rotors is tilted by a servo motor. Oliver the Tri features a Pixhawk Autopilot, an advanced autopilot systems largely used in the research or advanced drone industry. This autopilot system is capable of wide variety of flight modes including follow-me, waypoint navigation, and guided flight.
Amazon's Alexa will be using the guided flight mode. It will process the voice commands and send them to the ground station, which maps these commands to MAVLink (Micro Air Vehicle Communication Protocol) and sends them to the Pixhawk via telemetry.
This tricopter albeit small is powerful. It is around 30cm long and weighs 1.2 kg but with our prop and motor combo it can lift up to 3 kg.
Step 1: Materials and Equipment
Tricopter
- 3 Brushless DC Motors
- 3 Motor Shafts
- 3 40A Electronic Speed Controller
- 8x4 Composite Propellers CCW
- Power Distribution Board
- Wires and Connectors
- TGY-777 Servo Motor
- Battery and Battery Connector
- 6x 6-32x1" Shear Bolts, Nuts*
- 3M Dual lock*
- Zip Ties*
Autopilot
Safety RC Control
Voice Controlled Ground Station
- Raspberry Pi Zero W kit or Raspberry Pi 3
- Amazon Echo Dot or any Amazon Echo Products
Equipment and Tools
- Soldering Station
- 3D Printer
- Needle Nose Pliers*
- Screwdrivers*
- Allen Key Set*
* Bought from a local hardware store
Step 2: Content Organization
As this is a rather complex and long-term project I am providing a way of organizing this build to three main sections which may be performed simultaneously:
Hardware: The physical frame and propulsion system of the tricopter.
Autopilot: The flight controller calculates the PWM signal to provide each of the 3 brushless motors and servo motor accordingly from user command.
Voice Control: This allows the user to control the drone using voice commands and communicates via the MAVLINK protocol to the Pixhawk board.
Step 3: Downloading Tricopter Frame Parts
The entire frame of the tricopter is 3D printed on the Ultimaker 2+. The frame is separated into 5 main components in order to fit the build plate of the Ultimaker 2+ and to make it easier to reprint and repair particular parts in case they get damaged in a crash. They are:
- 2 Front motor arms (main-arm.stl)
- 1 Tail arm (tail-arm.stl)
- 1 Connecting piece between the tail am and the two front motor arms (tail-arm-base.stl)
- 1 Tail motor mount (motor-platform.stl)
Step 4: 3D Printing the Tricopter Frame
Print these parts with at least 50% infill and use lines as the infill pattern. For the shell thickness I use a wall thickness of 0.7mm and top/bottom thickness of 0.75mm. Add build plate adhesion and select brim at 8mm. This frame was printed with PLA plastic filament, but you can use ABS plastic filament if you prefer a more robust but heavier tricopter. With these settings, it took < 20 hours to print it all.
If the brim is not sticking to the printing surface of the 3D printer, use a glue stick and glue the skirt to the printing surface. At the end of the print, remove the build plate, wash off the excess glue, and wipe it dry before putting it back in the printer.
Step 5: Removing Supports and Brim
The 3D printed parts will be printed with supports everywhere and with an outer brim that needs to be removed prior to assembly.
The brim is a single layer of PLA and can be easily peeled off from the part by hand. The supports on the other hand, are much harder to remove. For this you will need a pair of needle nose pliers and a flat head screwdriver. For the support that are not in enclosed spaces, use the needle nose pliers to crush the supports and pull it off. For supports inside holes or enclosed spaces that's hard to reach with needle nose pliers, either drill through the hole or use a flat head screwdriver to pry it off from the side, then pull it out with the needle nose pliers. When removing supports be gentle with the 3D printed part as it can snap off if you stress it too much.
Once the supports are removed, sand off the rough surfaces where the supports used to be or carefully carve the remaining support with a hobby knife. Use a sanding or grinding bit and a dremel to smooth out the screw holes.
Step 6: Assembling the Tricopter Frame
For assembly, you will need six bolts (preferably shear bolts, 6-32 or thinner, 1" long) to secure the frame together.
Take the 3D printed parts called main-arm.STL and tail-arm-base.STL. These components interlock like a jigsaw puzzle, with the tail-arm-base being sandwiched in the middle of the two main-arms. Align the four screw holes then insert the bolts from the top. If the parts don't fit together easily, don't force them. Sand the tail-arm-base until they do.
Next, slide the tail-arm onto the protruding end of the tail-arm-base until the screw holes align. Again, you may need to sand before it fits. Bolt it from the top.
To assemble the motor platform, you need to first insert the servo into the opening on the tail-arm, pointing backwards. The two horizontal holes should line up with the screw holes on the servo. If friction fit isn't sufficient, you can bolt it into place through these holes. Then put the control horn onto the servo but don't screw it in. That comes in a moment.
Slip the motor platform's axle into the hole at the very end of the tail-arm and the other side over the horn. The horn should fit nicely into the inset on the platform. Finally, put the horn screw through both the hole in the platform and the horn as shown in the image above.
Step 7: Installing the Motors
The brushless motors won't come with the propellor axles and mounting cross-plate pre-attached, so screw those on first. Next you bolt them onto the motor platform and main arms of the tricopter using either the screws that came with it or M3 machine screws and nuts. You can attach the propellers at this step to ensure clearance and admire your handiwork, but remove them before pre-flight testing.
Step 8: Wiring the Autopilot Board
Connect the sensors to the Pixhawk Autopilot board as shown in the diagram above. These are also labeled in the autopilot board itself and is quite straightforward to connect, i.e. buzzer connects to the Buzzer port, switch connects to the switch port, power module connects to the power module port, and telemetry connects to the telem1 port. The GPS and external compass will have two sets of connectors. Connect the one with more pins to the GPS port and the smaller one to I2C.
These DF13 connectors that go into the Pixhawk Autopilot Board are very fragile, so do not tug on the wires, and push and pull directly on the plastic casing.
Step 9: Wiring the Radio Communication System
The radio control communication system will be used as a safety backup to control the quadcopter in case the ground station or Alexa malfunctions or mistakes a command for another.
Connect the PPM encoder to the radio receiver as shown in the image above. Both the PPM encoder and receiver are labeled, so connect S1 to S6 to the signal pins 1 to 6 of your receiver. S1 will also have a ground and voltage wires with it, which will power the receiver through the PPM encoder.
Step 10: Soldering the Power Distribution Board
The PDB will take in input from the Lithium Polymer (LiPo) battery with a voltage and current of 11.1V and 125A, and distribute it to the three ESCs and power the Pixhawk Autopilot board through the power module.
This power module was reused from a previous project made in collaboration with a friend.
Before, soldering the wires, cut the heat shrink to fit each of the wires, so it can be slipped onto the exposed soldered end later to prevent short circuiting. Solder the male XT90 connector leads to the PDB pads first, then the 16 AWG wires to the ESCs, followed by the XT60 connectors onto these wires.
To solder the wires onto the PDB pads, you need to solder it upright so that the heat shrink can fit through and insulate the terminals. I found it easiest to use the helping hands to hold the wires upright (especially the large XT90 cable) and place it on top of the PDB resting on the table. Then solder the wire around the PDB pad. Then, slide the heat shrink down and heat it to insulate the circuitry. Repeat this for at the rest of the ESC wires. To solder the XT60, follow the previous step on how the ESC battery terminal was replaced with XT60s.
Step 11: Wiring the Motors and Electronic Speed Controllers
Since we are using brushless DC motors, they will come with three wires which will connect to the three wire terminals of the electronic speed controller (ESC). The order of the cable connection do not matter for this step. We will check for this when we first power on the tricopter.
The rotation of all three motors should be counterclockwise. If a motor isn't spinning counterclockwise, then switch any two of the three wires between the ESC and motor to reverse the rotation.
Connect all the ESCs to the power distribution board to provide power to each one of them. Then connect the front right ESC to the pixhawk's main out 1. Connect the front left ESC to the pixhawk's main out 2, the servo to main out 7, and the remaining tail ESC to main out 4.
Step 12: Setting Up Autopilot Firmware
The firmware chosen for this tricopter build is Ardupilot's Arducopter with a Tricopter Configuration. Follow the steps in the wizard and select the tricopter configuration in the firmware.
Step 13: Calibrating the Internal Sensors
Connect with the tricopter using the wireless telemetry module by selecting 'auto' at the top right corner then click connect. It will take a while to connect wirelessly since it's connecting through 900MHz.
Follow the steps in the wizard to calibrate the following internal sensors:
- Accelerometer
- External Compass
Since there are components on the underside of the tricopter, prop the tricopter up with a box before calibrating the level position with the accelerometer. This is crucial because the accelerometer will be used for determining the attitude of the tricopter.
The compass will require sampling from a wide range of positions, so you should move the tricopter around as shown above during calibration.
Step 14: Voice Control Using Amazon Services Overview
There are three Amazon developer tools and services that we will be using in order to provide a voice control of for Oliver the Tri. These tools and services will allow us to process the voice commands, run our code, and communicate with our ground station over MQTT which is then relayed to the Tricopter Drone.
We will setup the following in the next steps:
- Amazon Web Services (AWS) IoT Core
- Amazon Web Services Lambdas
- Amazon Alexa Skills Kit
In addition, we will also use the Raspberry Pi as our ground station, running a customize version of Mission Planner which operates in Guided Autonomous Flight Mode and commanded over telemetry using MAVLink Protocol.
AWS IoT Core will communicate with our 'thing' (from Internet of Things) that is the Raspberry Pi ground station over MQTT. MQTT, like MAVlink is also a messaging protocol, but rather than through 900MHz telemetry, this will be communicating over WiFi (in our case 2.4GHz). In short, the AWS IoT core establishes a connection between the itself, the server, and it's node, the Raspberry Pi.
AWS Lambdas is a cloud computing platform which will run our NodeJS code. The NodeJS code will process the parsed voice commands and handle the intents for a particular skill. This includes the speech output for Alexa, following a command, verifying valid commands, etc.
Amazon Alexa Skills Kit will be used to listen to the voice commands through an Amazon Alexa Device and parse it through a set of intents and sample utterances, which we define.
Step 15: Setting Up a Thing With AWS IoT
First, create an account and login to AWS Console. You can sign up for free.
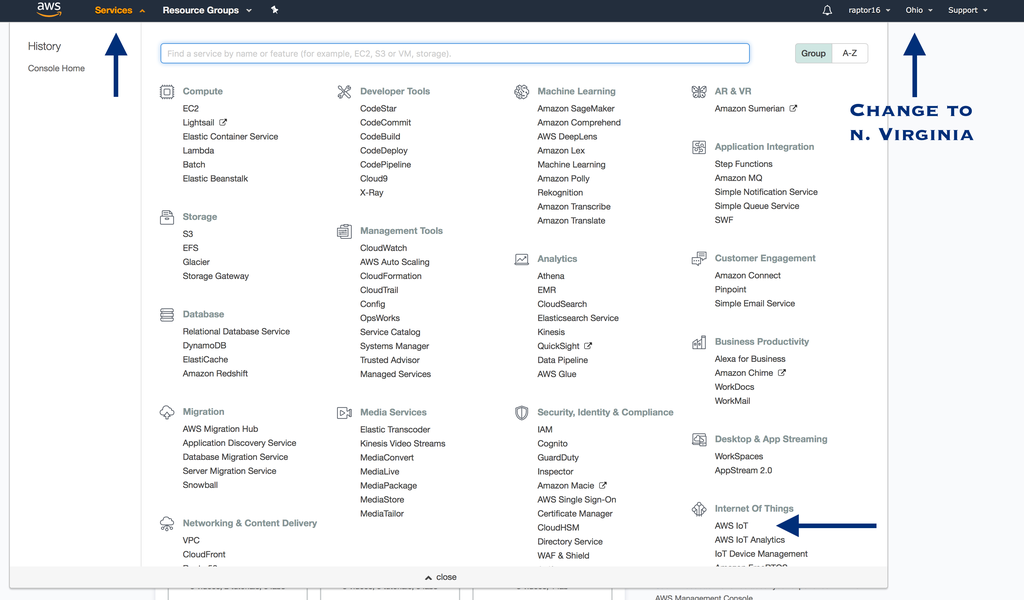
Once logged in, change your server to N. Virginia since that is where Alexa Skills Kit is supported. Mine defaulted to Ohio, so I had to redo it for N. Virginia.
- Go to services and select AWS IoT Core.
- Select Manage >> Things and selectRegister a Thing

- On the next screen click Create a single thing

- Give your thing an appropriate name, I called mine PiGroundStation then click next.
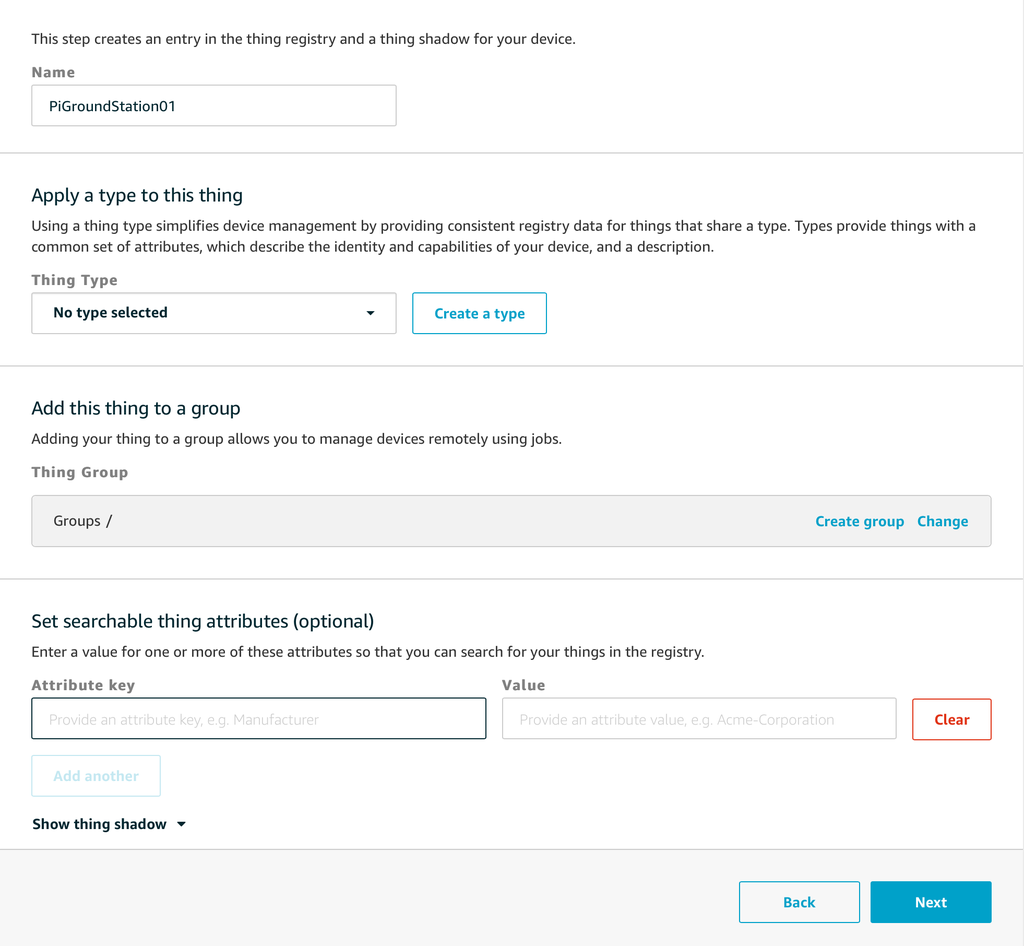
We've now create a Thing for our Internet of Things. Next we need to set up a certificate and a policy to provide our thing and lamda.
Step 16: Setting Up Security Certificates
Continuing on from the AWS IoT Thing wizard, we will create a certificate.
- Select Create Certificate

- Then, download all of the files, certificate, public key, private key, and root CA. Save these files to a safe place as we will need them later when configuring our ground station so it can communicate with AWS.

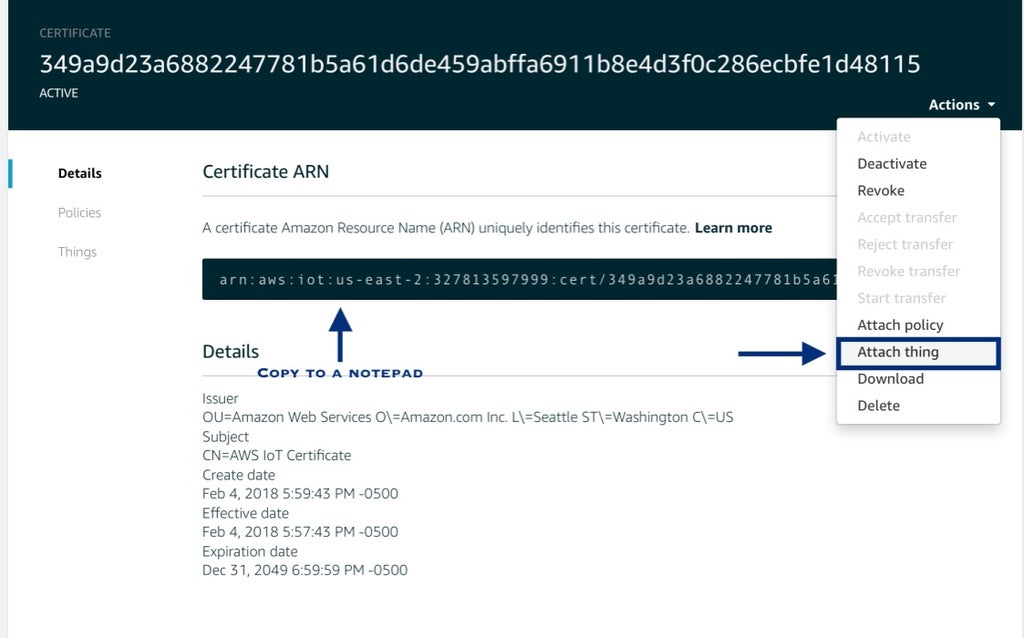
- Navigate to the Security tab and find your certificate. Then, select attach a thing, select your thing, and attach it the certificate to the thing by clicking attach. Note the Certificate ARN, copy it to a notepad as we will need this later.


Now, we will gather a few more crucial information in preparation for the configuration of our ground station.
- Navigate to the Interact tab and copy the Rest API Endpoint, this will be our host information, and the MQTT Thing shadow.

Step 17: Creating a Policy
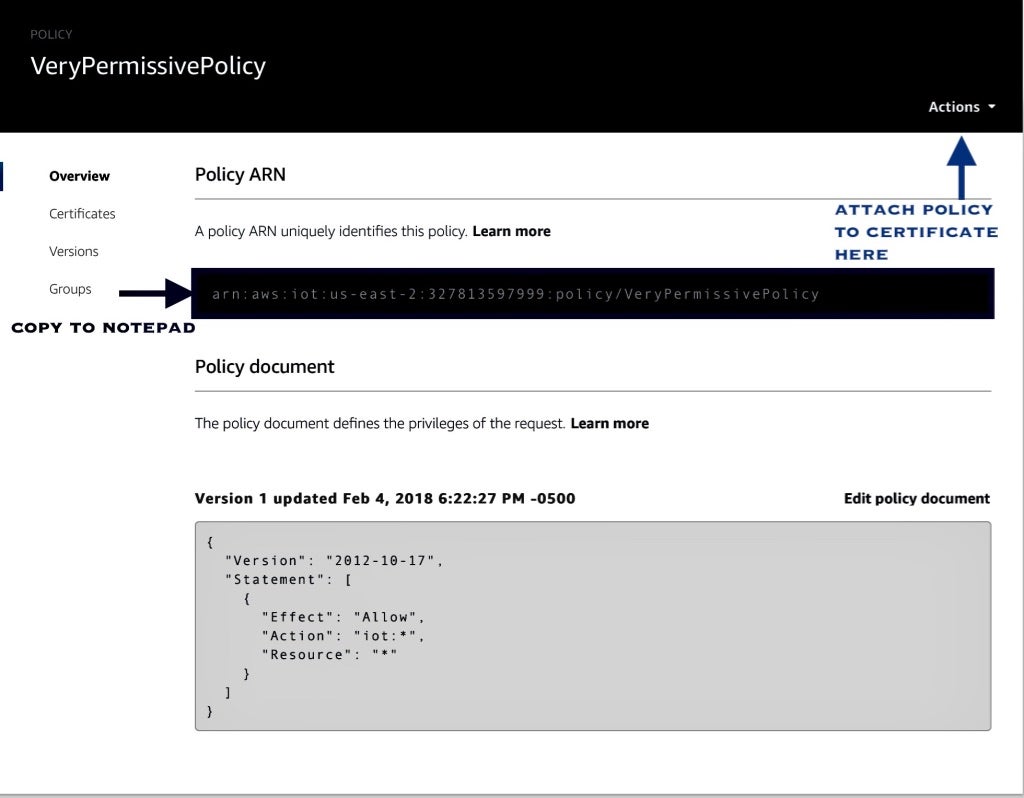
The Thing and the Lambda ideally would each have their own policies. For the sake of the demo, we will be creating a very open and permissive policy that can be used by both the Thing and the Lamda.
- Under the Secure>>Policies tab, select create a policy

- Name the policy appropriately, I named mine very_permissive_policy
- Assign action as iot:* and resource arn as *

- Select allow for effect and click create.
- Once done, like in the certificate step, attach the policy to your thing. Note, the Policy ARN, copy this to a notepad.

Step 18: Setting Up the Lambdas
Firstly, ensure that you are on the N. Virginia server, as this hosts Alexa Skills Kit which we will need.
- Navigate to the top panel and select Services>>Lamda. Then click, create Lamda function.
- Under the create function window, select Author From Scratch. Assign it the name EchoDroneControl, as this will need to match the name of the directory on the Raspberry Pi. The runtime will be Node.js 4.3.

- Select Create a Custom Role; this will open a popup window and assign it a role name lambda_basic_execution. Click Allow on bottom of Lambda Role page.
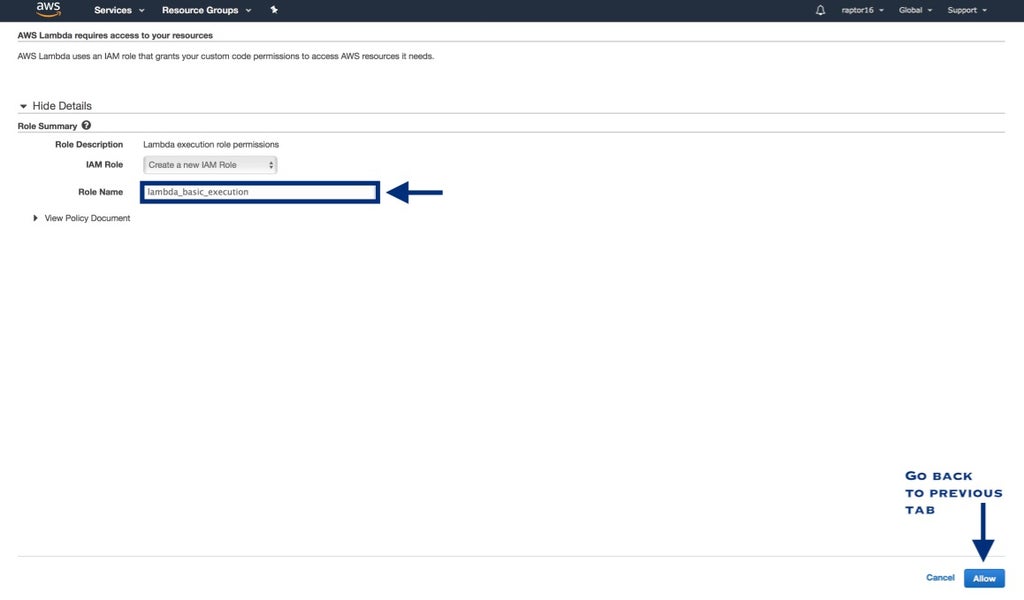
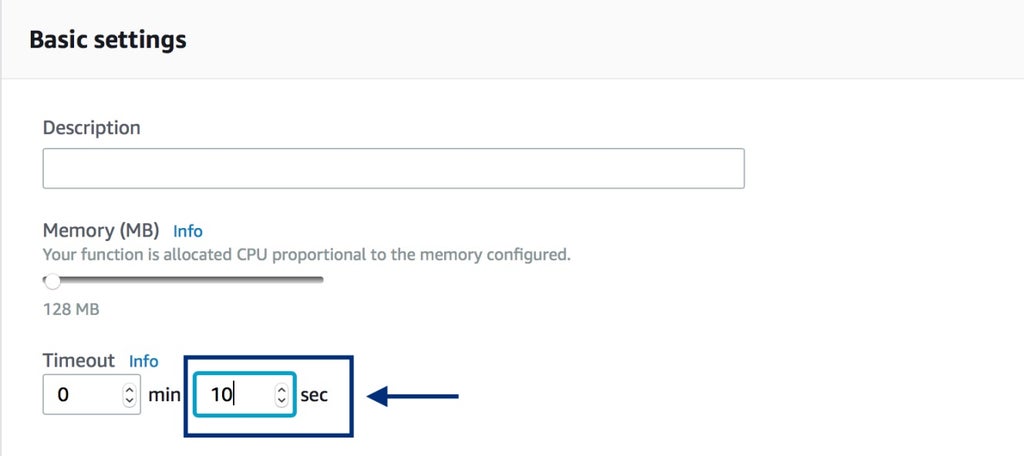
- Back at the Create Lamda Function page, Leave the other options at their default value except Timeout, increase this to 10 seconds. Then click Next.

- Under the triggers, add Alexa Skills Kit from the left pane.

Step 19: Creating a New Alexa Skill
Create an account with the Alexa developer portal. This is where we will create our custom alexa skills.
- At the top bar, select Alexa Skills Kit>>Start a Skill.
- Give your Alexa Skill an appropriate name and invocation name. I used Drone Control and Drone for the name and invocation name of my skill, respectively. Then click Next.
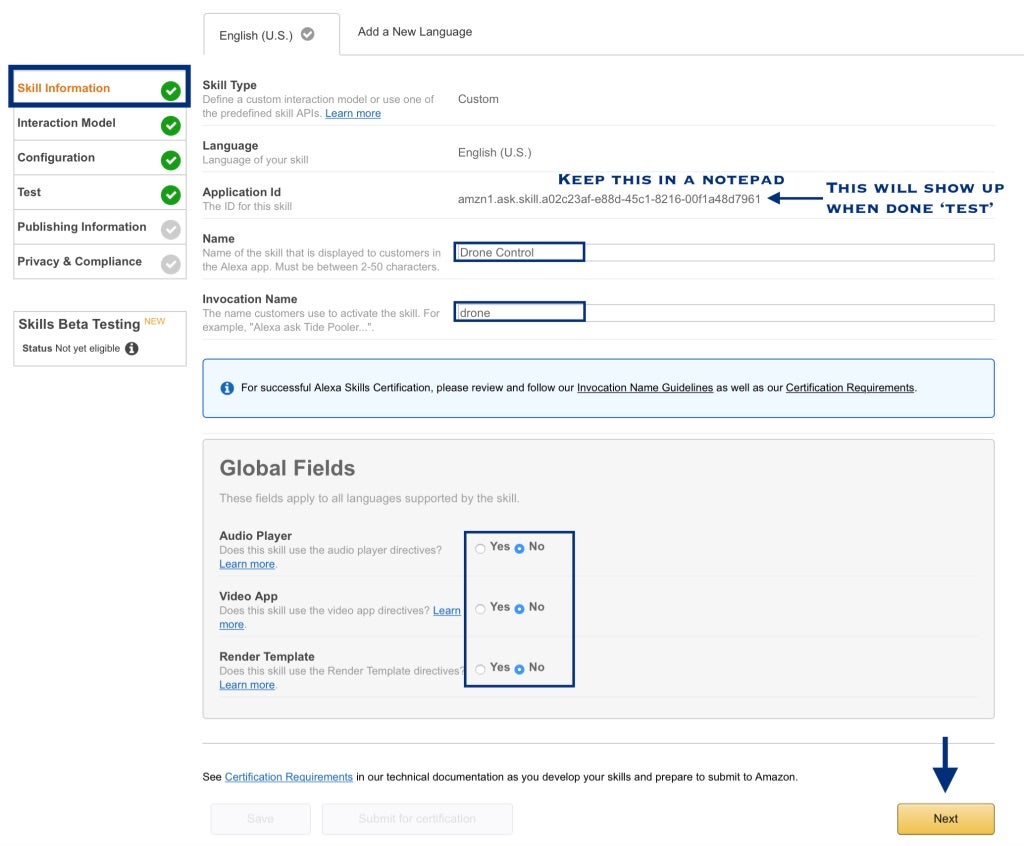
- Copy the intent schema code to the text block.

- Copy the sample utterances code to the bottom text block. Then click Next.

- Copy and paste the ARN link that you kept in the notepad in previous steps, then click next.

Now, before testing out the skill we need to setup the ground control station in with which the lambdas will communicate in the next step.
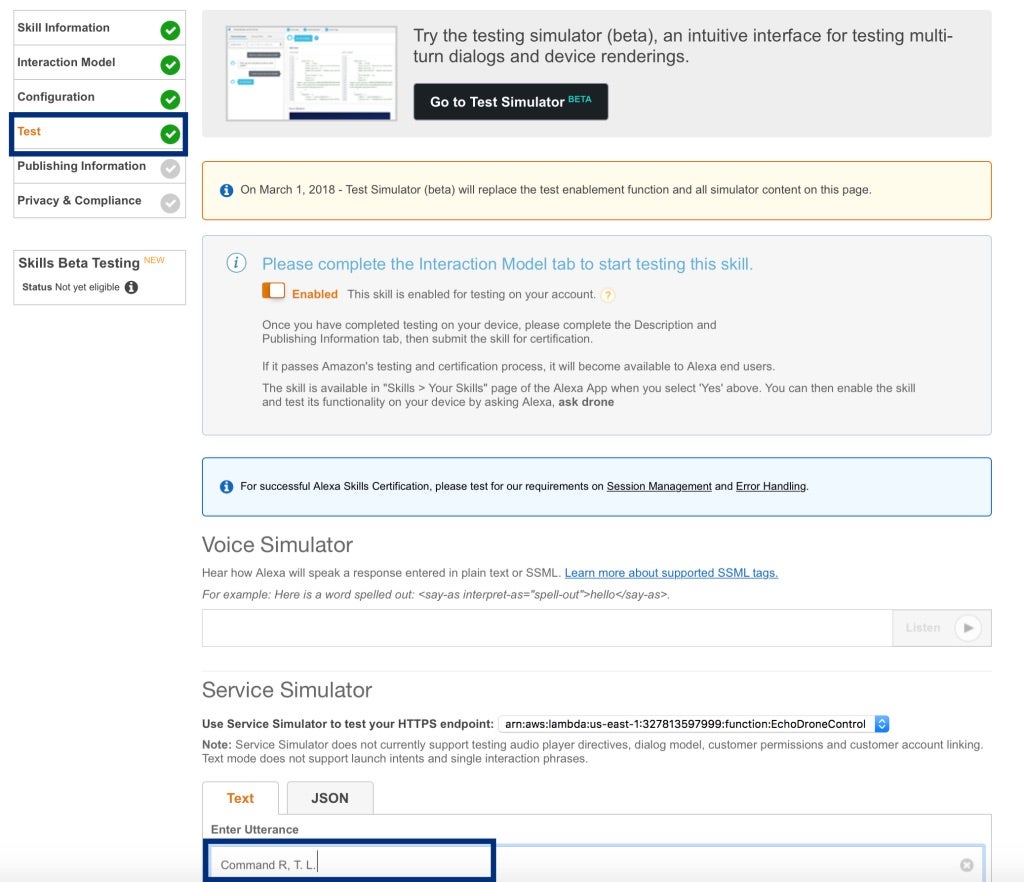
Step 20: Installing Raspbian to the Raspberry Pi
- Download the latest version of noobs NOOBs from the raspberry pi website and unzip the content.
- Copy and paste the content onto a formatted FAT32 SD card.
- Then plug in the raspberry pi to a monitor and a power source and install the operating system following the wizard.
Step 21: Installing AWS Commands and Configuring Parameters
Before we can upload out file and test our Lambda, we would first need to install AWS Commands and configure some access parameters.
Open terminal (or SSH) on the Raspberry Pi and run the following to install and verify AWS Commands:
pip install awscli --user
aws --version
- Open the IAM console and set the user details as shown below
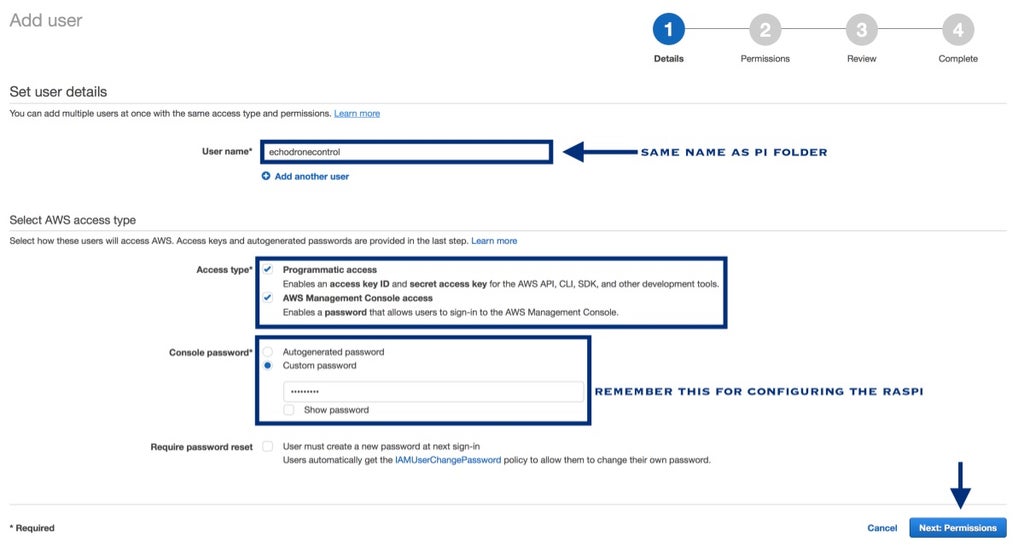
- Under the roles tab, attach the policies shown in the image below and click Next.These will be used to run the configuration file on the ground station.


Step 22: Setting Up a Custom Ground Control Station
- SSH onto the raspberry pi and login with the default password raspberry.
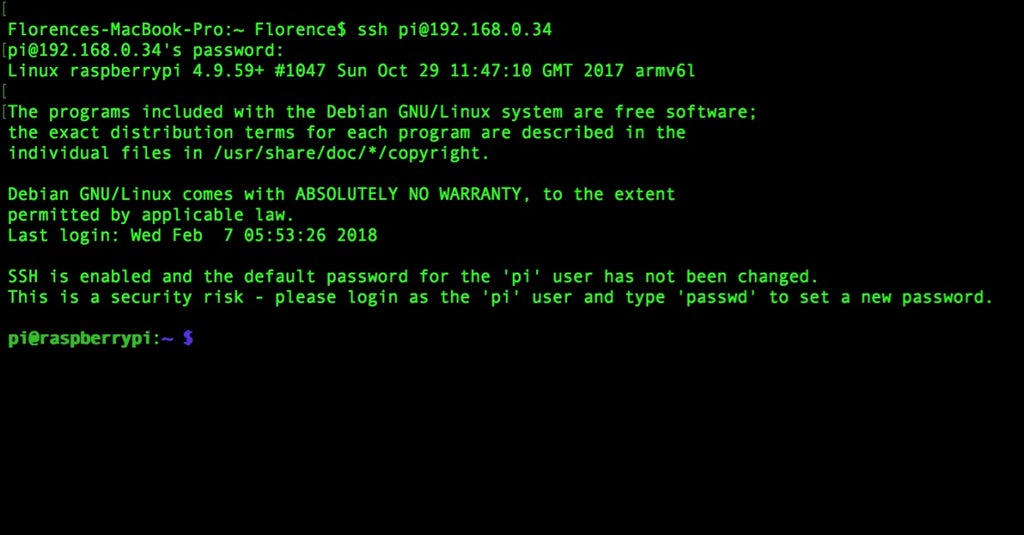
- Enter the following commands onto terminal once logged in
cd ~<br>sudo apt-get install avahi-daemon
sudo chown pi /usr/local/ -R
sudo apt-get install nodejs npm -y
sudo apt-get install zip
sudo apt-get install screen
pip install awscli
pip install dronekit
pip install paho-mqtt
git clone <a href="https://bitbucket.org/veggiebenz/echodronecontrol/">https://bitbucket.org/veggiebenz/echodronecontrol/</a> dronecontrol
cd dronecontrol
mkdir certs<br>
- The code open-sourced and can be found here. This will be cloned onto the raspberry pi ground station.
- Download Cyberduck, an SFTP app which allows the transfer of files to and from the raspberry pi.
- Login in to the Raspberry pi on Cyberduck with default username pi and password raspberry.
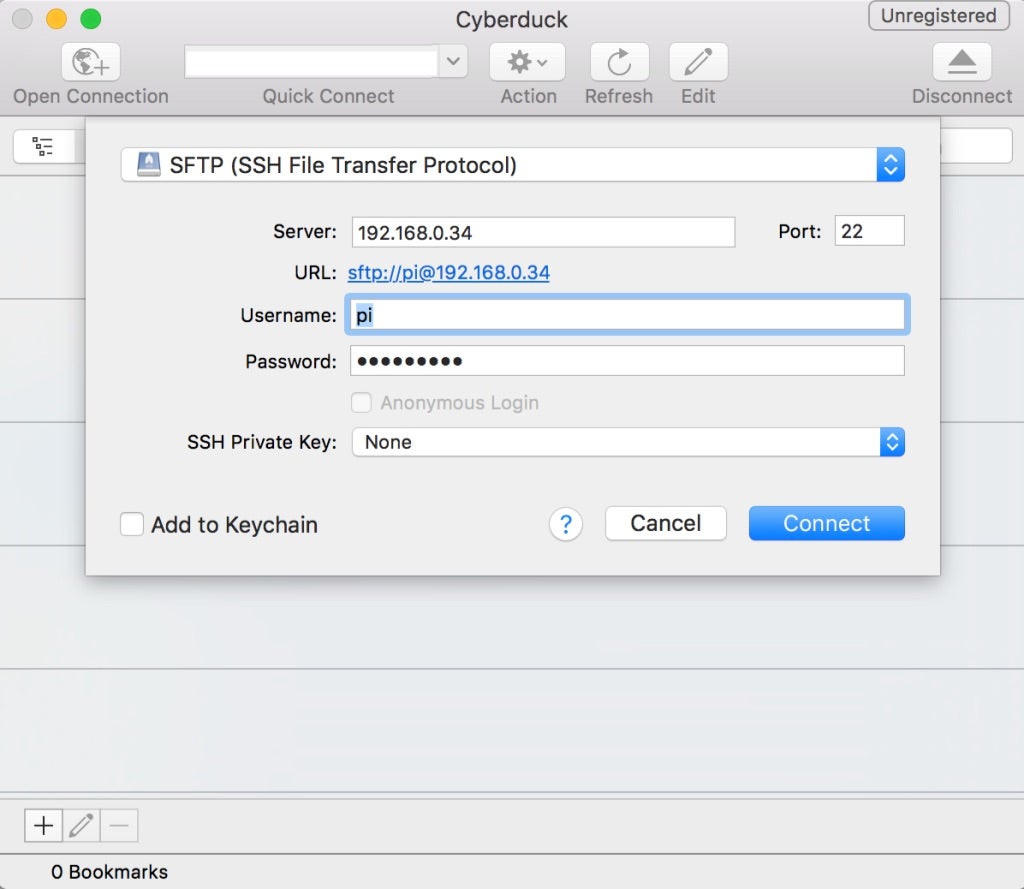
- Transfer the certificates to the certs folder.

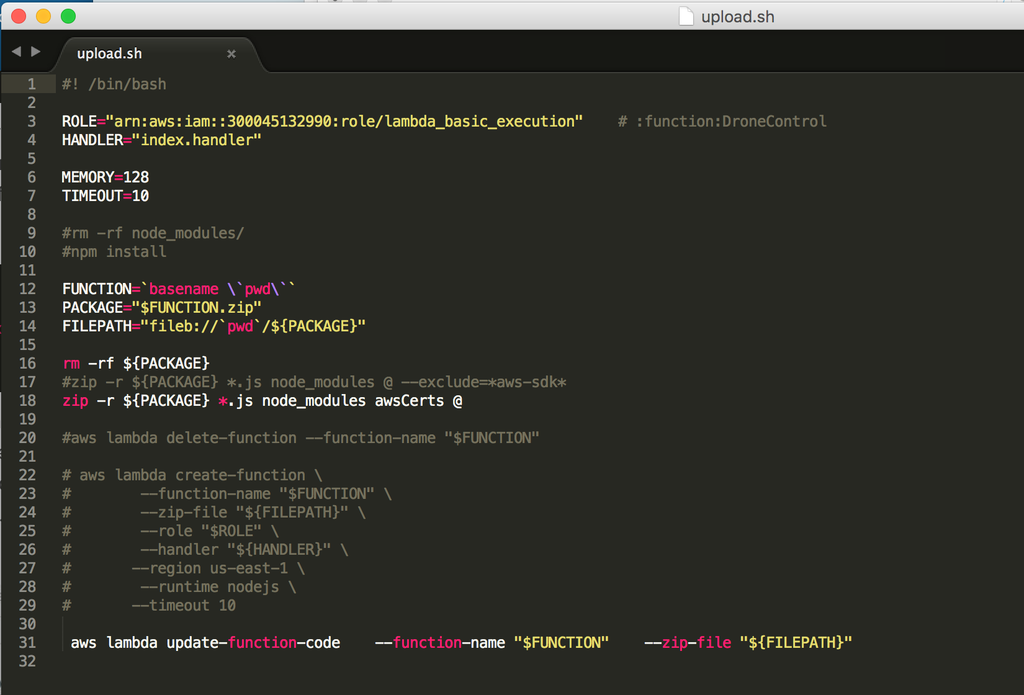
- On Raspberry Pi, navigate to ~/dronecontrol/EchoDroneControl/ where the files you need for the Lambda and Alexa Skills kit are stored and edit upload.sh file with the following changes:
- Add the Role ARN value into the variable on Line 3.
- Add your Rest API End Point as the host.
- Add your MQTT Topic
- Add your Alexa Skill App ID

- Then, add all the certificates you created and downloaded for the Lambda to the config.js file.
- Lastly, Run the upload.sh script file and enter the password you kept from the configuration step by typing the following into terminal:
.\ upload.sh
Step 23: Enjoy Flying
Find a day with good weather and enjoy flying it in any mode you choose, whether it's fully autonomous waypoint navigation, manual flight, or voice control.
Here are some commands to get you started:
- Alexa Launch
- Alexa Turn Left
- Alexa Move Forward 5 meters
- Alexa Land
- and more... (see sample utterances for more)
Have Fun!

Runner Up in the
Voice Activated Challenge

Participated in the
First Time Author Contest 2018


