

Introduction: West-Frisian Mechanical Steam Particles & Faraday Temperature Computatorium


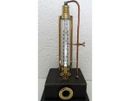

For many years I had an industrial thermometer in a metal cage lying around and never knew what to do with it. The thermometer was used in a glass house as part of a construction known as 'droge & natte bol techniek' where the evaporation of water at a certain temperature was calculated to decide the percentage of air humidity based on the difference between the ‘wet cotton’ and the ‘dry cotton ’temperature. This technique was used long before electronic components replaced this very reliable, but old fashioned way of measuring the air humidity in a confined glass house climate. This was all done by hand and for this process, large and good readable thermometers had to be used. Besides that, I had bought a tiny hygrometer for use in another project, but it suits this project better. So my third project got started with these two items.
Step 1: Cleaning and Modifying the Thermometer


Since this thermometer was used in a glass house and the metal housing was probably rusted, they painted the metal housing in a red color. The first thing to do was removing the thermometer, paint and as much of the underlying rust as much as possible. In the bottom of this metal case, I drilled a 3mm hole in the center and added a ring, 25mm long M3 bolt and nut to create a solution to attach this thermometer to a wood piece at a later stage in this project. When all done, the metal housing was degreased, the thread of the bolt was covered with some painters tape and a thin coat of acryl primer was sprayed on. After a few hours the first paint layer was dry and a second and final layer of gold acryl paint was sprayed on. As soon as this was all dry, the thermometer was placed back in it's metal housing, resulting in a nice looking thermometer.
Step 2: Creating Four Legs for a Wooden Box


3mm thick plywood was cut in 8 similar sidewalls that became part of the legs for the wooden box. For the shape and dimensions of these sidewalls, please have a look at the drawing. On four of these sidewall parts, I glued 'cut to fit' parts of wooden paint stirrers following the contours. This way, I made sure that all four legs have the same width and look straight. When his was all done, the remaining four sidewalls were glued on top, creating four hollow legs. Then these legs where sanded carefully to make sure they are all the same size and have the same 'connection area'. Take some time for this 'connection area', because you don't want your construction to 'wobble' when finished. In step four you know why this has to be done with some care.
Step 3: Create a Wooden Box, Part One


I already have some experience with creating small wooden boxes, so this step wasn't that difficult. The box size will be: 80 x 80 x 60 mm and the walls are 3mm thick, so I cut the following wood pieces:
2x Wood piece 1: 80 x 80 x 3 mm 4x Wood piece 2: 77 x 60 x 3 mm
From a few cotton candy sticks, size 3 x 3 x 30 mm, I cut 4 sticks with size 3 x 3 x 60mm and 8 sticks with size 3 x 3 x 68mm.
From each wood piece I measured the center by drawing two diagonal lines: one from the lower left corner to upper right corner and one from the lower right corner to the upper left corner creating a center point.
From one 'Wood piece 1' I cut an inner square with size 65 x 65 mm. This 'wood piece 1’ I used as the bottom of the wooden box. Then I took one 'wood piece 2’ and used a compass to draw a circle of 32mm diameter around- and using the center point. Then I took a second ' Wood piece 2' and did the same, but now with a circle diameter of 28mm. With the point of a sharp hobby knife I made small cuts along and on the two circle lines. When I got all round, I turned the wood pieces over and repeated this step along the perforated line made by the previous step. When finished, I used the hobby knife again to cut the circles along the perforated lines on both sides of both wood pieces and removed the two wooden circle pieces. Then I sanded both holes with a piece of sandpaper.
*) When performing this step, make sure to measure the inner diameter of your hygrometer and adjust the circle size.
Two 'Wood pieces 2' , one with and one without a hole were then glued perpendicular together, where one side is 80mm (77mm + 3mm) and the other is 77mm. A stick with size 3 x 3 x 60mm was then glued to the inner corner. I repeated this step with the two remaining 'wood pieces 2'. When dry, these two parts were glued together, making sure each side is 80mm (77mm + 3mm) and a 3 x 3 x 60mm stick was glued to the remaining two inner corners. When dry, the remaining 8 sticks with size 3 x 3 x 68mm were glued on the inside of the wooden box to all outer edges. Then 4 triangles were cut and glued horizontally to the inside top corners of the wooden box. These triangles are needed when screwing the top cover to this wooden box later on
Step 4: Creating a Wooden Box, Part Two


On the wood piece for the bottom and on top of each of the four legs, I placed a mark in the center of the parts that are going to be glued together as ‘Alignment help'. When done, each leg was glued to the bottom part one by one. When finished, the square box was glued on top of this construction, making sure that the legs are also glued to the sidewalls while the whole construction stays stable on a flat area. This can be a bit problematic if the legs aren't exactly the same!
Step 5: Adding the Thermometer to the Bottom Cover


For this step I used an e14 brass socket and a brass gearwheel which I got from Junophor. I prepared the brass socket by removing the glass in the bottom and by inserting a 9mm diameter, 23mm long copper pipe piece. This copper pipe piece fits very tight, but you can push it manually in the socket until the bottom end. At the top I used some two component glue to fill the remaining gap. When the glue was hardened, I used a metal file and some sandpaper to make this side smooth and level. It has to be level, because the thermometer will rest on this brass socket. And you will see every imperfection because the thermometer will not be perfectly vertical when placed on this brass socket and the top cover. The last 'wood piece 1' is used for the top cover and again, I measured the center by drawing two diagonal lines: one from the lower left corner to upper right corner and one from the lower right corner to the upper left corner creating a center point. In this center point I drilled a 3mm hole.
Junophor also provided a perforated copper plate from which I cut a rectangular strip with size 140mmx 45mm. At both ends I soldered a brass rod and rounded the whole construction around a glass bottle, creating some kind of case. This case should prevent the direct heating of the thermometer tip. To place this construction on top and around the thermometer, I measured the positioning height and soldered a tiny brass tube on both rods. Then I determined where to drill the two holes for these rods. These holes are drilled with a 2mm wood drill making sure that when the case is in position, the thermometer is in the center of this case.
The top cover was then given a dark brown color with brown shoe polish and left to dry. When dry, a large brass gearwheel, the brass e14 socket and the thermometer were placed in position. To keep it there, I used a ring and nut. Then the round copper case was added, centered and glued to the top cover. When placed on the square box, I had to make a few adjustments before everything was centered and perfectly vertical aligned. To attach the top cover to the square box, I drilled a 1mm hole at each corner *) while the top cover was in position and used 4 tiny screws to keep it in place.
*) these four holes were drilled through the top cover and the 4 triangles that were glued horizontally to the inside top corners of the wooden box
From now on it is going to look like a weird construction.
Step 6: Finishing the Project

I used a sanding block to remove excess wood from the top cover to align the top and bottom cover with the side walls. Then I removed the top cover and used brown shoe polish to give the square box and legs a brown finish. A thin perforated piece of aluminium plate was cut into a circle, approximately 5mm wider than the 28mm hole, sprayed in a brass color and when dry, glued on the inside of the box to cover the 28mm hole. The inside of the box and the bottom of the top cover were painted black with an acrylic paint. Before performing the final step, the hygrometer was placed in the front hole and the top cover placed in position and fixed with the four screws. For the final step, I drilled four holes in each corner of the front and the back wall of the square box, each hole 10mm from each edge, and then added 8 brass nails with a large rounded head. I also added a brass pipe piece to the left wall center and inserted a brass Water Tap key just for fun. After cleaning up and correcting some spots with brown shoe polish, I finished this project.
Enjoy!
Baron Atmo von der Sfeer


