

Introduction: Where to Place Your Bench Dogs


I tortured myself for months (6 to be exact) on this particular subject: WHERE DO I PUT MY DOG HOLES??? I watched a few videos (there aren't many out there) and read as much as i could on the subject. The last thing i wanted to do is ruin my bench that i have so much time and money in so it took me a while to get the nerve to drill holes in my bench. I finally mustered the courage and laid out the holes and started the drilling process. It all ended up just fine and i got a good set of starter holes in my bench to aid even further in my work holding options for my hybrid woodworking bench.
Supplies
For this Project you will need:
1. A completed Workbench
2. A drill with drill bits to match the bench dogs and or holdfasts you will be using in your bench
3. Layout tools, I used a variety of squares and tape measures as well as a fine mechanical pencil.
4. Not absolutely necessary but its helpful to have a drill guide and or jig to maintain a straight, perpendicular hole to the bench top surface
5. Some sort of bench dog and or holdfast to use in the dog holes
6. OPTIONAL a router and a 45 degree chamfer bit
Step 1: Gather the Tools to Begin Layout of Dog Holes


Get your layout tools together and take time to thing about where you want your holes to be along the bench. I chose a spacing of 8 inches between holes because the holdfasts i had with the shortest reach were 4 inches so i knew that my other holdfast would reach at that distance. Make sure to pay attention to what is on the under side of the bench and if you have a Nicholson Bench make sure that you step in from the edge at least enough to clear the thickness of your apron. On my Roubo side of the bench i had to clear the dado that my Sliding deadman ran in.
Step 2: Layout the Placement of the Holes and Punch a Center Point for the Drill Bit

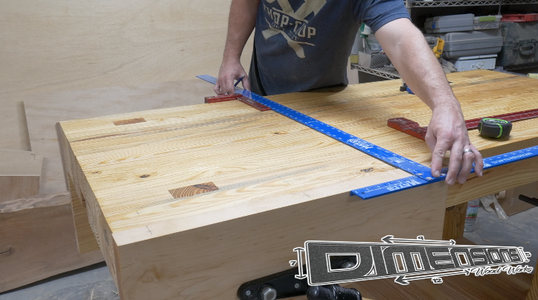

After you have determined the spacing between the holes and how far in from the edge of the bench you want them, Start to mark where the center of those holes should be. Once you have all your marks, look at the layout and ensure that you are clear in all directions (especially underneath the bench) If you need to make adjustments, NOW IS THE TIME!!! Make sure you are comfortable with the location of all the holes and center punch each location with a punch or awl.
Step 3: Drill Your Holes and Chamfer the Top Edge


Now that all the prep work is out of the way, it's time to drill the holes. Use your drilling guide or jig and make sure all your holes are totally perpendicular to the top of the bench. After you have all the holes drilled, add a 45 degree chamfer to the top side of the dog hole to prevent the top of the hole from blowing out over the years of use. I don't know about you, but i made my bench to WORK on, not a piece to sit in the corner and look pretty.
Step 4: Clean Up the Holes and Apply Finish to the Newly Drilled Holes


In my case, i had to use a little sandpaper to clean up the holes. I do not think this would have been an issue if i hadn't made my top so thick but nevertheless you may find yourself having to do a little fine tuning with either a file, rasp, or you can do as i have done and use adhesive backed sandpaper on a dowel smaller than the diameter of the holes. After i had a good fit in each hole i cleaned up any stray pencil marks on the bench top and applied finish to the areas around the hole on the top as well as in the hole itself. I plugged the bottom of each hole with a rag, then poured in some boiled linseed oil (BLO) because it was what the bench was finished with originally. I put some oil in the hole with the bottoms plugged, then used a small dowel to work another rag into the hole and applied the oil by rubbing the rag up and down until the inside of the hole was penetrated by the BLO. Then i reapplied oil to the top surrounding the hole where i cleaned up the pencil marks. Once the oil was applied, the bench looked good as new!
Step 5: Gather the Tools to Use in Your New Dog Holes


I got an array of tools to use for holding, they are pictured here: I have a basic bench dog by wood river from Woodcraft, A set of Wonder Dogs by Veritas, a traditional holdfast by Wood River, and two different Sjobergs Scandinavian style holdfasts. With this lineup i can handle anything the work can throw at me!!! One of the major goals of my bench was to have an INSANE variety of work holding options and combining the Roubo and Nicholson benches was a great start! One feature that i rarely showcase is the fact that this bench is a split top and i can remove the center of the bench as well to clamp large boards to the sides. With the addition of the dog holes in the top, i feel like I have covered any possible scenario that could arise in my daily work flow.
Step 6: Go Watch the Video and Get to Drilling Your Dog Holes!!!!
I hope this tutorial has shed some light on the world of bench dog placement. I was apprehensive to say the least to start this process but i have to say, now that it's done, I'm so glad i FINALLY did it!!!! I found myself needing these holes already in many situations and now that they are where they belong They will assuredly be getting some heavy use soon!!
Get Better Every Day!!!!


