

Introduction: White Oak Faced Powerful Passive Speakers


This is my third speaker project and completely different to the previous ones! This time I am going to make some big, powerful and nice looking monitors to go in my audio room!
I have some other projects on Instagram, please do check them out!
my etsy: ETSY SHOP I do custom orders here too. And sell some pf my projects!
I took on this challenge to make some new speakers and although it is a fairly simple build to do with hand tools, I love any excuse to use my CNC router. sorry...
Step 1: Parts


MDF - Sourced form most home improvement stores
speakers - available form amazon. The ones I used were Bass Face.
Oak - I have a local supplier of exotic hardwoods and I intend to use some more exotic hardwoods in the future!
Step 2: CAD

As always I jumped into Fusion 360 and quickly and easily came up with a design that I liked and used the available material I had very well.
I made some key design choices with these particular speakers as I wanted to try to use a little of my precious White Oak as possible so I decided to make the front a solid piece of oak and I used MDF for the rest of the enclosure. This wouldn't matter though as the box part would be painted white.
Step 3: CAM


I used Fusion 360's built in CAM to generate some g code for all the parts I needed and then I was ready to cut them out on the CNC router.
Having CAM built into Fusion 360 allows a really nice and seamless workflow, don't have to use any other programs to process the files.
Step 4: CNC


Then just load up some sheet material and let the machine do the hard work!
Step 5: Cleanup


Once the parts are taken from the machine, the tabs that hold the parts in place need to be cut away with a hacksaw blade and then I used a small block plane to trip down the excess.
Some course sand paper on a flat board can also help this process.
Step 6: Glue Up


I then glued up the main mdf boxes of the speakers taking extra care to make sure everything was straight.
I used a band clamp and masking tape as I find this the easiest way to glue up box shaped things.
Step 7: Cleanup

After the glue up, I used the sandpaper on a board to cleanup the edges and get everything flush and smooth prior to primer painting
Step 8: Preparing Speaker Fronts


I glued the speakers in place on the front panel with some epoxy, I could't find the right screws so this will do until I get around to getting the right screws and doing this properly!
Step 9: Gluing the Face On


The speaker face could then be glued on and I took the time to mask off the mdf to stop it getting covered in glue prior to painting.
Step 10: Painting


The whole thing could then be painted white, except the oak face. I used the bass ports covered in newspaper to seal up the holes in the back of the speakers.
Step 11: Chamfering


I actually did this before painting of course but I ran all the edges of the speaker over my router table to give a nice faceted look to the speakers.
Step 12: Wiring

Next I wired up the speakers.
Step 13: Extra Parts


I wired up the speaker terminals to the back and installed the bass ports into the frame of the speakers. I also added tome rubber feet to the speakers at this point.
Step 14: Varnishing


I masked off the painted mdf from the oak and then varnished the oak fronts.
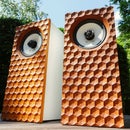
Step 15: Done!


Finished!!
The copper pipe stand is from an old project but I intend to use it in an upcoming project so stay tuned for that!!!
Step 16:

Runner Up in the
Box Contest 2017


