

Introduction: Windmill Tutorial

This instruction set will explain step by step how you do one of break dancing skills, which is called ‘Windmill’. Generally, break dancing has two different moves, which are style move and power move. Windmill is a basic trick of power move, but most of you guys practice windmill with wrong positions and sometimes get injured. I am going to let you know the best positions of it and how you practice it. With proper warm up before windmill and repeated practices, I guarantee this instruction will make you master the awesome trick in a short time like average 4 weeks.
Step 1: Before Windmill

Why should you warm up before windmill? This is because the introduced exercises will prevent a back, legs, and wrists injuries. Especially, you have to focus on wrists warm up, because your wrists bear your weight, so it is easily damaged. Likewise, stretch your legs as much as you can in order to increase flexibility. Do you need a technical ability? The answer is “No, enough warm up is only way to master windmill faster”.
Step 2: Needed Materials

1. Wrist Protector
It is mandatory for the beginners. It will protect your wrists from weight pressure.
2. Beanie
In some cases, your head’s skin is chafed. Let’s wear a beanie for your head.
Step 3: Start Position Looks Like That Picture, Since I Am Going Counter Clockwise.
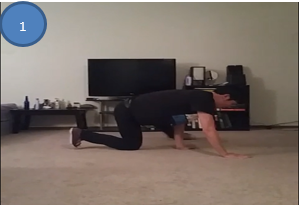
1. Go on your right knee
2. Stretch your left leg
3. Look on the ground
4. Position your arms like this picture.
Step 4: For This Trick, You Should Understand Centrifugal Force.

1. Your left hand should be off the ground.
2. Swing your left leg in a counterclockwise direction.
3. Ready to lift the right leg.
※Tip: The supporting hand should be perpendicular to the ground
Step 5: Collapse Your Upper Body and Make Your Legs As “V”.

1. Lift your right leg and straighten it.
2. Both of your legs should look like a “V” and collapse your body.
3. With this position, just poke the sky with your right foot.
Step 6: Collapse and Slide With Holding Your Legs.

1. Collapse your body and slide with your stabbing hand by folding in.
2. Just push away from the ground with the stabbing hand.
3. Roll onto your left shoulder
※Tip: Try to understand sliding with the shoulder. Don’t fall.
Step 7: After Collapsing and Sliding, You Will Spin With Your Back. Keep in Mind That You Should Be Ready for Multiple Windmills.

1. Keep legs in “V” position and spin based on the centrifugal force.
2. Ready to stab the ground with the left hand.
※Tip: Spin with your back, not waist.
Step 8: Ready for Multiple Windmills

1. Use your right forearm as support to pick you up into the second position in the second step.
2. Put your head on the ground, because it makes you be able to do fast windmill.
※Tip: When you put your head on the ground, the angle between your body and ground should around 40 degrees.
Step 9: Repeat the Previous Steps

Work Hard!!
Step 10: Other Things
These are my tips I’ve experienced and also help you to master Windmill easily.
1. Seek out a smooth floor like linoleum and hardwood surface.
2. Do not have a long break time while you practice. It will make you more exhausted.
3. Do not try to do everything in a day. Do it step by step.
4. Remove sweat on your palms. As your hand slipped, it causes a wrist injury.
DON’T STOP PRACTICING!!
