

Introduction: Raspberry Pi Audio Dac-Amp-Streamer


Re-purpose a dated Google AIY voice hat as a dedicated headless stereo audio streaming device.
Now that Google AIY voice kits are nearing two years of age, you may have found the novelty has worn off a bit. Or, you may be wondering if your browser's advertisements for the nearest renaissance festival have anything to do with the question you posed about where you may find a good deal on under armour running shoes.
If you already own one, this project will show you how to take your existing Google AIY voice kit, and re-purpose it as a dedicated headless audio streamer. If you don't already have a kit, and you live near a Micro Center; you're in luck - there are still plenty around, and I doubt that they are going to get any cheaper than the current price of $5. (actually, they are $3 as of July 2019).
This project is all about audio and nothing to do with AI. We will be working on a completely separate operating system stored on a separate micro sd card, which will allow you to keep all the AI functionality untouched. Furthermore, we will improve the user experience by introducing stereo sound (for a few dollars more) as we build a scalable audio streaming device. Finally, upon completion of this project, we will leave the voice hat remaining in a state ready for future expansion. The limitations of expansion will be only that of our creativity.
Step 1: Procurement

I will write this instructable from the perspective that you do not already have a Google Voice kit in your possession. Should you already have the voice kit setup - the additional items needed are marked with an * below. Also, the latest Raspberry Pi offering (Pi 3 A+) is perfectly suited for this project based on its form factor, and I highly recommend buying one anyway. However any Pi should do as long as it will accommodate the voice kit hat and GPIOs.
Ingredients:
- Raspberry Pi (recommend Pi 3 A +)
- 5.25V 2.4 amp micro usb power supply
- Micro SD Card ( depending on your music collection size, 16gb should be adequate)
- Max98357A dac and amp (from Adafruit )*
- Speaker*(s). The kit comes with one, however to get stereo we will need an additional speaker. (also Adafruit)
- Google AIY Voice kit
- Header – single band*
- Speaker Wire*
Tools needed: Soldering iron, solder, philips screwdriver size 00 or 000. wire strippers, masking or painters tape to secure header temporarily during soldering, USB to micro SD adapter.
Step 2: Assemble the Hardware

Out of the box, the voice hat arrives in mono mode. Thankfully, the engineers at Google designed the board to allow an upgrade to stereo simply by adding another Max98357a board to sit as another hat. They even outlined the box for us.
You guessed it: We will be constructing a hat on a hat. Hardware on top of Hardware already on top.
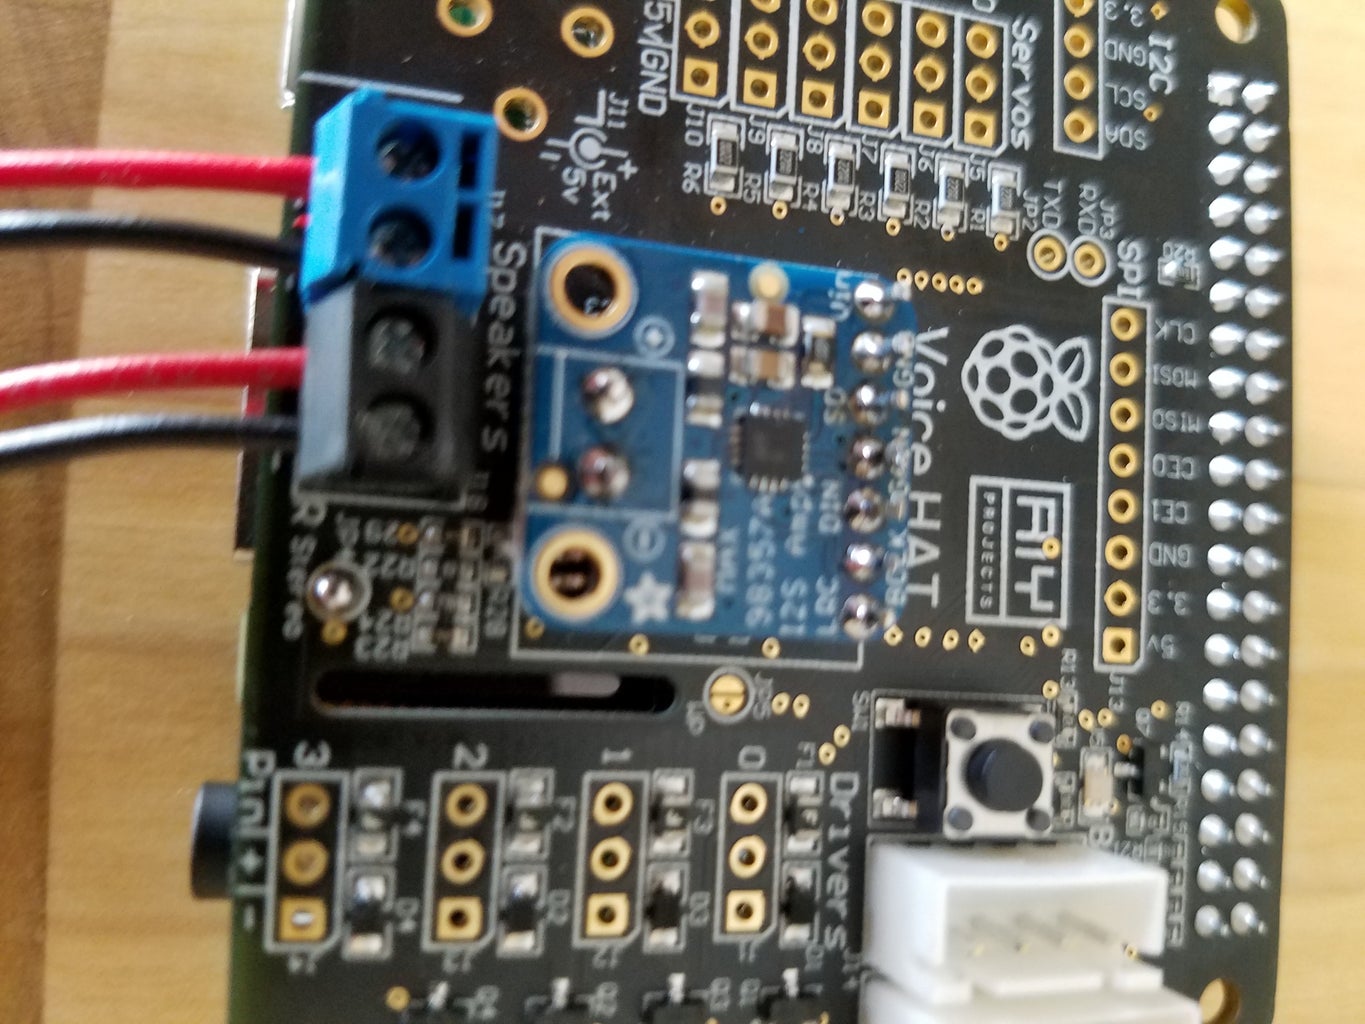
Using the header provided by the Adafruit Max98357a chip set, we begin by soldering the 7 pin header to the voice hat directly underneath the words “AIY projects Voice Hat”. A piece of masking tape affixed to the longer male pins to the face of the board may be useful to prevent the headers from sliding out of place as we will be working with the board upside down during this stage of soldering.
Also solder two pins inside the white outlined box to the voice hat where the blue max98357a board will sit.
DO NOT SOLDER THE SPEAKER CONNECTOR TO THE MAX98357a BOARD!
Connect the speaker terminals to the voice hat instead, aligned directly beneath where the two poles were just soldered. The left speaker connection and the right speaker connection should be aligned together side by side, in one row of four terminals.
Flip the board right side up.
Solder the jumper labeled “JP4” closed by leaving a drop of solder on the jumper. Do not forget this part or we won't have stereo!
Carefully attach the blue max98357a board to the long male pins protruding from the voice hat. This was a little difficult, so try to solder the pins as perpendicular to the board as possible. With some minor wrangling of the two pin header, I was able to accomplish this with only minor effort.
Complete the solder of the male pins to the blue max98357a chip – both the seven pin header and the two pin header should hold the max98357a firmly in place.
Done with Soldering!
Step 3: Attach to the Pi and Connect Your Speakers
Using the two nylon spacers provided with the kit, carefully merge the female voice kit atop the male headers on the raspberry pi. The nylon spacers should snap into place giving you a secure fit on the opposite corners of the header.
Using a tiny Philips head screwdriver (000 or 00), unseat the screws on the speaker terminal enough to allow your speaker wire to fit into the compression openings. You should not have to remove the screws, but open them enough where they feel loose.
Insert your small gauge speaker wire into the opening and tighten the screws to hold the speaker wire firmly in place.
I found this step to be the most daunting challenge of the whole project – I could not find a screwdriver small enough, or my flimsy speaker wire was too fine to absorb the compression of the screw and would rather break than hold firm. I made a modification by building “nibs” or smaller wires that were firm enough to withstand the compression, and just long enough to be soldered to the bare ends of the speaker wire. Ugly, yes- but effective.
Done with Hardware!
Step 4: Download Raspbian Lite


Many of you are already very familiar with the process of downloading and burning images onto an SD card, and the subsequent steps are a little beyond the scope of this project. I will bullet the steps below just in case, but if you find yourself still stuck, there are tons of resources to assist.
Last Edit: June 2020 for Buster Lite Download.
· Download and install Etcher by Balena Software
· Download the latest Raspbian Lite OS from raspberrypi.org
· Using Etcher, write the Raspbian Image to the SD card
· Once complete, unless using a pi zero w - transfer the newly imaged SD Card to our Raspberry Pi. If you are using a pi zero w, we need to make some edits to the WPA_Supplicant.conf file in the boot partition to setup your wifi.
Step 5: Configure the Pi

With our newly created image, Let’s power up the pi. But first lets borrow a monitor and keyboard to assist with the configuration. Insert the micro sd card, and attach the micro usb charging cable. With luck, the green led light will flash a few times while it is booting up. First boot may take a few minutes, but within 5 minutes we should be ready to work on our configuration. "Lite" Raspbian does not have a desktop.
Once at the command prompt: login as pi, password “raspberry”.
· Access the configuration panel by typing “ sudo raspi-config” at the command prompt.
· Change your password immediately.
· Setup you wifi using the network options on the configuration panel
· Change your localization options and set your time zone
· Enable SSH using the interfaces panel option
· Run “sudo apt-get update” to update your software to the latest version
We’ll need the IP address of the Pi. I recommend an app called "FING" that can be downloaded to any android device and it will list all the devices connected to your network. We would be looking for a device called “raspberrypi”. Write the ip address down.
From this point forward, we will no longer require the monitor or keyboard. All further configurations will be performed using the command lines through an SSH session.
Step 6: Use SSH to Open a Session on a Remote Machine
Using SSH is pretty basic. Open a terminal window from any device on your network, and type the command
ssh pi@myipaddress
Replace “myipaddress” with the numeric values obtained using fing.
For the first time, you may be greeted with a scary warning indicating you’re not on the invited list, however there is a sentence that should read “ to remove this…” copy the long string of characters, and paste it into the command prompt, hit enter. Then using the up arrow key, repeat the ssh pi@myipaddress command, choose yes, and now enter your password. Congratulations!, you’re now connected to your device if you are looking at a command prompt of "pi@raspberrypi: ~ $".
Step 7: Install Mopidy

We’re going to install Mopidy as our music server. There a plenty of options here, but I will show you how to install an extension called "Music Box" that will allow you to control your music from a web interface instead of a command prompt.
What is Mopidy? According to it’s website, Mopidy is a string of big words that make me feel pretty inferior at the moment, but let’s just say Mopidy is the platform that our the music will play from. It will be a music server, an MPD (music player daemon), and a web server. The PiMusic Box addon will offer the website that we can navigate to and control Mopidy from. I figured that since it plays nice with a bunch of popular services such as Spotify or Google Play Music, it would be suitable for this instructable. Plus it's way cool.
Below are the instructions shamelessly copied from Mopidy to install from the command line:
1. Add the archive’s GPG key:
sudo wget -q -O - https://apt.mopidy.com/mopidy.gpg | sudo apt-key add -
2. Add the APT repo to your package sources:
sudo wget -q -O /etc/apt/sources.list.d/mopidy.list https://apt.mopidy.com/buster.list
Finally install mopidy:
sudo apt-get update
sudo apt-get install mopidy
End shameless copy.
Step 8: Use Python Pip to Install Other… Installations (extensions)
We've just installed plain vanilla Mopidy, but we're just getting started. Extensions will be our building blocks to add customizations to our plain vanilla Mopidy. Because most of the extensions we will tack on to basic mopidy are written in python, we will use an equivalent of apt that is python specific.
Before we start using pip, lets first ensure we have all the gstreamer plugins using apt:
sudo apt install \
    python3-gst-1.0 \
    gir1.2-gstreamer-1.0 \
    gir1.2-gst-plugins-base-1.0 \
    gstreamer1.0-plugins-good \
    gstreamer1.0-plugins-ugly \
    gstreamer1.0-plugins-bad \
    gstreamer1.0-tools
This may take a few minutes to install. Without Gstreamer, you may not be able to stream music.
And now we can install python pip:
sudo apt install build-essential python3-dev python3-pip
Now we can use pip to add more mopidy nuggets. Pip is a python tool, similar to apt, but I find it works a little faster than apt. A little slow off the block, but it kicks in pretty fast.
Below are four to get us started:
A web front end. Let's use Iris, but if you want you can try mopidy-musicbox-webclient instead:
sudo python3 -m pip install Mopidy-Iris
An internet radio station hub with 30 channels:
sudo python3 -m pip install mopidy-somafm
Another Internet radio service hub with even more channels:
sudo python3 -m pip install mopidy-TuneIn
And another front end for mobile device. Radio Stations and Iris don't play together nicely, but mobile has all kinds of internet ration stations to listen to:
sudo python3 -m pip install Mopidy-Mobile
Once completed, you should be able to access Music Box using:
http://myipaddress:6680/iris/ -or- http://localhost:6680/musicbox_webclient
We still won't have anything coming out of the speakers yet if you attempt to play music.
For a list of other features and extensions: Help yourself:
sudo pip search mopidy
From here, you can continue to add extensions at your choosing.
I have a sample mopidy configuration file attached. Feel free to use the contents in /etc/mopidy/mopidy.conf
sudo nano /etc/mopidy/mopidy.conf

Step 9: Setup Mopidy As a Service

Since we will want to run mopidy upon startup, two commands will allow mopidy to run at boot:
sudo systemctl enable mopidy
sudo dpkg-reconfigure mopidy
Reboot, and then run
sudo systemctl status mopidy – l
to check on your status. You should see a green indicator. Mopidy has a very useful support site to assist with further configuration options. Check out the Mopidy Documentation site for more details.
Step 10: Add Your Own Music

By default, mopidy will want to store local music in a folder under /var/lib/mopidy/media. Copy your music collection there. I find it easiest to just remove the sd card from the pi (after safe shutdown), and using a micro sd to usb adapter, plug the adapter to your storage unit and copy/paste there. (this may take a while depending on the size of you collection). Once complete, return the sd card to the pi, boot it up, reconnect, and then type:
sudo mopidyctl local scan
This will add your music to the local media library in Music Box. You may notice .wma files are not recognized as audio, and .ogg files seem to get missed during the scan. Mp3 files should not be a problem though.
Step 11: Sound Card Configuration File - Asound.conf
You should not have anything in /etc/asound.conf yet, but if you do, replace the contents with those below, or create one using:
sudo nano /etc/asound.conf
and paste:
options snd_rpi_googlehat_soundcard index=0
pcm.softvol {
    type softvol
    slave.pcm dmix
    control {
        name Master
        card 0
    }
}

pcm.!default {
    type asym
    playback.pcm "plug:softvol"
    }

ctl.!default {
    type hw
    card 0
}
ctrl-x and Y to save the above as your new asound.conf file.
Step 12: Make Sure We Use the Correct Overlay to Configure.txt in /boot
type
sudo nano /boot/config.txt
The last few lines should resemble something similar to below. We want to ensure the standard audio is commented out, along with any previous overlay such as my hifiberry dac, while implementing the google voice hat overlay. Finally, we want to instruct the pi to use the i2s mapping. The # indicator tells the system to ignore the line.
# Enable audio (loads snd_bcm2835)
#dtparam=audio=on
#dtoverlay=hifiberry-dac
dtoverlay=googlevoicehat-soundcard
dtoverlay=i2s-mmap
reboot if all looks similar to the above. Wait a few minutes, open a browser to the the musicbox url, and play some music.
Step 13: Enjoy the Music
If your listening to stereo goodness, mission accomplished!
One of the beautiful things about using a raspberry pi as a headless music server connected to wifi is that it’s running without taking up a whole lot of resources. True, we’re pumping out only 3 watts per channel, but that is probably enough for close range listening. Your phones battery will thank you.
There is a very significant green factor too – we are only sipping 5.25 volts of energy. And compared to Bluetooth, we can set the radio stream and not be anchored to a 30 foot bluetooth range. With regards to our phone, we can take a call, play a game, and roam a little more freely without interrupting the stream of music.
We’ve only scratched the surface. There are tons of available mopidy extensions to explore, and mopidy has a growing developer base as it is open source. I’ll let you explore the features that interest you on your own.
Step 14: Conclusion

One of the most outstanding features of this project is that we are not restricting our pi by locking down access to the GPIO. This allows us access to many further options because the voice hat was designed that well. For example, my next project will be to add a momentary push button switch as a shutdown button. It should be easy, and I already know where the pins need to land: They're not obstructed. From there? Well, for this project we have completely ignored the microphone – maybe a pi karaoke? Perhaps a LED light show, or add a motor for a rolling jukebox? All the pins are still available and accessible. The question becomes why not?
And just in case you want to go back to the AI, just pop in the old sd card and have google respond in stereo.


