

Introduction: Upcycled (mostly) Light Table


My son is a confirmed doodler and was wanting to trace some projects. From my childhood I remember my father building a light table for his print shop using some scrap glass, some type of paper, florescent bulbs all built inside a wood box. His box was quite a bit more substantial since it was for his print shop and would have many people tracing and cutting - but the concept is the same.
First task - track down the available materials.
I had 3 pieces of thin glass (approx 1/8 inches). My design would use two of these pieces to sandwich the paper. So I had the glass - and a spare. A note:- The glass is probably too thin for this project If I were to purchase glass I would go with 1/4.
Box material. Had some 1x10's cluttering up the garage/jworkshop. Plenty of length to accomplish a box.
Paper. I tried typing paper, it was not quite the right size and also diffused too much light. Wax paper worked alright, but parchment paper seemed to work the best.
Lights. Didnt have any florescents laying around that would fit, so I had to buy some lights. The store was clearing out the LED's stips, two seemed like it would fit in my box so that is what I went with. Note 2: Do NOT use incandescent bulbs, these will generate far too much heat to be trapped in a wooden box. Use LED's or florescent only.
Step 1: First Step - Cut the Glass
Since the glass was my limiting material I wanted to get the pieces square and sized correctly. I was trying to make the glass area 19x14, but after breaking one of the pieces of glass I had to alter the size to be 19x12. Was successfully able to cut the 2 remaining pieces of glass to this size. (sorry, didnt get a picture of the carnage).
To cut the glass I used a glass cutter laying up against my framing square - then set the scratch in the glass over a dowel and pressed carefully on both sides.
The breakage happened after I cut the glass to the correct size - I set one of the sheets on my bench and a errant screwdriver fell on it - so be careful where you set things down.
Step 2: Measure the Box
With the glass sized to 19x12 had to build a box with a rabbet hold the glass. I figured a 3/8 inch rabbett would work on my 3/4 inch wood. So the end pieces needed to be 11 1/4 inches, and the side pieces 19 3/4.
Used a router to cut the rabbett.
Used pocket hole to hold the box together.
Step 3: Assembly


With the wooden pieces sized correctly. I cut the pocket holes (I love assembling with pocket holes).
A couple screws in each side more than adequate to hold everything together. The second photo shows the 'finger hole' that I put in one of the sides. This allows me to reach in and safely tip the glass up for removal and cleaning.
Step 4: Adding the Bottom

Happened to have a chunk of 1/4 inch hardboard laying around that I cut to fit the bottom. A couple self threading screws to attach. Self tapping - the only way to go.
Step 5: And Now the Lights

Set the lights in the box. They are held in place with some hot glue.
Step 6: And Finally the Glass Sandwich


Cut the parchment paper to the same size as the glass.
Carefully put first sheet of glass in the rabbet.
Lay parchment on the glass.
Then slide the top piece of glass over the parchment.
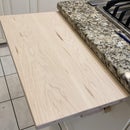
Step 7: Finished Project


Plug in the light strips and trace away.
I'm thinking of wiring the light strips together into a switch on the side, but for now just have to plug in the light strip in order to trace.

Participated in the
Lamps and Lighting


