

Introduction: 100 Lb Propane Tank Smoker Build


I've build a few smokers but most of them take up a bit of room. I wanted to build something smaller foot print, I have a 14.5" Weber Smoky Mountain Cooker that works awesome but is a bit small if I want to do any volume of smoked meat. So I figured I could build a bigger version from an old propane tank.
I have a 100lb propane tank that has expired and figured that it would be put to good use by reusing it for a project. The Weber Smoker has a diameter of 14.5", with two cooking racks and the propane tank has a very similar diameter, it would be better if it was a bit wider however it is much taller, so I will gain an extra few racks of cooking space.
My idea for this smoker is to have dual fuel sources, one will be fire and also have an option to power it with an electric element or propane burner but I will build those later. This Instructable will concentrate on building a fire smoker that burns charcoal or wood.
What I like about this smoker is since it is vertical I could smoke long items vertically and hang them such as fish and sausages or set it up with food grates and smoke pork butts and brisket (with the point and flat separated).
Step 1: Materials and Tools

Materials:
- 100 lb Propane Tank (expired)
1/8" x 1" Steel Bar Stock - 1/8" x 1/2" Steel Bar Stock
- 1/4" Steel Rod
- 1" Angle Steel
- 2 Welding Hammers
- 14 Gauge Sheet Metal
- Door Hinges
- 4" Ducting
- Miscellaneous hardware like bolts and nuts
Tools:
- MIG or Stick Welder (a MIG welder makes this build super easy, as there is no slag to chip)
- Angle Grinder with Flap Discs and Cutting Discs
- Drill and Bits
- Various small hand tools
Step 2: Build Video
Here is a build video from start to finish of the smoker, written directions follow:
Step 3: Cutting Open the Propane Tank


************Warning, cutting into a propane tank is not something anyone should do. I took precautions before undertaking this task so I do not take any responsibility if you damage yourself or your property should you attempt cutting into a propane tank. Do this at your own peril. ******************
Do any internet search on how to cut into a propane tank and you will get all sorts of recommendations on how to do it but I have no idea which one is the right way. Some say to fill it with detergent and water to force out the propane vapors or to get the tank purged with nitrogen.
I decided that the best way to cut into the tank was to fill it with water and then cut into it. The water ensures that any residual propane vapors that may be in the tank are forced out. One option was to take the valve out and then fill it with water, but removing the valve is easier said than done as it's really tightened into the tank and I did not want any chance of an explosion attempting to remove the valve.
What I ended up doing was opening the valve all the way, filling the tank little by little with water, because the tank will be air locked it takes some time to do this. I'd rather take extra time to fill it with water than to blow myself up. Once I filled the tank up to 1/4 full, I inverted the tank and drilled a small hole into the top of the tank, then flipped the tank back over. The hole lets air escape while water is being filled into the valve for the remaining 3/4 of the tank. Then I attached a hose to the valve so I could funnel water into the tank quickly.
Also 100lb tank is a large volume to fill with water. Instead of using tap or potable water, I collected water from my rain gutter to fill the tank. No sense in wasting clean water.
Once the tank was filled I drilled another hole where I wanted to cut into the tank to let out some of the water. Then using an angle grinder I cut just above the drain hole to remove the top of the tank. Also my grinder was plugged into a GFI plug, since I am cutting around a wet area.
Step 4: Making Doors


On the smoker I wanted to have the top removable, so that was cut off in the previous step. Now I needed to add two doors to the tank, the top door would be for the cooking area and will be larger than the bottom door. The bottom door is for accessing the firebox for tending the fire.
I marked out the two doors on the tank, I just eyeballed the rough size and then made sure to square them up using a measuring tape.
I first cut out the side of the door where the hinges will be located, using an angle grinder with a thin cut off disc. Then I welded on the hinges, this makes lining up the doors very easy. Also I used regular door hinges as they are inexpensive and work well. Once the hinges were welded on, the door was then cut out using the angle grinder. If everything works out, the doors will be perfectly aligned to the body of the propane tank.
Next the doors had 1/8" x 1" steel stock welded to the outline of the door, this serves two purposes, it makes the door rigid and covers the gap of the grinding disc from the cutout. Depending on how the doors sits against the body of the tank a felt gasket maybe needed, I did not bother to put one in.
Also I made sure that the bottom door opens first, as the overlapping top part of the bottom door prevent the top door from opening. As it's more useful to be able to tend and fee the fire from the bottom door. Generally you will only need to tend the food of the smoker a few times whereas fire management is far more important.
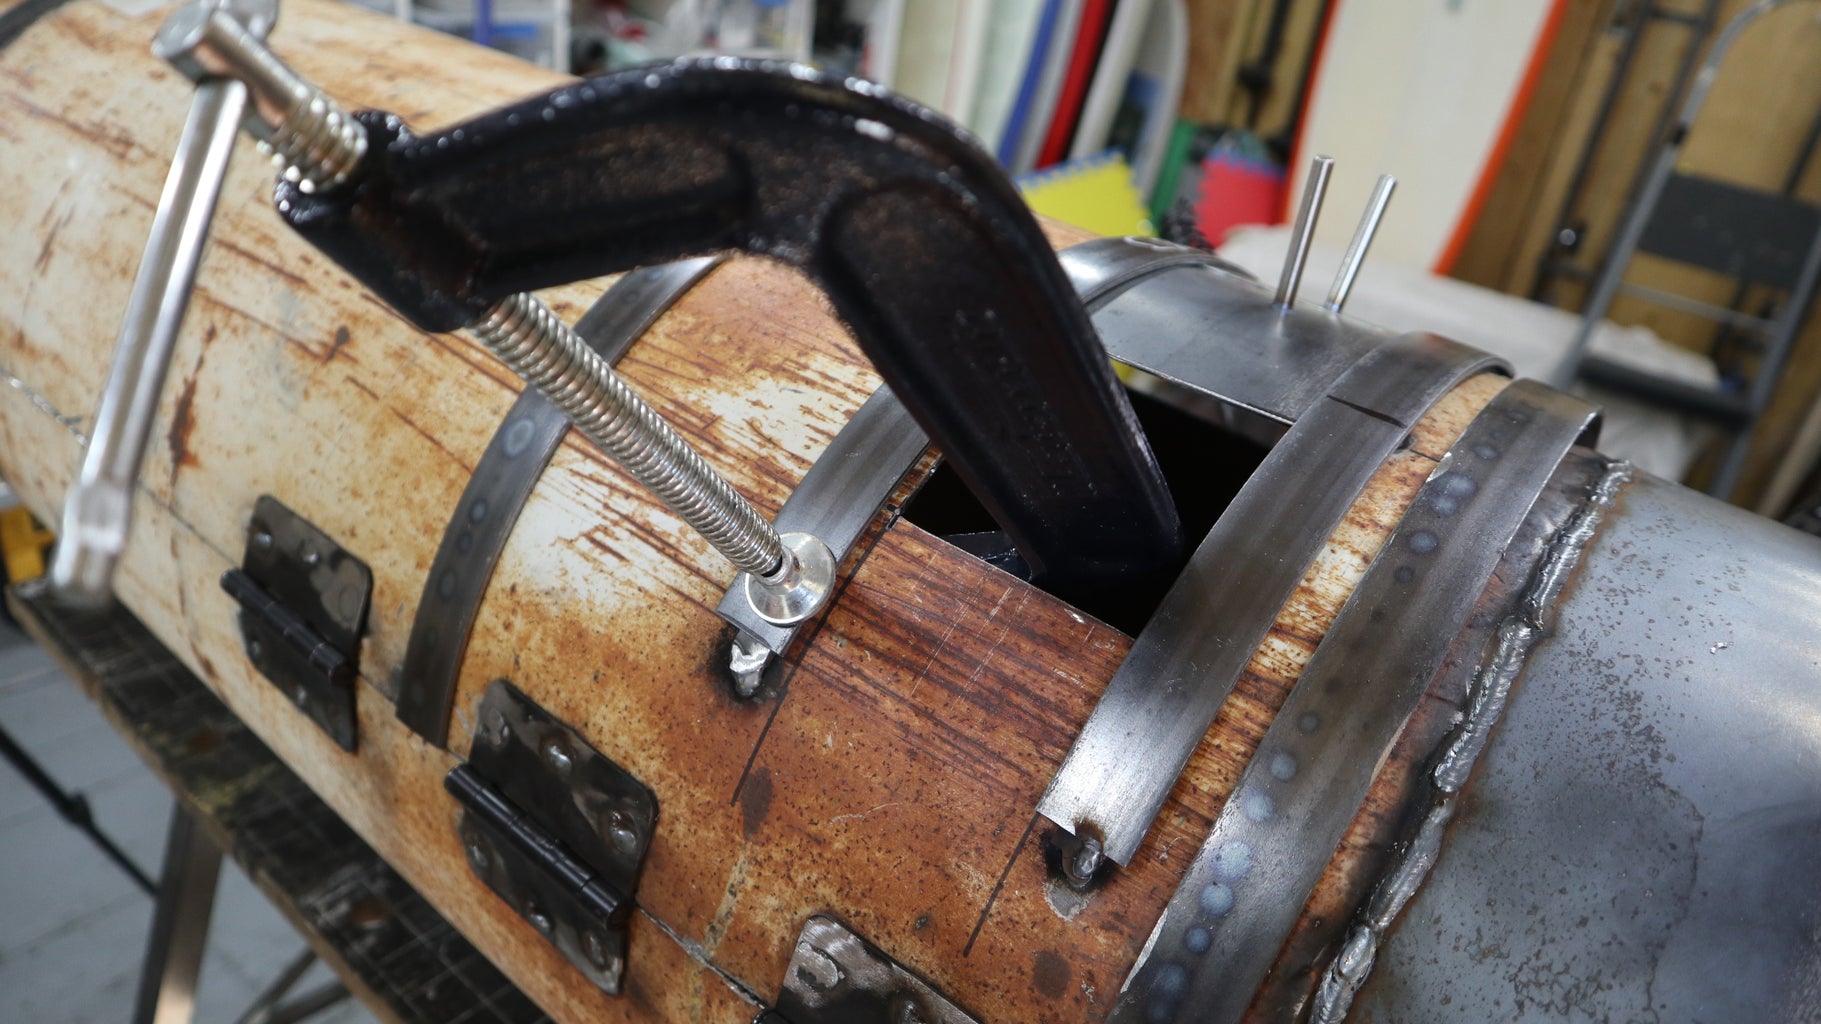
To keep the doors closed and secure a latching mechanism was made from some 1/8" steel stock. First an 8" piece was bent to the shape of the tank, a 3/8" hole was drilled in one end, this piece of metal will be the latch. On the latch a coiled handle from a welding hammer was welded in place. The welding hammer handle is perfect as it does not get hot when the smoker is in use and it looks cool. On the body of the tank a small piece of steel stock was cut with a notched "V" and then welded in place. A hole was drilled into the doors and the latch assembly was then installed using a 3/8" bolt and washers. The "V" notch welded in the tank holds the latch and door tightly to the body of the tank, the further you push the latch downward the more it draws the door tighter.
Step 5: Making the Top


I made the top of the smoker removable, this allows me to clean and check the food from the top should I need to. The top of the tank had the handle removed and a 4" hole was cut out, this will be for the smoke stack or vent. Around the perimeter of the 4" opening, I fabricated a flange from 14 gauge steel. I started by pre-bending the steel for the flange then spot welding it in place and continually bend and welding little by little until a full circle was created.
A piece of 4" ducting was used as the smoke stack.
For the top to fit onto the bottom of the smoker, I bent and welded a piece 1/8" x 1" stock around the outside. This created a lip which creates a nice seal and fit onto the bottom of the smoker. The handle was then welded back on, I kinda like keeping the look of the propane tank.
Step 6: Building the Intake


An intake is needed to control the airflow into the smoker. To fabricate one was simple but required a bit of pre-bending of some sheet metal and bar stock. First an opening was cut out at bottom portion of the door, I wanted it as close as possible to where the fire would be burning.
A rail system was created by bending some 1/8" x 1/2" bar-stock and welding a piece onto the top and bottom of the opening, leaving 1/4" on the top and bottom of the opening. Two doors were made from 14 gauge sheet metal. The 14 gauge sheet metal is thinner than the 1/8" bar-stock which allows the doors to slide once the rail is finished. On each door a piece of 1/4" round stock was welded on, these will be handles.
The doors were put into position and then 1/8" x 1" bar-stock was bent and welded into place. This creates a really smooth and reliable intake.
The bottom of the tank that sits on the floor was very rusted out in places so I bent and welded in place some 14 gauge sheet metal. Then some 1" angle was welded to the bottom of the tank for legs.
Step 7: Making the Food Grates


Since the tank is round, that makes for some interesting fabrication for the grates that will hold the food to be smoked.
Ideally a ring roller would have been useful for this project since it involves bending bar and round stock into arcs. To build the food grate used 1/4" round stock and bent it around the tank and then bent it inside the tank, to size the outside ring, an inch at a time was removed until the ring was the proper size, this would be the frame of the grate. I left about 1/4" gap between the outside of the frame and the inside of the tank.
The actual grate was made from 1/8" x 1" wire mesh. What I like about this stuff is it will eventually take a nice seasoning after some use because it's mild carbon steel. The wire mesh was welded to the 1/4" steel ring, it takes some time since each piece of the wire mesh was welded to the ring. While not necessary to weld each wire, I did it as it removes the sharp ends, this make cleaning the grates easy when scrubbing them with a scouring pad.
Depending on what you want to smoke will dictate how many grates that need to be made. I'm using one to hold the fire, one to to hold the water bowl and at least 3 for the food grates. I made a few extra as well in case I need to smoke a lot of smaller things.
To hold the racks in place some 1/8" x 1" bar stock was welded inside the tank at various heights.
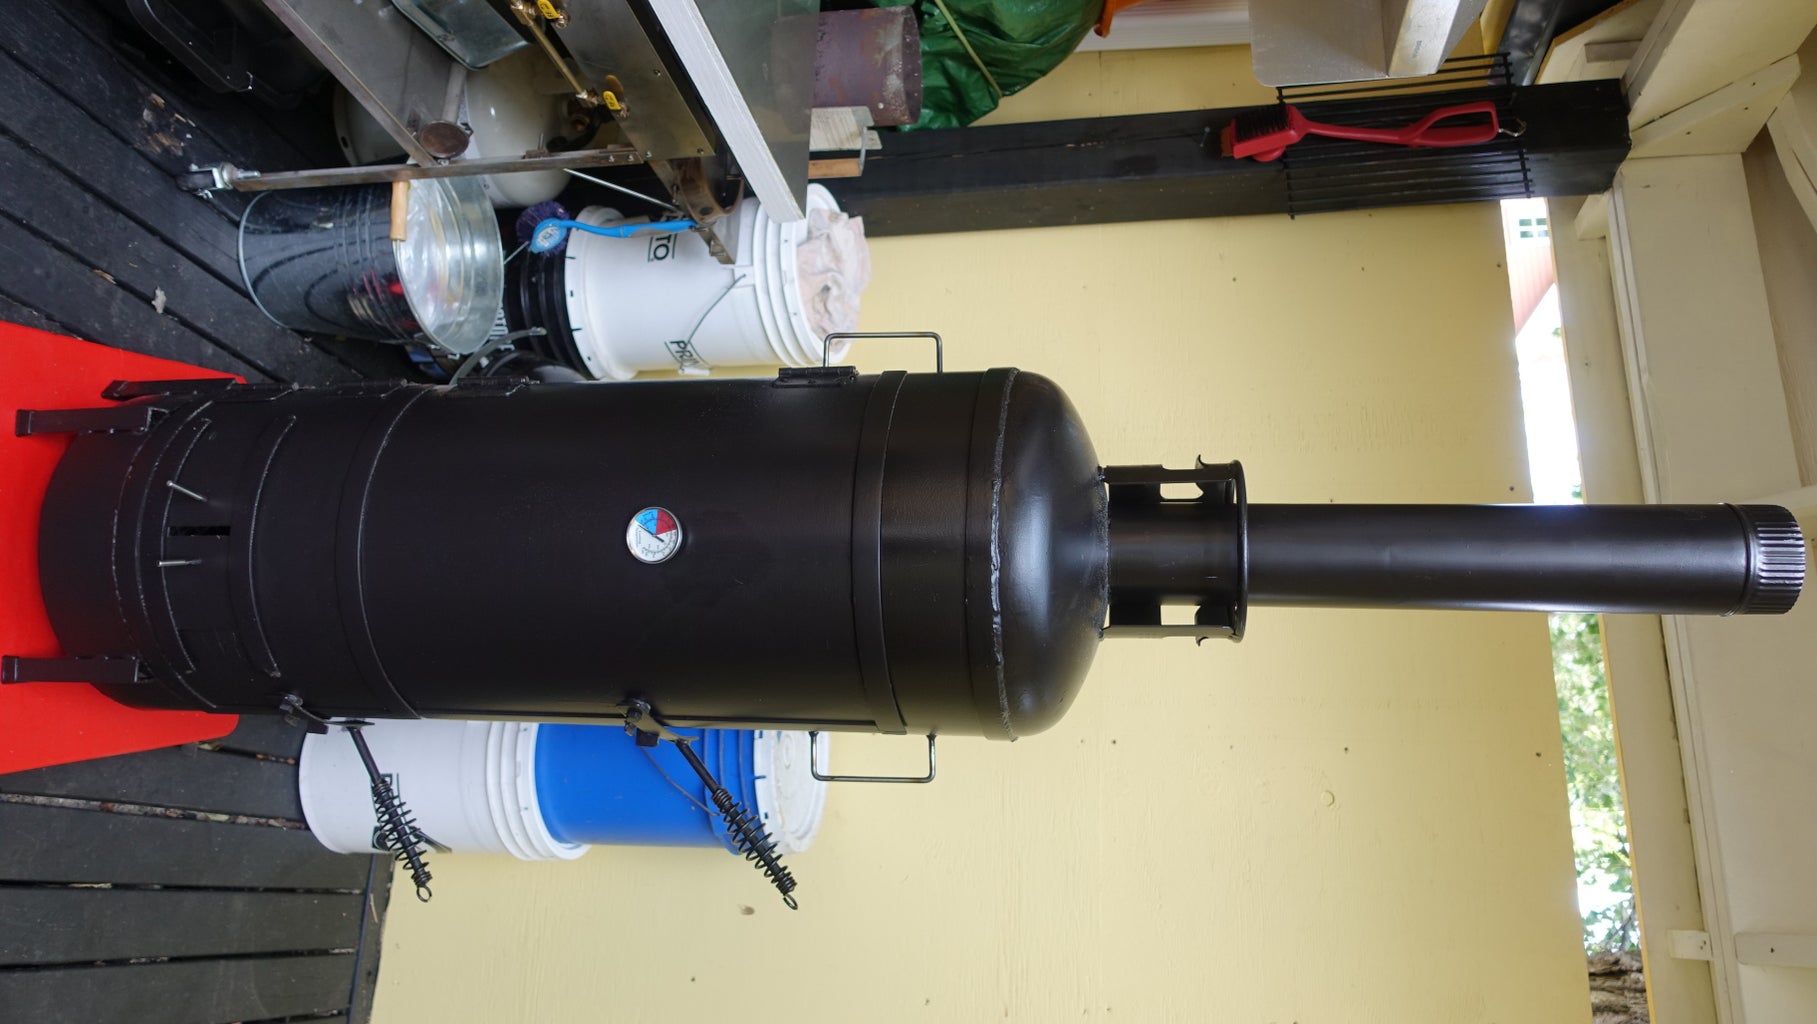
Step 8: Finishing and Painting


The inside and outside of the smoker was scrubbed out with lots of soap and water. After the smoker dried, a coat of high heat paint was applied to the exterior.
A thermostat was installed on the door approximately around the middle of the smoker, where the bulk of the food will be placed to get the most consistent readings. Ideally a few more thermostats could be installed in different locations.
I was going to put casters on the smoker to make it easier to move around but instead I made a platform with casters to place the smoker on. Putting the casters directly on the smoker would make the smoker too unsteady as it's so narrow and tall. The platform makes it more stable and allows me to move the smoker around or optionally leave it in once place.
Step 9: Cooking


For my first cook I made pork ribs. The smoker performed like a champ and I had lots of airflow to keep the fire burning nice and clean. Hope you enjoyed this build and follow me on Instructables or subscribe to my YouTube channel.
You can check out the how to cook pork ribs Instructable here:
Step 10:

Participated in the
Metalworking Contest


