

Introduction: Carved Pumpkin With NeoPixel Eyes


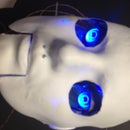
I wanted to make my carved Halloween pumpkin special. I was looking at AdaFruit's NeoPixel rings. They look really cool for a set of steampunk goggles or an arc reactor. Then it occurred to me that they would make great glowing eyes for a pumpkin. The NeoPixel rings are really easy to work with, so here goes.
Step 1: Materials and Connections


You will need:
some sort of Arduino
wire
solder
soldering iron
2 NeoPixel rings
gaffer or duct tape
coffee stir sticks
pumpkin with eyes carved out
This is really very simple. Solder a wire to the +5vdc and ground spots on the NeoPixel rings. Your Arduino runs on 5 volts, so you can steal the power from there. I am using a bare chip Arduino I made. It's just the chip and a crystal, and that's it. You can find out how to make one in Make Magazine ##25 on page 62. I program the chip when it's in a full scale Arduino board. Once it's working, I can move it to the minimal board and free up my other full-scale Arduino board for other projects.
Anyway, I ran the control to pin #4. The NeoPixels only need one control line. Because I was running out of time, I just used the "strandtest" program that comes with the NeoPixel library. You can download the NeoPixel library right from the AdaFruit page. The page also has several tutorials that show how to use the NeoPixel rings for other fun projects.
Step 2: Insert Eyes and Go


I just attached the rings to some coffee stir sticks. Then I jammed the stir sticks into the pumpkin's soft fleshy interior. I powered the minimal Arduino with a 5 vdc transformer. The NeoPixel rings are amazingly bright.
Happy Halloween!


