

Introduction: Face Recognition & Detection Using IP Camera - Face Biometric System - Raspberry Pi


In this Instructable, I will show you how to make your Face Recognition & Detection Using IP Camera.
What things you will need:
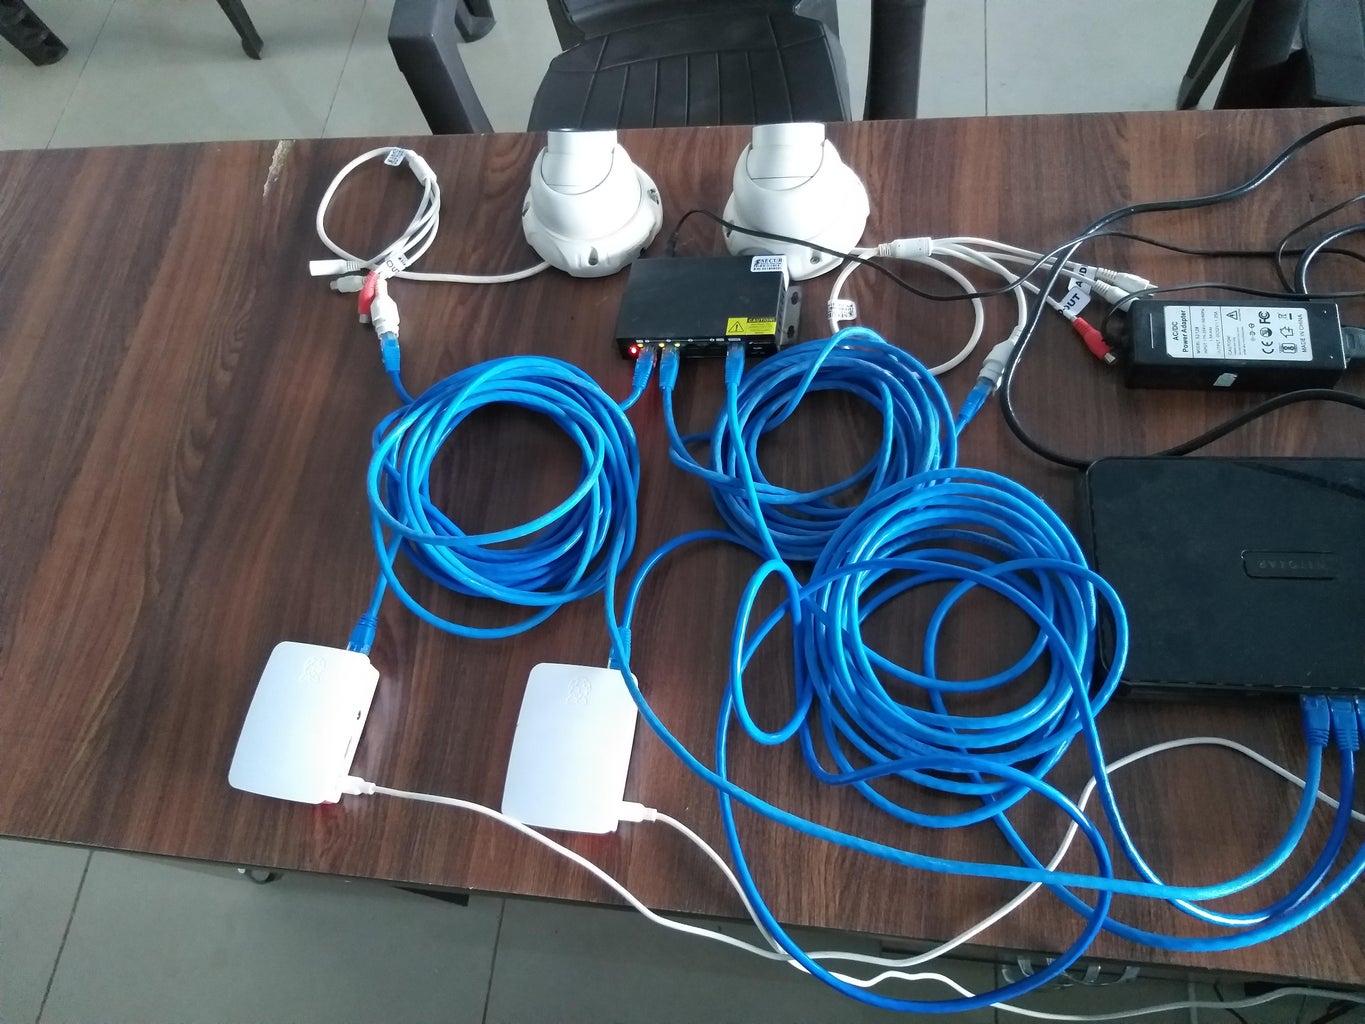
Hardware:
- Raspberry Pi Board - RPI 3 B+
- IP Camera
- Wi-Fi Router
- POE Switch
- LAN Cables
- Power Supply - 5V, 3Amps
Software:
- Raspbian OS
- Python IDE (Thonny Python IDE)
- OpenCV
- Putty
- VNC Viewer
Step 1: IP Camera Setting

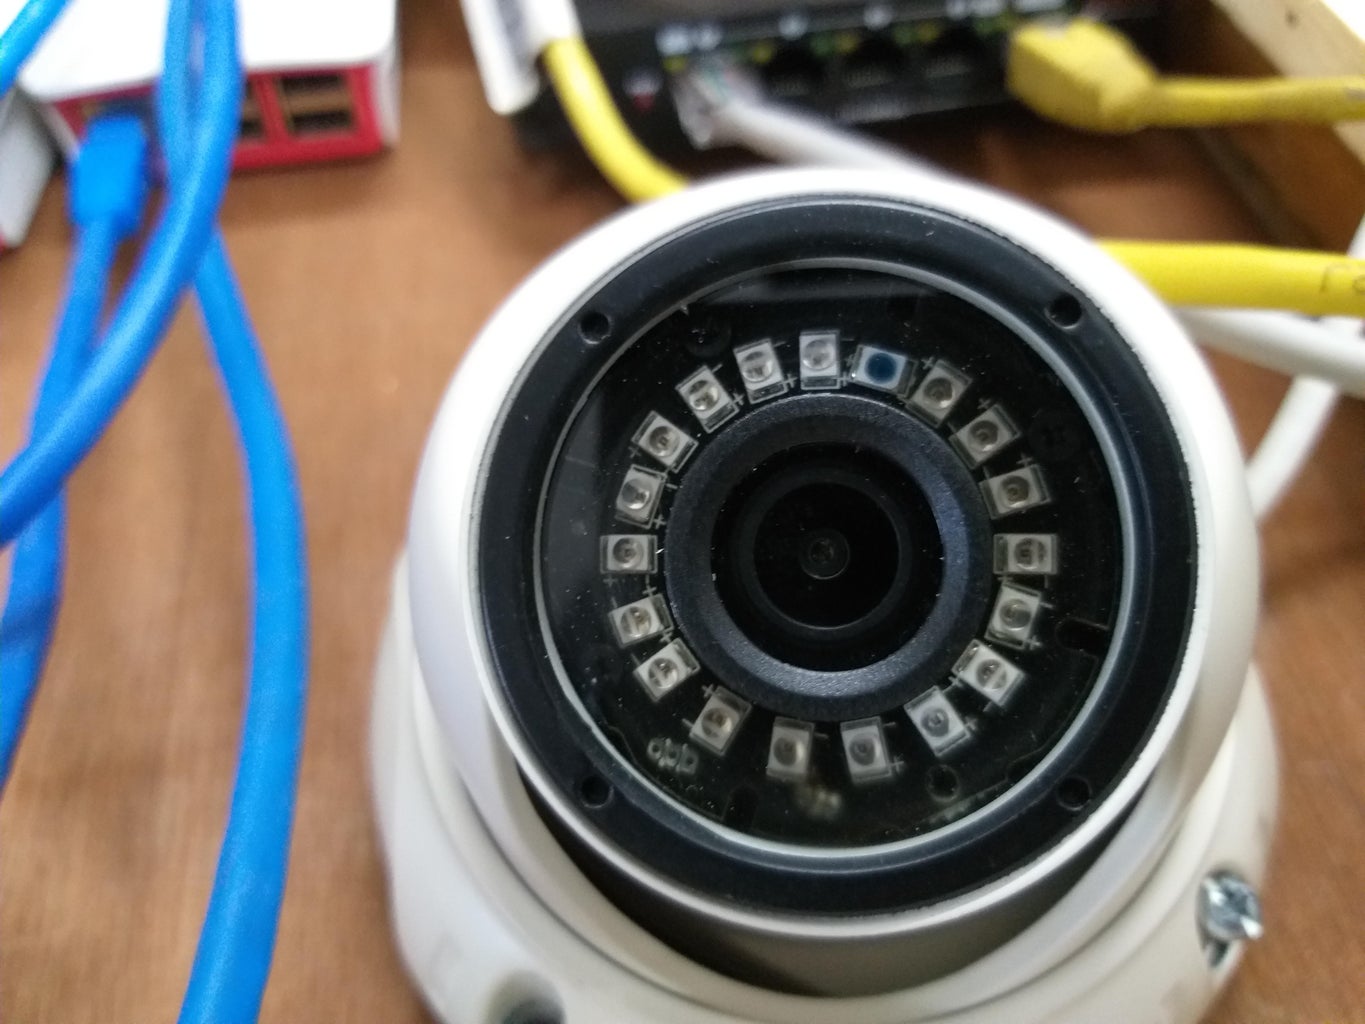
In IP Camera, I've changed the setting. Raspberry Pi 3 B+ not handled many frames to process, so I've decreased the FPS from IP Camera Setting page.
In Raspberry Pi, I've used sub stream RTSP link.
In my Case RTSP Link:
rtsp://Camera IP:port number/user=admin&password=admin@123&channel=1&stream=0.sdp?
*Note:Different IP camera manufacturer company have different rtsp link. Kindly refer data sheet of your camera manufacturer company.
Step 2: Face Recognition & Detection
Face Recognition & Detection has three distinct phases:
- Face Detection and Data Gathering
- Train the Recognizer
- Face Recognition
Step 3: How to Install OpenCV on Raspberry Pi
How to install opencv in raspberry pi | pythonpip installation
--------------------------------------- Follow the Steps: ---------------------------------------
1. sudo apt-get install libhdf5-dev libhdf5-serial-dev libhdf5-100
2. sudo apt-get update
3. sudo apt-get install libhdf5-dev
4. sudo apt-get update
5. sudo apt-get install libhdf5-serial-dev
6. sudo apt-get install libqtgui4 libqtwebkit4 libqt4-test
7. sudo apt-get install libatlas-base-dev
8. sudo apt-get install libjasper-dev
9. wget https://bootstrap.pypa.io/get-pip.py
11. sudo pip3 install opencv-contrib-python==3.4.6.27
--------------------------------------------------------------------------------------------------------
Note: While importing opencv if you get error like "ImportError: /usr/local/lib/python3.7/dist-packages/cv2/cv2.cpython-37m-arm-linux-gnueabihf.so: undefined symbol: __atomic_fetch_add_8", then use "sudo pip3 install opencv-contrib-python==3.4.6.27" - this command as the latest version of openCV doesn't work with Raspberry Pi.
--------------------------------------------------------------------------------------------------------
Refer Video:
How to install OpenCV on Raspberry Pi
Step 4: Installing OpenCV Dependencies on Raspberry Pi
OpenCV Python - Installing Dependencies & Libraries | Raspberry Pi
--------------------------------------------- Installing Dependencies: ---------------------------------------------
1. sudo apt-get update && sudo apt-get upgrade
2. sudo apt-get install build-essential cmake pkg-config
3. sudo apt-get install libjpeg-dev libtiff5-dev libjasper-dev libpng12-dev
4. sudo apt-get install libavcodec-dev libavformat-dev libswscale-dev libv4l-dev
5. sudo apt-get install libxvidcore-dev libx264-dev
6. sudo apt-get install libgtk2.0-dev libgtk-3-dev
7. sudo apt-get install libatlas-base-dev gfortran
8. sudo apt-get install python2.7-dev python3-dev
--------------------------------------------------------------------------------------------------------------------------
Refer Video:
OpenCV Python - Installing Dependencies & Libraries | Raspberry Pi
Step 5: Virtual Environment - OpenCV
Let's go to our virtual environment and confirm that OpenCV is correctly installed.
source ~/.profile
Next, let's enter on our virtual environment:
workon cv
If you see the text (cv) preceding your prompt, then you are in the cv virtual environment:
(cv) pi@raspberry:~$
Now, enter in your Python interpreter:
python
and confirm that you are running the 3.5 (or above) version.
Inside the interpreter (the ">>>" will appear), import the OpenCV library:
import cv2
If no error messages appear, the OpenCV is correctly installed ON YOUR PYTHON VIRTUAL ENVIRONMENT.
You can also check the OpenCV version installed:
cv2.__version__
The 3.3.0 should appear (or a superior version that can be released in future).
Step 6: Face Detection - RPI


The most basic task on Face Recognition is of course, "Face Detecting". Before anything, you must "capture" a face (Phase 1) in order to recognize it, when compared with a new face captured in the future (Phase 3).
To detect a face (or any objects), is using the "Haar Cascade classifier".
Here we will work with face detection. Initially, the algorithm needs a lot of positive images (images of faces) and negative images (images without faces) to train the classifier. Then we need to extract features from it. The good news is that OpenCV comes with a trainer as well as a detector. If you want to train your own classifier for any object like car, planes etc. you can use OpenCV to create one.
OpenCV already contains many pre-trained classifiers for face, eyes, smile, etc. Those XML files can be downloaded from haarcascades directory.
import numpy as np
import cv2
faceCascade = cv2.CascadeClassifier('Cascades/haarcascade_frontalface_default.xml')

#For CSI Camera => cv2.VideoCapture(0), For USB Camera => cv2.VideoCapture(1) & For IP Camera => cv2.VideoCapture("Your RTSP Link")

#cap = cv2.VideoCapture(0)
cam = cv2.VideoCapture('rtsp://ip addrss:port/user=admin&password=admin123&channel=1&stream=1.sdp?')


cap.set(3,640) # set Width
cap.set(4,480) # set Height
cam.set(cv2.CAP_PROP_FPS, 10) # FPS

while True:
    ret, img = cap.read()
    img = cv2.flip(img, -1)
    gray = cv2.cvtColor(img, cv2.COLOR_BGR2GRAY)
    faces = faceCascade.detectMultiScale(
        gray,
        scaleFactor=1.2,
        minNeighbors=5,
        minSize=(20, 20)
    )
    for (x,y,w,h) in faces:
        cv2.rectangle(img,(x,y),(x+w,y+h),(255,0,0),2)
        roi_gray = gray[y:y+h, x:x+w]
        roi_color = img[y:y+h, x:x+w]
    cv2.imshow('video',img)
    k = cv2.waitKey(30) & 0xff
    if k == 27: # press 'ESC' to quit
        break
cap.release()
cv2.destroyAllWindows()
Step 7: Face Detection and Data Gathering
Face Detection and Data Gathering:
''''
Capture multiple Faces from multiple users to be stored on a DataBase (dataset directory)
==> Faces will be stored on a directory: dataset/ (if does not exist, pls create one)
==> Each face will have a unique numeric integer ID as 1, 2, 3, etc
'''

import cv2
import os

#cam = cv2.VideoCapture(0) # For CSI Camera
cam = cv2.VideoCapture('rtsp://ip address:port/user=admin&password=admin123&channel=1&stream=1.sdp?') # Use your RTSP Link

cam.set(3, 640) # set video width
cam.set(4, 480) # set video height
cam.set(cv2.CAP_PROP_FPS, 10)

face_detector = cv2.CascadeClassifier('/home/pi/haarcascades/haarcascade_frontalface_default.xml')

# For each person, enter one numeric face id
face_id = input('\n enter user id end press <return> ==>  ')

print("\n [INFO] Initializing face capture. Look the camera and wait ...")
# Initialize individual sampling face count
count = 0

while(True):

    ret, img = cam.read()
    #img = cv2.flip(img, -1) # flip video image vertically
    gray = cv2.cvtColor(img, cv2.COLOR_BGR2GRAY)
    faces = face_detector.detectMultiScale(gray, 1.3, 5)

    for (x,y,w,h) in faces:

        cv2.rectangle(img, (x,y), (x+w,y+h), (255,0,0), 2)
        count += 1

        # Save the captured image into the datasets folder
        cv2.imwrite("/home/pi/dataset/User." + str(face_id) + '.' + str(count) + ".jpg", gray[y:y+h,x:x+w])

        cv2.imshow('image', img)
        print("\n [INFO] Face Sample No.: " + str(count) + " Captured")
    k = cv2.waitKey(1) & 0xff # Press 'ESC' for exiting video
    if k == 27:
        break
    elif count >= 10: # Take 30 face sample and stop video
         break

# Do a bit of cleanup
print("\n [INFO] Exiting Program and cleanup stuff")
cam.release()
cv2.destroyAllWindows()
Step 8: Train the Recognizer
Train the Recognizer:
'''
Training Multiple Faces stored on a DataBase:
==> Each face should have a unique numeric integer ID as 1, 2, 3, etc
==> LBPH computed model will be saved on trainer/ directory. (if it does not exist, pls create one)
==> for using PIL, install pillow library with "pip install pillow"

'''

import cv2
import numpy as np
from PIL import Image
import os

# Path for face image database
path = '/home/pi/dataset'

recognizer = cv2.face.LBPHFaceRecognizer_create()
detector = cv2.CascadeClassifier("/home/pi/haarcascades/haarcascade_frontalface_default.xml");

# function to get the images and label data
def getImagesAndLabels(path):

    imagePaths = [os.path.join(path,f) for f in os.listdir(path)]
    faceSamples=[]
    ids = []

    for imagePath in imagePaths:

        PIL_img = Image.open(imagePath).convert('L') # convert it to grayscale
        img_numpy = np.array(PIL_img,'uint8')

        id = int(os.path.split(imagePath)[-1].split(".")[1])
        faces = detector.detectMultiScale(img_numpy)

        for (x,y,w,h) in faces:
            faceSamples.append(img_numpy[y:y+h,x:x+w])
            ids.append(id)

    return faceSamples,ids

print ("\n [INFO] Training faces. It will take a few seconds. Wait ...")
faces,ids = getImagesAndLabels(path)
recognizer.train(faces, np.array(ids))

# Save the model into trainer/trainer.yml
recognizer.write('/home/pi/trainer/trainer.yml') # recognizer.save() worked on Mac, but not on Pi

# Print the numer of faces trained and end program
print("\n [INFO] {0} faces trained. Exiting Program".format(len(np.unique(ids))))
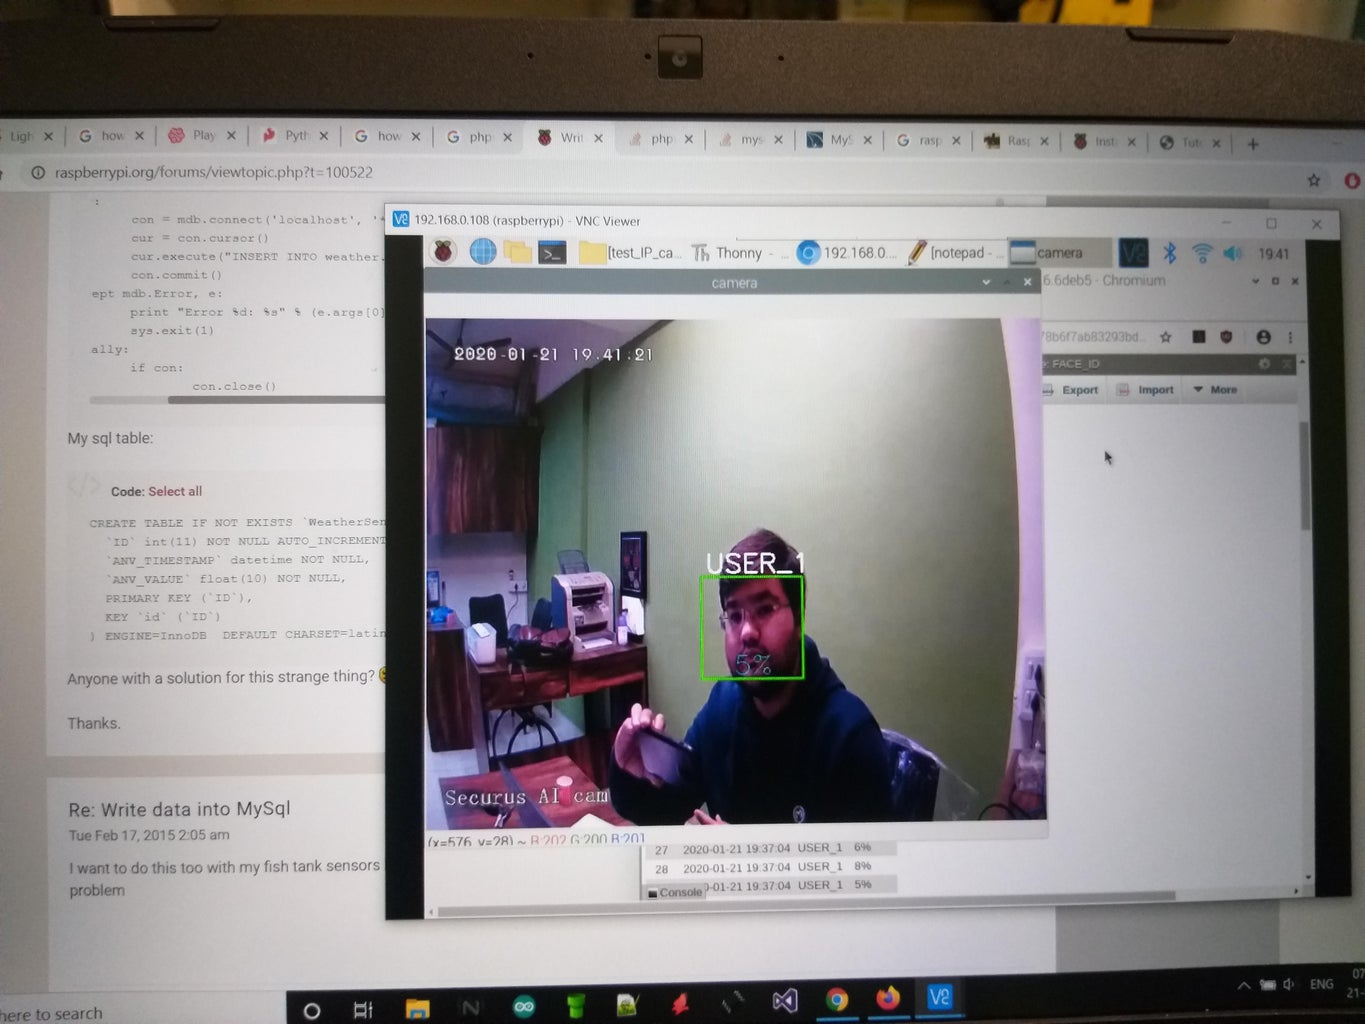
Step 9: Face Recognition
Face Recognition:
'''
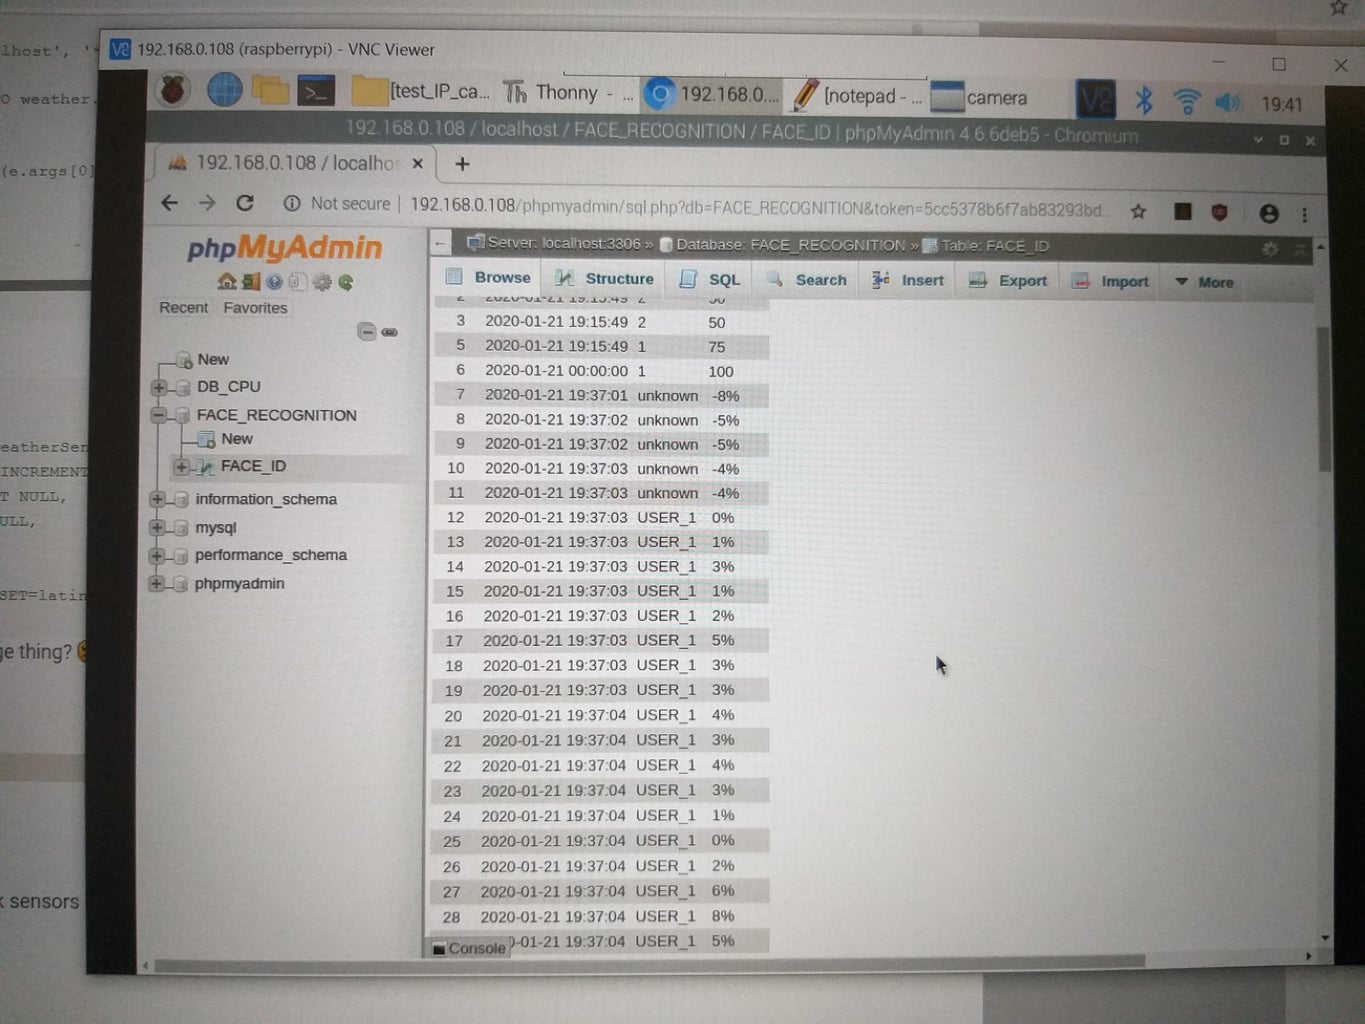
Real Time Face Recogition ==> Each face stored on dataset/ dir, should have a unique numeric integer ID as 1, 2, 3, etc ==> LBPH computed model (trained faces) should be on trainer/ dir ''' import cv2 import numpy as np import os import MySQLdb import datetime con_data = 0 called = False db = MySQLdb.connect("localhost","admin","12345","FIDAR") # Set a cursor object cursor = db.cursor() cmd = os.popen('scp pi@1other pi ip:/home/pi/trainer/*.yml /home/pi/trainer') cmd.read() print("\n [INFO] Trainer File Load Successfully") recognizer = cv2.face.LBPHFaceRecognizer_create() recognizer.read('/home/pi/trainer/trainer.yml') cascadePath = "/home/pi/haarcascades/haarcascade_frontalface_default.xml" faceCascade = cv2.CascadeClassifier(cascadePath); font = cv2.FONT_HERSHEY_SIMPLEX #iniciate id counter id = 0 # names related to ids: example ==> Name 1: id=1, etc #names = ['None', '1', '2', '3', '4', '5'] names = ['None', '1', '2','3', '4', '5', '6', '7', '8', '9', '10', '11', '12', '13', '14', '15', '16', '17', '18','19','20'] # Initialize and start realtime video capture cam = cv2.VideoCapture('rtsp://IP Adress:Port/user=admin&password=admin@123&channel=1&stream=1.sdp?') #cam = cv2.VideoCapture('rtsp://IP Adress:Port/user=admin&password=admin@123$&channel=3&stream=1.sdp?') #cam = cv2.VideoCapture(0) cam.set(3, 640) # set video widht cam.set(4, 480) # set video height cam.set(cv2.CAP_PROP_FPS, 10) # Define min window size to be recognized as a face minW = 0.1*cam.get(3) minH = 0.1*cam.get(4) #Percentage in_min = 0 in_max = 100 out_min = 100 out_max = 0 while True: ret, img =cam.read() # img = cv2.flip(img, -1) # Flip vertically gray = cv2.cvtColor(img,cv2.COLOR_BGR2GRAY) faces = faceCascade.detectMultiScale( gray, scaleFactor = 1.3, minNeighbors = 5, minSize = (int(minW), int(minH)), ) for(x,y,w,h) in faces: cv2.rectangle(img, (x,y), (x+w,y+h), (0,255,0), 2) id, confidence = recognizer.predict(gray[y:y+h,x:x+w]) # Check if confidence is less them 100 ==> "0" is perfect match if (confidence < 100): id = names[id] con_data = round(confidence) print("[INFO] User ID: " + str(id) + " Confidence: " + str(con_data) + "%") #confidence = " {0}%".format(round(100 - confidence)) if not called: cmd = os.popen('aplay "/home/pi/thank you.wav"') # Play Sound File #cmd.read() called = True break else: id = 0 con_data = round(confidence) #confidence = " {0}%".format(round(100 - confidence)) cv2.putText(img, str(id), (x+5,y-5), font, 1, (255,255,255), 2) #cv2.putText(img, str(confidence), (x+5,y+h-5), font, 1, (255,255,0), 1) cv2.putText(img, str(con_data), (x+5,y+h-5), font, 1, (255,255,0), 1) #con_confidence = (confidence - in_min) * (out_max - out_min) // (in_max - in_min) + out_min cursor.execute("INSERT INTO FID_DATA (ID, DATE_TIME, FID, CONF) VALUES (null, now(), %s, %s)", (id, con_data)) # Commit the changes db.commit() cv2.imshow('camera',img) k = cv2.waitKey(1) & 0xff # Press 'ESC' for exiting video if k == 27: break # Do a bit of cleanup print("\n [INFO] Exiting Program and cleanup stuff") cam.release() cv2.destroyAllWindows()
Attachments
Step 10: Database Connector - MySQL
Database Connector - MySQL:
import mysql.connector
from mysql.connector import Error
# initializing bad_chars_list
uw_chars = [';', ':', '!', "*", ",", "[", "]", "'", "(", ")"]

try:
    connection = mysql.connector.connect(host='localhost',database='FIDAR',user='admin',password='12345')
    cursor = connection.cursor()
    cursor.callproc('SP_ADDLOGS',["2"])
    # print results
    #print("Result")
    for result in cursor.stored_results():
        main_string = str(result.fetchall())
        # remove bad_chars
        for i in uw_chars :
            main_string = main_string.replace(i, '')
        print(main_string)
        connection.commit()
        cursor.close()
        connection.close()
except mysql.connector.Error as error:
    print("Failed to execute stored procedure: {}".format(error))
finally:
    if (connection.is_connected()):
        cursor.close()
        connection.close()
        print("MySQL connection is closed")
Step 11: Videos
For the testing, use the following Code:
- 01_face_dataset_IP.py
- 02_face_training_IP.py
- 03_face_recognition_IP.py


