

Introduction: Servo Control With Raspberry Pi Pico W and Blynk App


Hi, it's Loan from Gubutek and it's been a while from the last time we talked about using Blynk app to control servo motor. You can find the video tutorial here
That time I used the Raspberry Pi 2 to control the servo motor but this day is really really hard to find Raspberry Pi as the standalone computer.
In the opposite, you can very easy to find a Raspberry Pi Pico W. It's like eight ten dollars and you can connect it to Blynk app too. In this post, I will show you how to control Servo motor with this new micro controller. Tutorial video is here https://youtu.be/GEYPA-c2pjY
Please consider supporting my work
Buy Me a Coffee https://www.buymeacoffee.com/gubutek
Paypal https://paypal.me/gubutek
Supplies
All the files are accessible at https://github.com/hongloan/Pico-W-Blynk-Servo
Step 1: Understand the Hardware


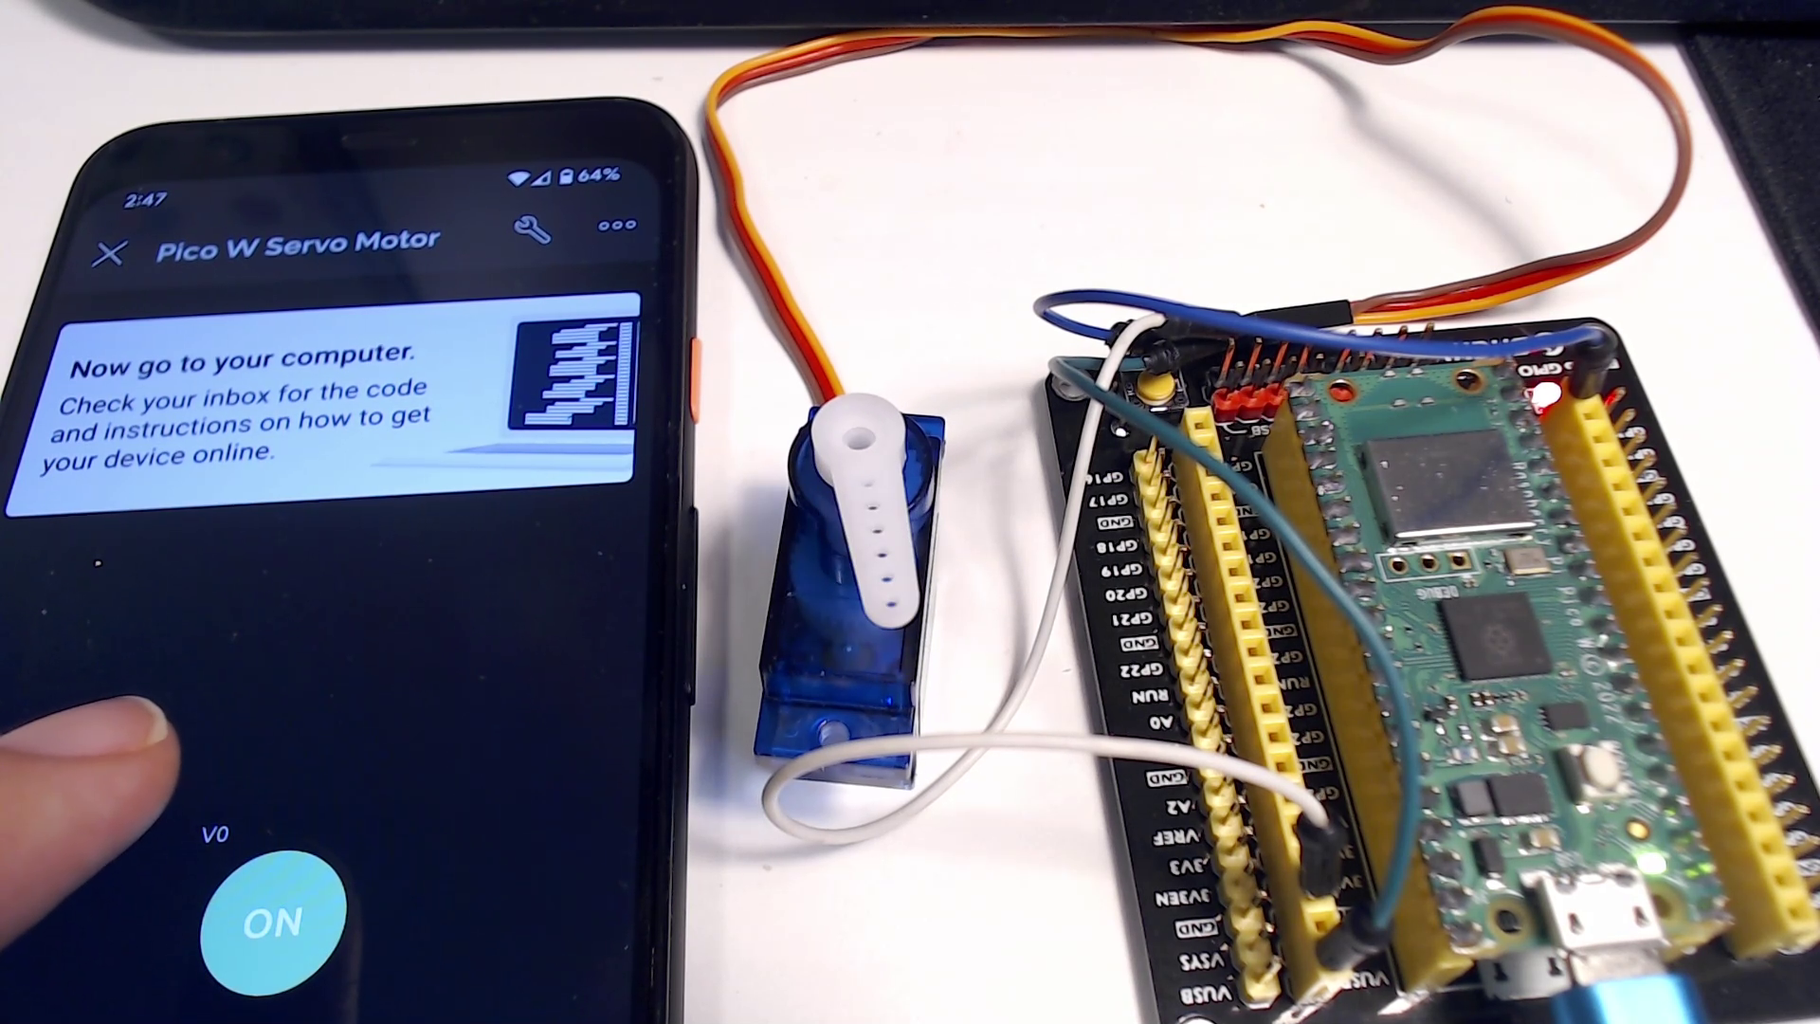
First, let’s talk about the hardware. I used the same servo motor that I used before. It has three wires orange, red and brown:
- the brown one should be connected to the 0V ground
- the red one should be connected to the 5V supply. Some people connect it to the 3.3V of RP Pico but it won’t be enough power for the motor to work
- the orange one is the pwm that you can connect to any gpio pin of the Raspberry Pi Pico W. Here I use the GPIO15.
That's all about the hardwares connection. Let's have a look at how servo motor works. I just have a brief instroduction for people that never have experience with this one. For details you can check on this datasheet
It has a pwm period of 20 milliseconds and the duty cycle can be assigned from 1ms to 2ms
- 1ms position “-90”. It will at the minimum side
- 1.5 ms position “0” it’s gonna be in the middle
- 2ms position “90”. It will at the maximum side
Step 2: Blynk App Create New Project


Blynk app got updated to The Blynk Internet of Things. You can download it from the Google Play and here's my app and my device which I use for the demo but we can start to do all over again
You can add a new device, then choose Quickstart Device. It's faster like that.
You can hardware to Raspberry Pi and connection to Wi-Fi
You can edit some information for example I can change the name of the project to Pico W
Step 3: Blynk App Edit Device Information


The number and type of components depend on the Quickstart template you have there. In my case, I already edited it to have one button.
if you have any difference don't worry you can click on the right side and add the button from the Widget Box
After that, you can change the settings of each widget. When you click on the button you can change the type of button. I choose the switch one so that we have the control level of zero or one. That’s all you need to do for this demo
Step 4: Blynk Console


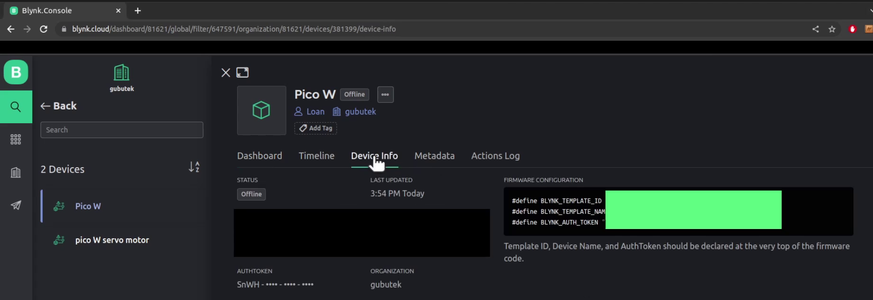
The instruction said that go to your computer check your email to see how to use this kind of thing but you can go straight to your Blynk Console.
I have two divices here. You can just click on the Pico W we just created. You will see a Switch like this. This is the button that we have in the device.
Then go to Device Info you're gonna see the most important thing that we need from the app, the BLYNK-AUTH-TOKEN. You need them to put on your python code so that the you can control it using your cell phone.
Step 5: Python Code


Now let's have a look at our code. First of all you will need to import The BlynkLib app library because that is how you can connect to the Blynk internet of things ( line 4)
Then you need the machine Library this is for you to work with the Raspberry Pi Pico w (line 1)
from machine import Pin, PWM
import time
import network
import BlynkLib
For the the pwm pin first of all you will set the pin connection is number 15 for the GPIO 15. You can choose another pin, just put the correct number there (line 7)
and with this motor because the datasheet said that it's 20 milliseconds and 50 hertz so you can put here pwm dot frequent is 50 (line 8). It means 20 milliseconds of the pwm periods
#set PWM
pwm = PWM(Pin(15))
pwm.freq(50) #20ms PWM period
Then there will one whole section just to connect this one to the internet. You will need your network name, the password (line 12) and the BLYNK-AUTH-TOKEN (line 14)
wlan = network.WLAN(network.STA_IF)
wlan.active(True)
wlan.connect('SSID','Password')

BLYNK_AUTH = "YOUR BLYNK-AUTH-TOKEN"
The button here is v0 so we have a Blynk code on v0 here should to handle when the button is pushed
I put a very simple code which is
- set it go to the left
- go to the middle
- go to the right
- come back to the middle
# Register virtual pin handler
@blynk.on("V0") #virtual pin V0
def v0_write_handler(value): #read the value
    if int(value[0]) == 1:
        print("ON")
        print("Left")
        pwm.duty_ns(1000000) #dutyCycle 1ms
        time.sleep(1)
        print("Middle")
        pwm.duty_ns(1500000) #dutyCycle 1.5ms
        time.sleep(1)
        print("Right")
        pwm.duty_ns(2000000) #dutyCycle 2ms
        time.sleep(1)
        print("Middle")
        pwm.duty_ns(1500000) #dutyCycle 1.5ms
        time.sleep(1)
and when the the button will be off we're gonna just stop the pwm for the servo (line 57)
    else:
        print("OFF")
        pwm.deinit()
        time.sleep(1)
and then we need a while loop to run the Blynk (line 61)
while True:
    blynk.run()
Step 6: Enjoy
Try it with your phone now.
This is how you can control a servo motor using the raspberry pi micro controller with Wi-Fi I hope this is useful for your project.
Happy making!


