

Introduction: Connect Your RevPi Core to Ubidots


Revolution Pi is an open, modular, and durable industrial PC based on the established Raspberry Pi while meeting the EN61131-2 standard. Equipped with the Raspberry Pi Compute Module, the RevPi Core base can be expanded seamlessly using appropriate I/O modules and fieldbus gateways for energy management, process monitoring, machine health and more.
The Rev Pi Core is the foundation to any application and depending on your I/O requirements expansion modules such as RevPi DIO, RevPi AIO, RevPi Gates can be attached as digital, analog, or gateway modules. The Revolution Pi series begins with the base device, the RevPi Core and RevPi Core 3, the central processing unit of the modular system. Equipped with a quad-core processor with 1.2 GHz and 1 GByte RAM, the multi-core processor by Broadcom has enough power for complex tasks such as image processing or edge computing. Installed in a DIN rail housing and powered by 24 VDC the RevPi Core is built to last and requires standard energy input.
In the following guide you will learn how to integrate your RevPi Core and RevPi Core 3 with Ubidots Cloud, simulate Pressure, Temperature, and Humidity readings through a python firmware script, and visualize this data in your own Ubidots application with ease. This tutorial is designed for only RevPi Core setup, if you already have your core compiled and look to now work with some expansion modules, please reference the below setup article for additional integrations and application development: RevPi Core + RevPi DIO
Step 1: Requirements
- Ethernet Cable
- 24V Power Supply
- Revolution Pi Core 3
Ubidots account - or - STEM License
Step 2: Hardware Setup
To begin the setup of your RevPi Core or RevPi Core 3, reference the Quick Start Guide from Revolution Pi to get your device configured and connected. ;)
Once your RevPi Core is configured with the last image version (Jessie) and properly connected device's terminal, execute the below commands:
sudo apt-get update
then:
sudo apt-get upgrade
NOTE: The commands above will take several minutes to update. The whole system is updating, so please be patient.
Step 3: Firmware Setup
We decided to use Python programming language, because of its easy of use with the RevPi Core. If you wish to code an another language please reference the Revolution Pi forum for additional details in firmware support.
If this is your first time working with Python in your RevPi Core, take a peak at this video to become a bit more familiar.
1. To begin writing your firmware, create a Python script in the RevPi Core terminal. We are going to use nano editor, in order to create the new script. To do this run the command below:
nano ubidots_revpi.py
2. Please copy and paste the sample code below into the nano editor. Once pasted, assign your Ubidots Token where indicated in the script. Reference here for help locating your Ubidots token.
In this sample code we have written delay for data communication with Ubidots to be every 1 second. If you wish extend this delay, you can do so simply do so by adjusting the "Delay = 1" line.
NOTE: To save the script into the nano editor - press Ctrl+o, confirm the file name to write (ubidots_revpi.py) and press enter. To close the nano editor press Ctrl+x.
3. Now let's test the script. Run the script previously created in the RevPi terminal:
python ubidots_revpi.py
Once the script begins to run, you will see the successful status code response from the Ubidots Server.
Step 4: Visualize Your Data


Go to your Ubidots account and verify the data has been received. You will see a new device automatically created in the Device section with the device name being the MAC address of your RevPi Core.
The advantage of assigning the RevPi Core MAC address as device label, is that the same script will serve all your RevPi Cores, but needing only to adjust the MAC address in the code. This maintains that from the first time to the last time you send data to Ubidots, the data always remains stored in its proper device in Ubidots.
Don't like the MAC address as your device's name in your Ubidots display? Don't worry! You can change the name to a more friendly one, but the device label will be stay as the MAC address to never get confused which device is which. Check out this help center article to better understand Device Labels and Device Names in Ubidots.
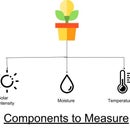
Click on any device in your Device section to visualize the variables being recorded and sent to Ubidots from our sample firmware. As you can see, our sample code has provided three variables: humidity, pressure, and temperature.
IMPORTANT NOTE: As previously mentioned, the data published from the provided sample code is simulated. To begin sensing real world environments, you will need a expansion module of the Revolution Pi. One such as the RevPi DIO, please reference to the article below to build this integration for sensor and actuator readings: RevPi Core + RevPi DIO
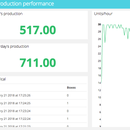
Step 5: Results
In just a few minutes you integrated the RevPi Core with Ubidots, sent some sample data using a mock Python code, and reported your work to Ubidots for data retention, visualization, and calculation. To deploy your Industrial solutions for monitoring or management, check out the full lineup of RevPi expansion modules.
Now its time to create Ubidots Dashboards to visualize and understand your data to make the best decisions, simply and coherently.

![Tim's Mechanical Spider Leg [LU9685-20CU]](https://content.instructables.com/FFB/5R4I/LVKZ6G6R/FFB5R4ILVKZ6G6R.png?auto=webp&crop=1.2%3A1&frame=1&width=306)


