

Introduction: Gun Locker Using Actual Lockers!


This project hit on all cylinders of the holly trinity for me. I needed something, I was able to re-use something and I got to hit something with a hammer - a LOT! Here are a couple of obligatory finished shots with the lockers in their final configuration.
Over the years I've accumulated a few toys, inherited a few toys and marriage brought yet more. I've always wanted someplace to store all of the toys and keep them out of reach of small exploring hands. In the past I've used locking trunks, locking cabinets and a few lock boxes but they either didn't fit correctly or were spread out around the house. I wanted something to hold them all, in one place and offered a basic level of security. To this end I had explored many different ready to buy cabinets. Too small, too expensive, too not what I wanted to use. You know, normal story.
I then started looking around for different, larger lock boxes and happened across a local shop selling some old, beat-up, lockers for a great price. PERFECT!! I fired up Jethrina and we took a short trip to pick them up. They were a bit rusted, a bit dented and we had to split the quad lockers in half to get them loaded which turned out to be a good thing, more on that later.
The general idea was to have the left locker for storage, the center compartment for the boom sticks and the right locker mostly for bags...
Step 1: Stuff You'll Need

LOCKERS
- Quads! Four individual spaces that offer plenty of space to store everything.
- Each locker space is about 15" deep, 15" wide and 78" tall from the floor.
- Each locker shares a wall with its neighbor so when we took the quad and turned it into twins we did this by removing the center steel panel.
TOOLS
- BFH! Yeah baby, I get to use the hammer on those dents!
- Standard Socket Set
- Dremel w/ Cutting Heads
- Wrenches
- Drill w/ Steel Bits
- Electric Saw
- Coping Saw
- Electric Sander
- Face Mask, 3M Chem and Partical - Do use!
- GOOD Pair of Scissors
- Perm Marker
- Long Straight Edge
- Duct Tape
- Tin Snips
- Masking Tape
- Epoxy
MATERIALS
- Paint, Rust-Oleum 'Smoke Gray' (4 Cans)
- Felt, Tan (14 Yards)
- MDF Shelf Boards
- 15" x 3/4" with rounded front (Bottoms)
- 12" x 3/4" with rounded front (Shelves)
- 3M 77 Spray Adhesive (2 Cans)
- White Peg Board
- 1" Machine Screws
- Locks (4 - Set Your Own Combo)
- Misc Wood Strips 1"
- Aluminum Sheet (Left over from roof flashing)
Step 2: Tear It Down...


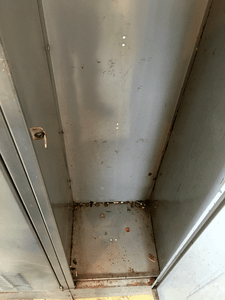


First step is to get the lockers into a bit better shape.
We started be removing all of the shelves, hooks and kick plates. After many years of abuse this was a bit harder than I would have otherwise thought. The main issue was that the nuts and bolts had rusted tight and with the bolts having a round, tapered head there was nothing to grab a hold.
Out comes the Dremel! We used the cutting disk of the Dremel to make a slot into the round bold heads. This made the process of removing them MUCH easier by allowing the use of a flat bladed screwdriver.
Once the extra bits and pieces were removed we spent a few days with the sander. We scuffed up the paint without rust and tried our best to sand out all the rusted bits we could find.
Stop, Hammer Time! Cringe.. - moving on... These lockers were not treated with care and had many, many dents. A few bangs hear, a few bangs there and the lockers were at least square again. We did our best to smooth out the worst of the dents and left the others. I believe they added to the overall "character" of the build or so I tell people when they point them out!
A few days later we had a set of lockers, cleaned up, stripped out and standing straight.
Next!
Step 3: Paint It, Move It and Reassemble!


SPRAY IT, SPRAY IT GOOD
Before painting I did a bit of fix-up work on the lockers. One problem I found was that the door stiffeners had spots welds that had broken. I drilled out a few holes and dropped in some pop rivets. No more spot weld issues!
Next was to tape up the door handles. These were pretty much the only things that I didn't want to cover with paint. There were no locker numbers, although I might some latter, nor locks. Two doors still had their original locks but cheap locks (wafer) and no keys so I removed them.
The 'Smoke Gray' Rust-Oleum I used was paint and primer in one so I just covered everything with a couple of coats of paint. It did a great job of covering everything and left a mostly smooth and uniform finish. It took four (4) cans of paint to cover everything and I didn't spend a lot of time on the top or back. The kicker plates showed a rough surface from all the rust but they look darn good otherwise.
I pained these prior to moving and reassembling because I wanted them done in a well ventilated area. It also allowed me to get into some of the harder spots.
DO THE TIGHTEN UP
These are not the lightest of lockers so it took two of us to move them to my basement. Once there we screwed the two halves back into a quad with one difference, we left out the center dividing panel. We now had four lockers with two regular lockers and one large locker. I used leftover nuts and bolts to reattach the two halves and then Dremeled off the exposed threads for later felt covering.
FIRST PROBLEM!
Turns out the center steel dividers are actually used to hold the locker faces together. Without the center panels the front of the lockers just sort of "hang" loose. Not good. I dug around my parts bin and come up with some copper plated steel straps. I cut them down a bit and the holes lined up PERFECTLY with the perimeter attachment holes. One in the top front, one in top back and then two for the bottom and the locker was immediately strong and secure again. I couldn't believe the luck. If you pull any center dividers you'll need to secure the sides with some sort of tie downs. Without this I wouldn't have been able to create the large center storage compartment.
NOT EXACTLY AIRTIGHT
I know these lockers are far from airtight but I wanted to close them off as much as possible. To this end I used aluminum sheeting (old roof flashing) and cut out squares to cover the larger openings. I first tried heavy duty aluminum folder but it left ridge bumps through the felt. You can see them in some of the pictures. For the rest I used the sheet aluminum, same for the lock holes. I used epoxy to hold the lock covers in place with duct tape holding the rest. I also used duct tape for any spare holes.
NOTE:
I first tried to use hot-glue to hold the aluminum. I read somewhere else that hot-glue might be an issue - spot on! Hot-glue held for a day and then just fell off. The epoxy seemed to hold just fine and the duct tape covering everything should help keep everything tight.
Step 4: Measure Once, Cut Many Pieces


A PLACE FOR EVERYTHING AND EVERYTHING IN ITS PLACE
Once the lockers were painted, together and most of the holes we had to figure out where the shelves were going to be located. From here we used the existing holes in the lockers.
All the lockers had a single hold on each panel for the top shelf. They also had sets of double holds on each panel that ran top to bottom. I figured out what shelves I wanted where and marked the locations with a marker. I then drilled some extra holes so the shelves would hold up to a heavier weight.
Now I knew which shelves were going where.
CUT - IT - OUT
When I was looking for shelf material I was wafting between different types of hardwood and plywood. Hated all my options. My wife stumbled across these MDF pieces that were just PERFECT. One was just short of the 15" depth which was perfect for the shelves and the other was just a bit larger so it was perfect for the floors. Both had rounded noses so again, great for shelves.
I cut out all the shelf boards and did a quick dry fit. I then cut out the floor pieces. During the dry fit I found out that the floor pieces hung up on the securing bolts so I used a saw to cut out the corners. They now dropped right in, perfect fit.
For the center compartment I had some scrap wood that was just the right depth (about 6") so I cut it to the right width and then used a hole saw (2-1/2") to cut rounds out of the front with about a 2" spacing. A bit with the sander and all is good.
The two center boards needed to have a notch cut-out so they would fit flush against the back. There's a lip where the two sides connect so I had to cut out a 1/2" wide and 1" deep notch.
Again, dry fit everything and then mark the boards where the screw holes match up. I pre-drilled all the shelves so the screws would not split the wood.
NOTE:
- MDF is dirty stuff and when you cut them PLEASE use a mask. The dust is supposedly bad juju with your lungs.
- When hole cutting the wood you're going to want to use some sacrificial wood or when the hole saw cuts through the other side it will RIP the edges to smitherens. Trust me on this. My "friend" found out the hard way.
Step 5: Felt It Up!


Now for the part that took the most time, felting up the inside. It helps if you have a LONG straight edge ( I used an old piece of track lighting ) and good scissors.
When I marked the felt for the cut lines I used a permanent marker with the straight edge. I also marked up the "glue" side (same side as the marking side) with the same pen as to not confuse the two sides. I always wanted to the marker side to be the glue side because when I cut the lines a bit of marker would show on one side or the other or both. This way any markings would always be hidden.
I also did the left two outer lockers before the center space. This allowed me to cover the exposed shelf screws in the center compartment with felt. I didn't mind exposed screw heads in the outer lockers as they're mostly for box storage.
Here's a hint. Measure and then cut a BUNCH of pieces. Trust me, it will go so much faster that way.
Here's another. MASK the inside door opening slide on each locker. There's a piece of metal, the height of the door, right behind the opening lever. This has to slide up and down easily. If you glue it closed or something gets glued to it the door will NOT open. Again, friend told me..
*/*/* DANGER *\*\*
These glue fumes are dangerous. Please use a proper respirator or over plentiful fresh air. It will also out gas for several days as it dries. My friends wife was VERY upset about that. Not sure which was worse!
DOORS
Easiest to do. Simply measure, gut and glue! These were first.
WALLS / CEILING
Here's the order that I applied the felt
- Back
- Side
- Side
- Top
You may find that a different order works for you better.
I applied a bit of spray glue to the top of the felt so I could attach it to the locker and then sprayed more glue as I worked my way down. If you have to pull it off to correct the position don't forget to hit it with some more glue. The felt smooths out well but carries every bump and surface deformity.
Mark the shelf holes and then push an awl or something through. Pushing a screw through without the hole causes the material to get caught up in the threads.
NOTE: The width and depth are slightly different so for the ceiling piece I marked the sides as not to mix it up when glued into place.
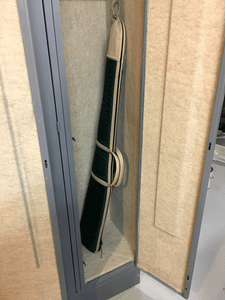
CENTER COMPARTMENT
This was a bit different. I was going to install some peg board below the top shelf so I marked off it's position and just felted above and below. I didn't use one piece because of the center lip so I used two.
I used a single long and thin strip to cover the center lip
Remember those pieces I used to secure the center compartment from falling apart? A small piece of felt patch and some glue and they're covered.
SHELVES
Easy to do. I measure out a 15" wide, full length piece of felt and dry fit a shelf. Place the back end to the edge, lay flat, flip over and then mark the other end. Cut, glue and then wrap. I wrapped it the same way I measured it. Lay it flat with the back edges matching and then flip over. Run your hand over to smooth it out and adhere the glue and lay aside to set. Don't worry if there's a little flap over the edges, these will tuck away. Cut any large access.
FLOORS
I did the floor pieces the same way as the shelves. Measure, glue, wrap. The only difference is that I snipped the corners because of the cut outs. This helped them drop in a bit easier and fit better.
CENTER HOLDER SHELF
This turned out a bit better than I expected. I measured the width of the wood and cut a LONG strip of felt. Out of this I cut individual pieces that measure the curve of the wood. Glue, attach, smooth. Turned out pretty darn good! The wood itself had a light stain applied, sanded and then another quick coat.
INSIDE DOOR LIP
Similar to the rear wall, the front wall (the piece where the two front pieces come together) also has a lip. You don't normally see it but it's there and cause cause issues so I also glued a strip of felt to it as well.
Step 6: Putting It Together


Wow, it really started coming together at this point. With the shelves and felt it looks "almost" professional if you don't look really close. It has a very high WOW factor when you show someone the locker and then open the doors. The tan felt was a good color choice and really pops with the gray.
PEG BOARD
It was suggested that I have a place to mount and hang a bunch of miscellaneous bits and pieces so a peg board sounded like the most appropriate choice. White was all I could find and I didn't feel like painting it. didn't turn out so bad after all.
I cut some scrap pieces of wood (1x1) and cut gaps to mount across that infamous center lip. I secured them with the same sheet metal screws as the shelves.
I then measured the board, cut and then secured to the mount points. That's all there was to the peg board.
FINISHING UP
At this point everything was pretty much finished. I drilled some extra screw holes on the shelves because I wanted to be doubly sure they would hold weight.
So now we had the point done, the felt was in place and all the shelves where up and in. With the peg board installed the only thing to do was to slide the unit into it's final space and load it up!
Step 7: TADA!


If I had to do this again I would make a few changes but this turned out better than I expected and is everything that I was looking for in the build.
If you're interested in building something similar to this I would highly suggest taking it on. It's not really hard, just a bit time consuming. It's also very customizable. More shelves, less shelves, one large center compartment? This build will allow you do it it all.
I loaded up the cabinet, threw on four new combo locks and called it a day.S
DONE!


