

Introduction: MYDIYCNC Engraving


Hello There!
This is Tory at MYDIYCNC. This is one of the first of my instructable tutorials demonstrating one of the many ways you can use your MYDIYCNC machine. Our machines can be used for a wide range of projects from 3D Milling, Laser cutting, Engraving, PCB prototyping, and more! This tutorial will just be a brief step by step on how to engrave on your MYDIYCNC Machine. Anyone can do it, its fun, unique, and can have endless possibilities.
LETS GET STARTED!
Step 1: Create Your G-code
You will need to Create your G-code. Familiarize yourself with programs such as Inkscape,Makercam, and FabCam
How you start is you find an image online that you want to engrave. Generally black and white images seem to be the easiest. Download your image, then you want to download software called Inkscape, once you have downloaded that then you want to import the image you have downloaded then you will need to "trace the image", tracing the image will turn the image into more of an outlining with solid lines minus all of the extra unneeded details.
Once you have traced the image you want to save the image as an SVG File. Once you have done this you can move on to actually making the G-code. Go to a website program called makercam.com. Here you will be able to set things like, depth of cut, number of passes, and tool selection.
Now when you are finished, export your G-code and save it to your computer.
Step 2: Get Your'e Supplies Ready


You will need:
1. Your milling material, in this case we are using a small piece of black acrylic.
2. Something to bond your material to your milling bed, we are using some basic carpet tape which holds very well.
3. Apply your bonding material to your milling material, basically tape on all sides should do well.
3. Your end mill, we are using a V-shape 45 Degree end mill today, these work great with acrylic, any V-shaped end mill should work just fine.
4. Of course you will need your MYDIYCNC machine!
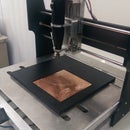
Step 3: Prepare for Lift Off


Coming up on the finale, time to put the final touches.
Now once you have your G-code created, supplies prepared, and MYDIYCNC machine set up...... You can begin.
With your milling material bonded to the machines milling bed, go to FabCam and jog your machines end mill to its home position. You want to make sure your home position allows for the correct size milling area that is needed to complete the project. The tip of the end mill needs to be just right above barely touching the material. Once your position is correct, go ahead and "Set Home Position." With everything in place, and nothing obstructing the movement of your machine, Process your G-code, and watch your MYDIYCNC do its magic.
Step 4: Admiring Your MYDIYCNC's Work


Now that you have created your G-code, prepared your machine, and set it to do its job, you can sit back and relax.
Take some time to get a coffee, maybe even start on your next project!
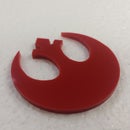
Once your MYDIYCNC machine has finished, simply remove the acrylic from the machine and Voila!
You have Successfully created an engraved piece with your own MYDIYCNC machine.
Now the question is...... What Will You Create?? Our team here at MYDIYCNC is eager to see what work you have done with your own MYDIYCNC machine. Check our website mydiycnc.com and sign into your account to check out any contests we have currently. We would love to see your work!
Thank you for being part of our MYDIYCNC world!


