

Introduction: Seam-Ripping Continuity Meter


Videos:
Step 1: Materials and Tools

Materials
- seam ripper with metal blade
- LED
- coin cell battery holder
- 3V coin cell battery
- wire
- alligator clip
- shapelock
Tools
- pliers
- soldering iron
- wire clippers
- hot water boiler
Step 2: Dismantle the Seam-ripper


Use a pair of pliers to pull the metal part of your seam ripper out of its plastic handle. Most seam ripper models are relatively similar and easy to dismantle this way.
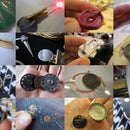
Step 3: Solder the Parts Together


Strip some wire and wrap it around the end of your seam ripper as shown in the photos. Wrap it tight and solder the wire to keep it in place. Clip the leads of your LED and solder the positive lead (longer lead) to the wire wrapped around the end of the seam ripper with the LED facing forwards.
Cut a short piece of wire and solder one end to the other leg (negative) of the LED and the other end to the negative connection on your coin cell battery holder.
Take an alligator clip connector and cut off one of the clips, leaving the cable attached to the other clip as long as possible. Solder the cut end of this alligator clip cable to the positive lead on your coin cell battery holder.
Step 4: Testing and Trouble-shooting

Insert the battery into the battery holder and when you touch the alligator clip to the tip of your seam ripper, then your LED should light up.
If your LED doesn't light up, then it is likely that the metal of the seam ripper is coated in a thin layer of isolating varnish. Take a knife and scrape the surface of the seam ripper. Try again. If it still does not light up, make sure your battery is full and the orientation of your LED are correct.
Step 5: Shape the Shapelock


Boil some water and add a handful of shapelock pellets. Wait for the pellets to turn clear, then mix them so that they stick together. Remove the clump from the hot water and shake to remove the hot water so that you can hold it in your hands.
Working quickly, but not stressing, shape the clump of shapelock around the tip of the seam ripper, the battery holder and the alligator clip. See pictures for final shape.
Test to make sure LED is still lighting up.
Step 6: Rip a Seam

When the time comes and you've sewn a connection with conductive thread and it is connected to parts of the circuit that it shouldn't be touching, use your seam-ripping continuity meter to undo the seam so that you can see when you've successfully disconnected it. Remember to clip the alligator clip to a part of the circuit you wish to disconnect from before starting to rip the seam.

Participated in the
4th Epilog Challenge


