Introduction: 3D Printed M8 Drink Holder With Magnetic Bottle Opener and Tripod

Summer is coming, get ready to prevent your drinks from getting knocked over!
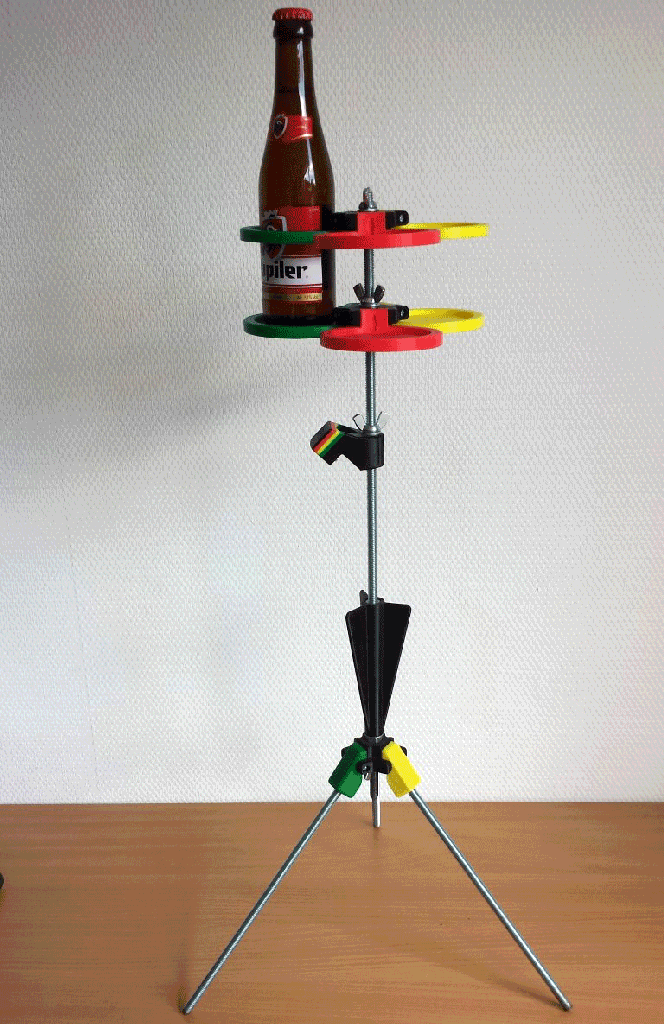
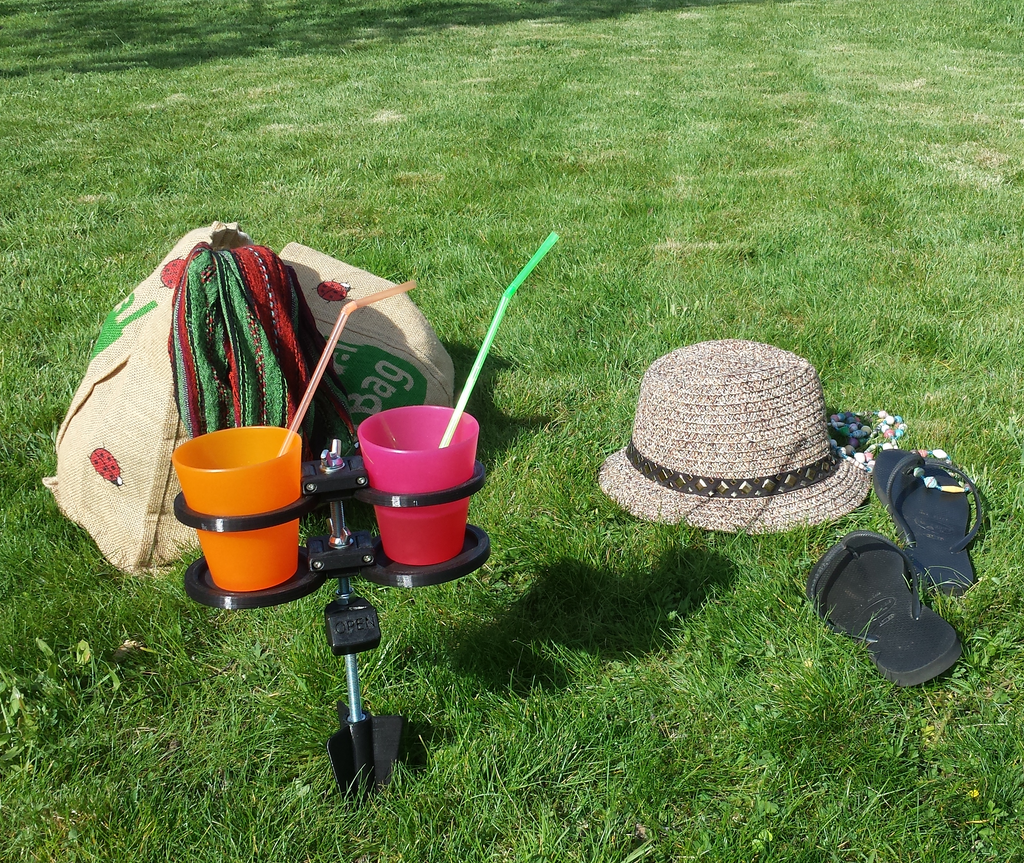
I needed a drink holder that is strong, stable, compact (must fit in my beach bag) and versatile. After googling around without finding something to fulfil my needs I decided to design my own "perfect" cup holder. I'm using M8 threaded rod, nuts and washers as a base to fit everything together because these seem to meet my project goals. M8 threaded rod is especially very versatile, imagine all the stuff you could attach to your drink holder or all the other stuff you could connect your drink holder to. I already made a M8 tripod, a beach piercer and a bottle opener with magnet to set an example. I hope you will design and/or share your own ideas to make this drink holder (or whatever it will evolves to) even more perfect.
Read the next steps to discover more...

Note: this is my first instructable and I tried to be as thorough as possible. If something is not clear or you have a genius idea to enhance the drink holder, please leave a comment so I can improve this instructable.
Step 1: List of Materials and Tools
I tried to keep the variety of the materials needed for this project as low as possible. Use ebay (or similar) to source the parts that you can't find in your local hardware store.
List of the materials used in this project (quantities depend on the chosen design and addons)
- M8 threaded rod(s)
- M8 nuts and washers (optional M8 nylocnuts)
- M8 wing nuts or printed thumb wheels for M8 nuts
- M3 bolts with cylinder flat head 3cm long (I used socket cap screws but any type will do)
- Disc neodymium magnet (10mm diameter and 3mm thick, used for bottle opener but can be admitted)
- Printed plastic parts (see next step)
Tools you need for assembly
- 2.5mm allen/hex key (for M3 socket cap screws)
- Lighter (for heating nuts when necessary)
- 3mm drill bit (for cleaning out screw holes)
- Crafts knife
3D printer or 3D printing service
Example: quantities for full option triple design
- 1x 50 cm M8 threaded rod as base pole (you can choose the exact length)
- 3x 25 cm M8 threaded rod for tripod legs (you can choose the exact length)
- 3x M8 wingnuts (or M8 printed thumb wheels)
- 9x M8 nuts (from which minimum one nyloc nut)
- 5x M8 washers
- 1x neodymium magnet (I used N52 strength)
- 9x M3 bolts (3cm long)
- 9x M3 nuts
Note: when possible try to find stainless steel threaded rod, nuts and bolts these are more expensive but also are more durable as they won't oxidate/rust when leaving outside.
Step 2: Discover More About the M8 Drink Holder
The drink holder consists out of two joints (pink) screwed on a M8 rod. The joints will fit the top support (ring) and the bottom support (plate) blue pieces. I've made a double drink holder and a triple version. The only parts that differ between the double and triple designs are the joints. All other parts/addons are interchangeable and will fit both designs.
Ok, let's learn more about the plastic parts.
Basic parts
- Double or triple joint (pink)
You will need minimum two of the same type to assemble a drink holder. The joints have insets for M3 screw heads with a maximum head diameter of 6mm (the insets are sized 6.2mm). I used 3cm long stainless steel M3 socket cap screws which I sourced on ebay. You will need two or three of these for every joint piece.
- Top and bottom support(blue)
The top blue piece is the ring to prevent your drink from falling. It is 7cm in (inner) diameter so it will fit most cans, bottles and glasses. The bottom blue piece is the part that actually will carry your drink. It has a rim of 4mm high to prevent your drink from slipping of. The rim and ring are 2mm wider at the joint area for a better force distribution. Both pieces can fold together to make the drink holder easier to carry. You can see a small inset bottle across the top half and the bottom half of the blue pieces. This is for preventing delamination but it is also decorative. The inset icon makes the model more strong by increasing the contact area in the weakest zone (between layers) and by decreasing the interior volume to force the printer (in fact the slicer) to generate a higher local infill. The blue pieces have insets that will fit M3 nuts for assembly. The nuts are located at the inside of the joint (between pink and blue pieces) to prevent it from falling out.
Addons
- Beach piercer (purple)
Suitable for soft grounds like the beach but works on a lawn too, prevents the cup holder from spinning. You need two M8 nuts and a washer for assembly.
- Tripod mod (green)
I made the tripod especially because I wanted to use the drink holder on my porch and terras. You will need three of the green pieces together with a single triple joint piece (pink) to assemble the tripod. The legs of the tripod can fold together. I found it a bit disturbing that the legs didn't stay in the correct position while moving the drink holder so I also made a lock ring (yellow) for the legs. You can screw a beach piercer to every leg of the tripod to make your M8-drink holder look extra tough.
- Bottle opener (orange)
The bottle opener can hold a magnet to guide your unopened bottle in the correct position for popping it's cap of (45°). The magnet also prevents the bottle cap from falling and loosing it (we want to keep the beach clean). You will also need a M8 washer and nut for assembly.
Step 3: Decide and Download the 3D Files (STL)
Now you know what pieces are available it's time to decide whether you go for a double or triple version or both (or combine more then 2 joints on a single threaded rod to hold even more drinks). Select and download separate STL files or get everything at once by downloading the attached "M8 drink holder.zip" file at the bottom of this step. All files are metric (in millimetres)
Note: If you don't have a 3D printer and you don't know someone that has one you might consider printing the files through 3Dhubs. Have a look at their website, you'll be amazed how many 3D printers are in your neighbourhood ready to print (btw I'm a hub too :-)!
Attachments
Step 4: Printing the Parts
Note: If you don't print the parts yourself it's wise to link this instructable to your printer guy or girl as this step contains important information to get high quality (read strong) prints.
I'm printing the parts on my home build reprap 3D printer with PLA filament (ABS, nylon, etc should be fine too). I'm using Repetier host to control my printer and Slic3r to slice the 3D models (I love open source!).The parts are designed for FDM printing but they are also printable with other 3D prototyping technologies (SLS, SLA). I recommend FDM printing as the other options are too expensive and may not result in strong parts.
I'm printing all parts with 3 solid top and bottom layers as well as 3 perimeters. I printed the parts at 0.3mm layer height and 30% rectilinear infill (more is good too but probably overkill). These settings will assure you that you will end up with super strong parts that will last (virtually) for ever. You could consider printing at a higher resolution (layer height < 0.3 mm) but that will significant increase the printing time. In case a part get damaged you can simply print a replacement!
For reference, here are the extrusion widths I'm printing at:
perimeters extrusion width = 0.50mm
infill extrusion width = 0.70mm
solid infill extrusion width = 0.33mm
top infill extrusion width = 0.36mm
Note about perimeter width: If you are printing with narrower perimeters (< 0.5 mm) I recommend adding extra shells to compensate the thinner total wall thickness (I used 3 shells * 0.5 mm perimeter width = 1.5 mm wall thickness)
All the models in the STL files (see previous step) are ready to print. This means that they are manifold and flat to the print bed (z origin = 0) with the correct side down (it's safe to rotate on the z axis or move the parts to fill your plate). None of the parts need support material. The bottle opener is probably the hardest part to print because there is some overhang (I printed without cooling and they all came out perfect). The text on the bottle opener is facing down so you might need to reduce the print speed even further (first layer) to be sure the outlines of the letters are laid down crisp and clear. It's possible that you need to clean out the letters due to the "elephant feet effect" of the first layer but this entirely depends on how much you squeeze the first layer (perimeter extrusion width) and on the initial distance between nozzle and printing bed.
As always it is important that the first layer sticks well to the bed. This is especially important for the bottom support piece as it is prone for warping. You can consider to print this piece with a brim but that will give you extra cleaning work (I'm lazy so I didn't). I discovered a way to achieve excellent bed stickiness onwhite painters tape (yes, you read that correct it's white painters tape) by treating the tape with acetone (nail polish remover). Just put some acetone on a napkin and wipe the surface of the tape with it before you start a print (you only need to do this once). You can control the bed adhesion by the amount of acetone applied but that needs some practise. A downside is that the tape will be difficult to remove from the glass (especially on printed areas). This can be solved by placing the glass plate in a (hot = faster) water bad. The tape will come lose in one piece almost immediately without leaving glue marks. I'm using the cheapest white painters tape I could find (1 euro/roll) and do not heat my bed. Since I discovered this trick I never had any warping.
Before you start printing don't forget to check the slices generated by your slicer. Are the perimeters touching each other, are the top layers properly filled.
Estimated print times
It will take some time to print all the parts but I promise you will be rewarded with the best and coolest drink holder you ever owned! The mentioned printing times (see below) are based on the following speed settings in Slic3r. You can significant reduce the printing times by printing parts together.
Perimeters: 40 mm/s
Small perimeters: 30 mm/s
External perimeters: 70%
Infill: 70 mm/s
Solid infill: 60 mm/s
Top solid infill: 60 mm/s
Bridges: 60 mm/s
Gap fill: 20 mm/s
Non-print moves: 150 mm/s<br>
Top ring (± 40 min)
Bottom plate (± 55 min)
Triple joint ( ± 40 min)
Double joint ( ± 35 min)
Beach piercer ( ± 3 hours 15 min)
Tripod piece ( ± 40 min)
Bottle opener ( ± 1 hour)
Step 5: Assemble the Basic Parts
Assembling the M8 drink holder isn't rocket science. If you are familiar with the Reprap project you could probably skip the assembly steps. If you printed the parts with an of the shelf 3D printer (or used a 3D printing service) you might consider reading further.
Cleaning parts
Prefit a M3 bolt in the joint holes from the pink and blue pieces. You can clean out the joint holes with a 3mm drill bit when necessary. If the parts are printed with a well calibrated printer no other clean up should be necessary.
Insert nuts
Insert a M8 nut at the bottom side of the pink joint pieces. The inset is sized for a tight fit so you may need to heat the nut with a lighter (be careful, do not overheat or you will ruin your part). The inset is 9mm deep so it will also fit a nyloc nut (prefit a normal nut because you can't heat up a nyloc nut).
Now we need to add a M3 nut to the blue support pieces. As you can see there are insets at both sides of the joint. You can insert two nuts if your M3 bolts are threaded along the whole length. I used socket cap screws that I had laying around which are not fully threaded so I inserted only one M3 nut (what is fine too). However, in this case you need to be sure that the nut is inserted at the correct side (i.e. the opposite side of the screw head). Again, you may need to add some heat to the nuts to fit them more easily.
Screw joints together
When all the nuts are in place you're ready to screw the pink and blue pieces together with 3cm long M3 bolts. Be sure to screw them whole the way down without over tightening them too much. This should be easy when the M3 nuts are aligned properly with the holes. The nuts can't be lost since they are held in place between the two parts.
Step 6: Assemble the Addons
After assembling the basic parts it should be self explanatory to assemble the addons. However I will walk through the process real quick.
- Beach piercer
Insert a M8 nut to the top of the beach piercer (widest side). Screw it on the main threaded rod and add a washer and (preferably) a nyloc nut at the point side of the part. I used a nyloc nut oriented with the rounded side down as this will reduce friction a bit while penetrating the beach. Also the nylon ring in the nut will clean the threaded rod from sand and dirt that would otherwise be stuck between the screw threads. The washer is needed to protect the plastic during piercing. You can sharpen the end of the threaded rod with a grinder. We will tighten the beachpiercer in the next step.
- Tripod
Add a M8 nut to a triple joint piece. Also add a M8 nut to the slots of the tripod pieces. Here the nuts only fit when you slide it in with a corner first. Make sure they align the hole so the legs can be screwed in easily. Insert one or two M3 nuts at the joint sides and screw everything together. Mind that the joint piece is used upside down for the tripod mod (inserted nut up).
- Bottle opener
Insert a M8 nut for attaching the bottle opener to the threaded rod. Also insert a M8 washer in the dedicated slot under the "open" text. If your washer does not fit you need to heat it up (do not overheat!). If your washer fits too loose you can put some tape around it to make it thicker or find another washer that fits snug. You also have the ability to add a round neodymium magnet (10 mm diameter and 3mm thick) to the bottle opener. Add the magnet to the dedicated slot and push it in the channel. It should be a tight fit.
Step 7: Srcew All Assembled Parts on the M8 Threaded Rod
In this step you need to keep one rule in mind: always add a washer between a (wing) nut and a plastic part unless the nut has a dedicated inset/slot!
Add all assembled parts to your base threaded rod. I'm using wing nuts to fix the parts in place. The washers will protect the plastic from wearing out. The beachpiercer should be tightened well (use a spanner) so it can not spin around. I kept a 6cm spike on the threaded rod so there is place to attach the lock ring for the tripod and it also helps to increase the stability. All holes that should fit a M8 threaded rod are sized for self tapping.
Step 8: Enjoy Your M8 Drink Holder With Mates
Congratulations, you should now have a fully assembled M8 drink holder! Here are some pictures of the drink holders I printed. I did some tests in my backyard to evaluate if the design is practical and strong enough. Well, I can tell you that it is!

Participated in the
Mind for Design

Participated in the
3D Printing Contest


