Introduction: ARDUINO SANITIZER DISPENSER(Tinker CAD)
Hi guys , here's the instructable for automatic sanitizer dispenser . This would help you out prevent corona virus and keep your hands clean and neat.Check out my other instructables too.
Supplies
You need only basic components for this, which are easily available in electronic shops and online.
Materials needed:
*Arduino UNO
*Ultrasonic sensor
*Servo motar
*A to B Arduino cable(For programming)
*Pc or Laptop for programming
*Sanitiser bottle
*Steel wire
*Happiness to start the project
Step 1: Connecting the Circuits.
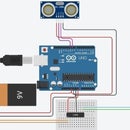
Look at the image of circuit diagram which is made with tinkerCAD circuits, to have a better view of the connections. Assemble the circuits in the same way.
Step 2: Modelling the Dispenser
All what you need to do is take the sanitiser bottle and fix the ultrasonic sensor on the middle. Fix the servo at the bottom by connecting the steel wire with servo and sanitizer bottles pressing area. Fix the Arduino at the back and cover it with some coverable items like cardboard.Just design your own dispenser with your own creativity.Check out the image for further clearance.Clear images available online, check out the idea models.
Step 3: Code Your Project
Just simple connect the arduino to your computer or laptop with the arduino IDE app.Copy and paste the following code:
// defines pins numbers
const int servo = 9;
const int trigPin = 10;
const int echoPin = 11;
// defines variables long duration; int distance;
#include
Servo myservo; // create servo object to control a servo // twelve servo objects can be created on most boards
int pos = 0; // variable to store the servo position
void setup() {
pinMode(trigPin, OUTPUT); // Sets the trigPin as an Output
pinMode(echoPin, INPUT); // Sets the echoPin as an Input
myservo.attach(servo); // attaches the servo on pin 9 to the servo object
myservo.write(0); // Sets Servo to initially 0 degrees
Serial.begin(9600); // Starts the serial communication }
void loop()
{ //
digitalWrite(trigPin, LOW);
delayMicroseconds(2); // Sets the trigPin on HIGH state for 10 micro seconds
digitalWrite(trigPin, HIGH);
delayMicroseconds(10);
digitalWrite(trigPin, LOW); // Reads the echoPin, returns the sound wave travel time in microseconds duration = pulseIn(echoPin, HIGH); // Calculating the distance
distance= duration*0.034/2; // Prints the distance on the Serial Monitor
Serial.print("Distance: ");
Serial.println(distance); //Servo
if(distance<10){ //Check distance is less than 10cm
myservo.write(45); // Sets Servo in stages from 0 to 180 degrees so soap does not pitch out.
delay(100);
myservo.write(90);
delay(100);
myservo.write(135);
delay(100);
myservo.write(180); //Ajust how far you want the servo to go.
delay(1000);
myservo.write(0); // Reset the servo to 0 Degrees
delay(3000); //Delay the next time someone can get soap ,done by Vedanth.k
}
}
Step 4: Tutorial!!

Participated in the
Arduino Contest 2020


