

Introduction: Accelerometer With Micropython Using BharatPi Board


In this blog, you’ll learn how to use the Accelerometer Sensor with the ESP32 using Micropython firmware. This tutorial covers how to wire the sensor to the ESP32 boards and provides a simple Micropython script for Accelerometer.
In this project, we are using Bharat Pi which has both an ESP32 microcontroller and a SimCom A7672S 4G/LTE module.
Bharat Pi is an IoT prototyping board for students, innovators, startups, and developers. A simplified board with an all-in-one compute, network and storage on a single board to build rapid prototypes.
Accelerometer:
- Measures acceleration along three axes: X, Y, and Z.
- Provides data about the static acceleration due to gravity as well as dynamic acceleration in all three dimensions.
- Useful for detecting orientation, tilt, and motion of an object.
- Typically outputs data in units of g (acceleration due to gravity), with 1 g representing the standard acceleration due to gravity at the Earth's surface (approximately 9.8 m/s²).
Supplies


Parts required:
Here’s a list of the parts you need,
1. ESP32
2. Accelerometer sensor
3. USB Cable
4. Jumper wires
Pre required:
To follow this instruction you need an IDE to write and upload the code to your board, you can use uPyCraft IDE or Thonny IDE.you also need Micropython firmware installed in your ESP32 boards.
If you don't have the setup means then you can check the README file of installing and setup of uPyCraft in our Bharat Pi github page you can find the link below,
> https://github.com/Bharat-Pi/MicroPython/blob/main/README.md
Step 1: Accelerometer

The MPU6050 is a popular integrated circuit (IC) that combines a 3-axis gyroscope and a 3-axis accelerometer into a single package. It's commonly used in various projects and products for motion sensing and tracking applications.
The MPU6050 integrates both accelerometer and gyroscope data and provides a convenient way to access this information through an I2C (Inter-Integrated Circuit) interface. By reading data from the MPU6050's registers via I2C communication, you can obtain real-time measurements of acceleration and rotation, which can be processed and utilized for various purposes in your projects.
Step 2: Schematic - Esp32 With Accelerometer
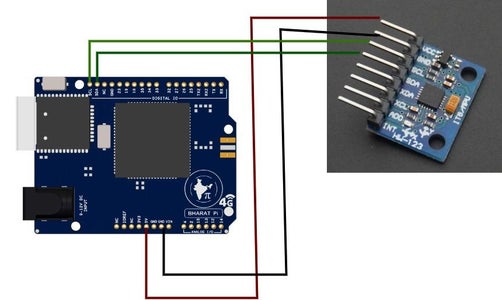
In this section, we will see how to connect Accelerometer sensor with ESP32. The Accelerometer sensor will be connected with the ESP32 board with its pins.
Follow the schematic diagram for the ESP modules and connect them accordingly. Connect the ESP32 device with the Accelerometer sensor as shown in the schematic diagram above:
Pinout of the Accelerometer Sensor :
Accelerometer Sensor - ESP32
VCC - Power Supply
SCL - SCL
SDA - SDA
GND - GND
Wire the Accelerometer sensor to the ESP32 as shown in the following schematic diagram. We’re connecting the vcc pin to 3v/5v and the sda pin to sda, scl pin to scl of esp32, and GND pin to GND of esp32.
ESP32 Wiring With Accelerometer Sensor :
Accelerometer Sensor - ESP32
VCC - 5V / 3V
GND - GND
SCL - SCL
SDA - SDA
Step 3: CODE Snippet

Before uploading the code to esp32 install the necessary library go to > tools > manage plug-ins > search for mpu6050 lib> install that library > Close.
from machine import Pin, SoftI2C
import time

# MPU6050 Register Addresses
MPU6050_ADDR = 0x68
MPU6050_ACCEL_XOUT_H = 0x3B
MPU6050_PWR_MGMT_1 = 0x6B

# Initialize I2C
i2c = SoftI2C(scl=Pin(22), sda=Pin(21))

# MPU6050 initialization
i2c.writeto_mem(MPU6050_ADDR, MPU6050_PWR_MGMT_1, bytearray([0])) # Wake up MPU6050

def read_acceleration():
  # Read raw acceleration values
  data = i2c.readfrom_mem(MPU6050_ADDR, MPU6050_ACCEL_XOUT_H, 6)

  # Convert raw data to acceleration values
  accel_x = (data[0] << 8 | data[1]) / 16384.0
  accel_y = (data[2] << 8 | data[3]) / 16384.0
  accel_z = (data[4] << 8 | data[5]) / 16384.0

  return accel_x, accel_y, accel_z

# Main loop
while True:
  try:
    accel_x, accel_y, accel_z = read_acceleration()
    print("Acceleration (m/s^2):")
    print("X:", accel_x)
    print("Y:", accel_y)
    print("Z:", accel_z)
    print("-----------------------")
  except OSError as e:
    print("Error reading from MPU6050:", e)
  time.sleep(1)
Step 4: Applications
- Motion-controlled gaming devices
- Gesture recognition systems
- Inertial measurement units (IMUs) for robotics, drones, and other mobile devices
- Motion tracking and analysis in sports science and healthcare
- Virtual reality (VR) and augmented reality (AR) systems
Step 5: Demonstration


![Tim's Mechanical Spider Leg [LU9685-20CU]](https://content.instructables.com/FFB/5R4I/LVKZ6G6R/FFB5R4ILVKZ6G6R.png?auto=webp&crop=1.2%3A1&frame=1&width=306)


