

Introduction: Blackout Poetry With Makey Makey and Scratch


You will learn to create poems out of old book pages and make your poetry interactive with Scratch and Makey Makey!
Supplies
Makey Makey Classic, Makey Makey Inventor Booster Kit, Paper, 6B pencils, old books or newspapers
Step 1: Begin to Craft a Poem From Someone Else's Words!

Video One is how to make a blackout poem without Makey Makey. Austin Kleon uses a black marker for his "found poetry."
Video Two is how to make a blackout poem with a pencil so you can draw circuits and make them interactive with Makey Makey and Scratch.
- Find a newspaper you can mark up or some book pages. (Sometimes libraries weed old books because they are damaged or no longer current. Whatever you do, don't tear up a new book!)
- Look at the page for words that speak to you or stick out in some way.
- Using a pencil, put a box around 10-20 words. Make sure you never pick more than three consecutive words, that is what keeps this from being a copyright violation.
- Look for words and phrases that stand out to you from the words you boxed. Think of how these could be a statement or a poem.
- When you think you have a good idea of your poem, go the next step before blacking out all of the other words on the page. (Or make sure you watch all of video 2 so you can see how to draw your circuits!)
Educator Tip:
This is based on a project I've done with students and teachers during workshops. Here is where I first posted this resource. I also got the idea for combining blackout poetry with Makey Makey from educator David Saunders!
"Instead of telling my students how to make the blackout poetry work with Makey Makey, I wanted students to explore how to complete circuits on their own time. So we had a few examples handy of other student versions of black out poetry, but I also told students that I really wanted them to discover the information on their own. I even asked them, “Why do you think I want you to figure it out yourselves?” To which they responded, “So we’ll learn it! Duh, Mrs. Graves.”
Step 2: Explore Makey Makey and Make Circuits for Poetry


- As you begin to finalize your poem, you are going to create circuits with your boxed words.
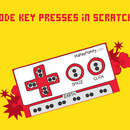
- To do this, you'll need to understand how Makey Makey works! Take it out of the box and plug in the red USB cable. Then using your hands, hold EARTH and press any of the inputs on the front of your Makey Makey. (Up arrow, down arrow, left arrow, right arrow, space, and click.) Picture 1
- You can extend any of these connections by plugging an alligator clip into the silver spots, and even extend it further by drawing with graphite! (aka pencil lead!) Just make sure that you make your drawing thick with graphite and that you make boxes around your words, but keep the drawings from touching like in Picture 2.
- You can then alligator clip directly to your drawings. You may want to use an index card fr stability or you can put your drawing on a clipboard and use the metal on the clipboard for your EARTH connection like in Picture 3.
- The best thing about drawing your circuits is that you can erase your mistakes! Watch this student troubleshooting. Or watch the whole video tutorial here.
- You will make a voice recording for each black out drawing. So make sure you draw around clumps of words you want to be read together, or even around "stanzas" of your poem. See the example in Picture 4.
More advanced blackout poetry: In the second half of the video, you can see my more advanced circuit drawings. I gluesticked my poetry pages to a sheet of paper and drew my circuits so that it looked more like abstract art. To connect the drawing from one page to the next I added conductive tape like a patch or a bridge. Without the tape, my circuit would only close on the white paper. The tape helps the electrons flow to the rest of my black out boxes on the book page. It helps to test your circuits as you are drawing. I don't do any coding or go to any specific webpage. Instead I just turn my computer on and plug in the Makey Makey to see if the lights are lighting up when I touch my drawing.
Educator Tip:
To explore how Makey Makey works, I had students plug in the USB, but not even sign into the computer or go to any particular webpage. I wanted them to see how to complete circuits just by using their hands, and then extending the key presses with wires and graphite drawings (I had 6B art pencils available at all tables.) Mrs. Myers and I noticed that this act of discovery and scientific learning in the English classroom kicked most of our students into hyper-engagement mode. The classroom atmosphere shifted and our students began testing, troubleshooting, and figuring things out. We gave them 20-30 minutes to test out blacking out words and making Makey Makey connections. One of my favorite aspects to learning circuits by drawing them was that the students could mess up and then erase their markings to fix mistakes. Such a safe way to fail forward!
Step 3: Add Scratch!


It's time to incorporate Scratch and record voices for your poem!
- Scratch 2: For each recording, Record your voices in Scratch by clicking on the "Sounds" tab and clicking the microphone to record see Picture 1 and Picture 2.
- Scratch 3: In Scratch 3, you will still navigate tot he Sound tab, but you'll see the "add sound button" is a blue circle on the bottom. You have more choices for editing your sounds in the new Scratch! It even automatically looks for quiet parts to edit. Drag the red bars to where you want your sound to start and end like in Picture 3. Then you'll have some editing choices like in Picture 4. I used the "slower" effect to make my voice sound like someone else! The echo effect sounds really neat too.
Going Further: Have your poetry animated in the digital world as you interact with your poem in the physical world! See this teacher's example.
Educator Tip:
After most students had working circuits, I gave the kids a super quick Scratch intro and showed them where the “Event” palette, “Sounds” palette, and Sounds tab were located in Scratch. Again, I told them, here’s a little info, but really you need to figure out how to do it on your own. At this point the kids were invested and started moving around the library to find quiet spots to record their voices reading the different stanzas of their black out poetry.
Step 4: Share!

After completing your poem, recording your voice, and troubleshooting to make sure your poem is playable, create a gallery of poems and share your work with others!


