Introduction: Breadbaord Pincushion
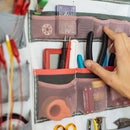
This breadboard doubles as a pincushion, or vice-versa. The pincushion design has strips of conductive fabric adhered to its surface, so that metal pins or component contacts that protrude through the same piece of conductive fabric are electrically connected. This cushion can be used for prototyping electrical circuits as well as for storing pins, needles and components.
Make your own >> http://www.etsy.com/listing/81731914/breadboard-pincushion-kit
Video: http://www.flickr.com/photos/plusea/6106904173/in/photostream
Hard vs. Soft video
Make your own >> http://www.etsy.com/listing/81731914/breadboard-pincushion-kit
Video: http://www.flickr.com/photos/plusea/6106904173/in/photostream
Hard vs. Soft video
Step 1: Materials and Tools
- scissors
- some regular fabric
- conductive fabric (i recommend stretch conductive fabric from LessEMF because it is soft so that the pins can penerate it nice and easily)
- fusible interfacing (fabric heat glue)
- iron
- regular thread
- stuffing
- sewing needle
- some pins and electrical components
- some regular fabric
- conductive fabric (i recommend stretch conductive fabric from LessEMF because it is soft so that the pins can penerate it nice and easily)
- fusible interfacing (fabric heat glue)
- iron
- regular thread
- stuffing
- sewing needle
- some pins and electrical components
Step 2: Prepare and Cut the Materials
Cut two rectangles of regular fabric.
Fuse some of the fusible interfacing to the back of a piece of the conductive fabric, then cut the conductive fabric into strips. Remove the backing before cutting the strips into even smaller pieces, as shown in the pictures.
Fuse some of the fusible interfacing to the back of a piece of the conductive fabric, then cut the conductive fabric into strips. Remove the backing before cutting the strips into even smaller pieces, as shown in the pictures.
Step 3: Fuse the Breadboard Design
Lay the pieces of conductive fabric out on one of the regular fabric rectangles. Use some tweezers if necessary. Then carefully iron over the pieces to fuse them together.
Step 4: Sew the Cushion Together
Lay the rectangular pieces of fabric on top of one another with the conductive pieces facing inwards. Thread a needle with regular thread and sew around the edge of your rectangle, leaving a hole large enough for you to turn the cushion inside out through. Without cutting the thread, turn the cushion insideout. Stuff the cushion with sufficient stuffing and then use the remaining thread to close the hole neatly.
Step 5: Insert Pins and Components
Now you are finished. Insert pins and components into your cushion, penetrating the conductive strips of fabric when you want to electrically connect components.

Participated in the
4th Epilog Challenge


