Introduction: Burning Bootloader to Atmel Atmega 328P Using Arduino


In this tutorial you'll learn about the easiest and cheapest way to burn bootloader to Atmel Atmega 328P using any kind of Arduino. So, you don't need to spend money on buying some extra components to program and mess up with the fuses of Atmel Atmega 328P.
NOTE:
This tutorial only work, if you configure Arduino IDE for Atmel Atmega 328P to use 8MHz internal clock. If you have not configured it yet, click the following link to configure it now!
Configure Arduino IDE for Atmel Atmega 328P to use 8MHz internal clock
If you already configured Arduino IDE for Atmel Atmega 328P to use 8MHz internal clock, then you are ready to go!
Step 1: Requirements
The following things are required to get this project done:
1- Arduino
2- Computer with Arduino IDE installed
3- Breadboard
4- Jumper wires
5- Atmel Atmega 328P
Step 2: Upload Arduino ISP Sketch to Arduino


If you successfully configured Arduino IDE for Atmel Atmega 328P to use 8MHz internal clock, then you are ready to go!
So, open Arduino IDE and navigate to File > Examples > ArduinoISP > ArduinoISP and open the sketch.
Step 3: Review the Parameters


After opening the sketch of Arduino ISP, navigate to Tools menu at the top of Arduino IDE and select the Arduino you are using. Also, set the Programmer to AVRISP mkII.
Now, upload the sketch to Arduino. After successfully uploading the ISP sketch to Arduino, disconnect Arduino form computer.
Step 4: Pin-outs & Wiring
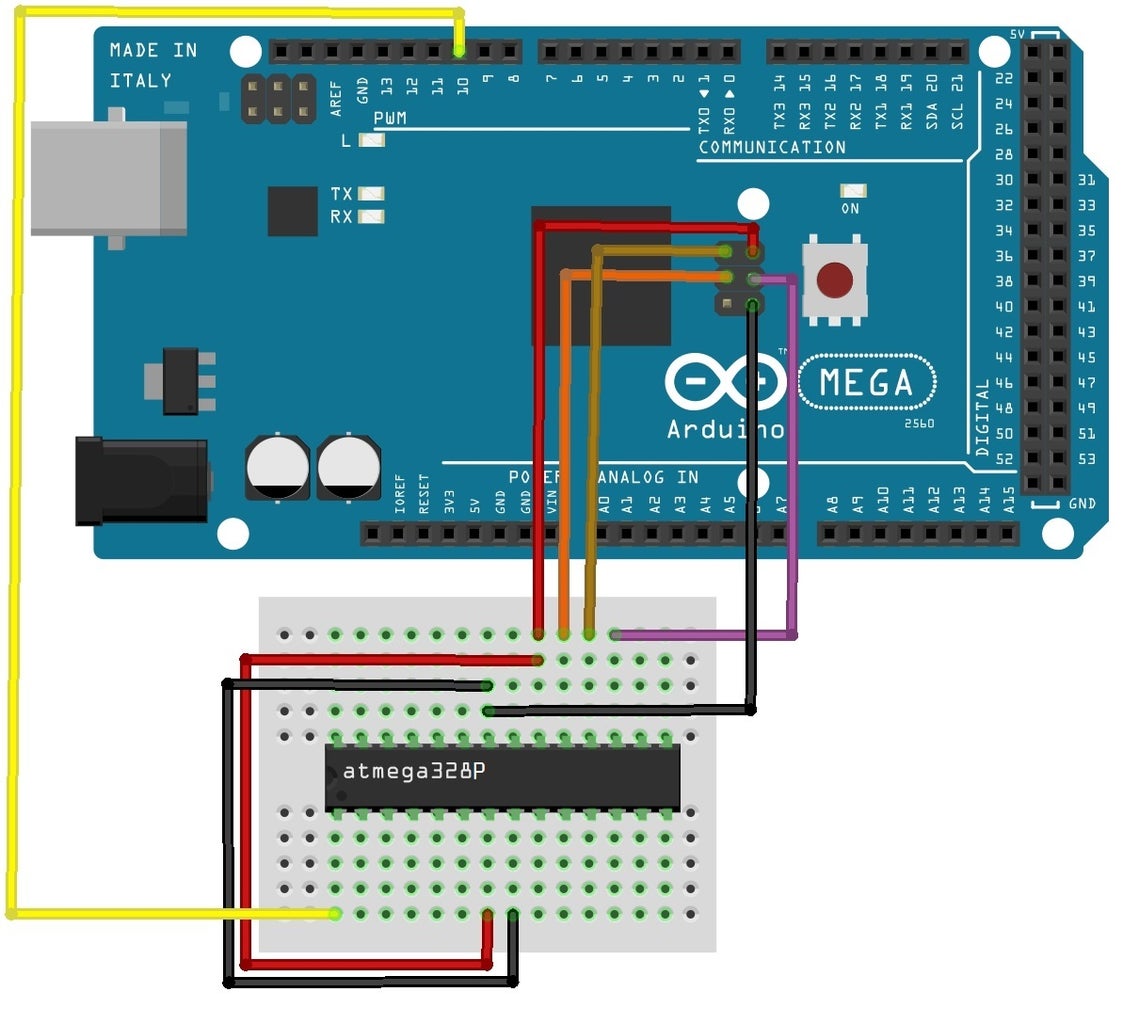
The Pin-outs & Wiring of Arduino and Atmel Atmega 328P is attached with this step and also given following:
=========================
Arduino => Atmel Atmega 328P
=========================
D10 => Pin-1
+5V => Pin-7
+5V => Pin-20
GND => Pin-8
GND => Pin-22
MOSI => Pin-17
MISO => Pin-18
SCK => Pin-19
Step 5: Changing the Parameters for Programmer


After wiring your Arduino and Atmel Atmega ISP 328P, connect the Arduino to computer and navigate to Tools which is located at the top of Arduino IDE.
Now select the Board to ATmega328 on a breadboard (8MHz internal clock) and select the Programmer to Arduino as ISP.
After changing the parameters, click on Burn Bootloader. This will burn bootloader to newly Atmel Atmega 328P. This will take a few moments. After burning the bootloader, you will see a success message at the bottom of Arduino IDE.
This step is also shown in attached figure.
Step 6: Uploading Your Program to Atmel Atmega 328P


After you successfully burned the bootloader to Atmel Atmega 328P, you can now upload sketches onto the chip.
To do this, navigate to Tools located at the top of Arduino IDE and select the parameters. Set Board to Atmega 328 on a breadboard (8MHz internal clock) and set Programmer to Arduino as ISP.
After selecting the parameters, open your sketch. Now, click the upload button in Arduino IDE while holding Shift key. The sketch will upload to Atmel Atmega 328P.
Step 7: Exiting From Programming Mode

After you done uploading your desired sketch to Atmel Atmega 328P using Arduino, you need to exit from Arduino ISP to program your Arduino board (As you were using it before programming Atmel Atmega 328P).
To do this, you just need to change the parameters. First, navigate to Tools located at the top of Arduino IDE and set the Board to Arduino board you are using and set the Programmer to AVRISP mkII.
Now, to upload the sketch to Arduino board just use Arduino IDE as you were using it before burning the bootloader to Atmel Atmega 328P.


