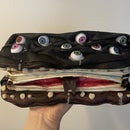
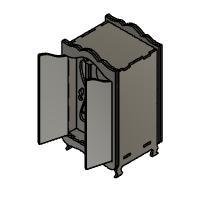
Introduction: CNC Steal Magic Wardrobe/Tea Light Holder
My name is Hannah and I am a student at South Carleton High School. This instructable is also for my co-op summative as well as an entry into the 2023 fall CNC student design contest, but you are welcome to make your own!
This instructable guide you on how to re-create this “magic wardrobe”. It can be made out of steel, aluminum, or even laser-cut wood. These instructions will be for making it out of steel. My goal when creating this project was to prove that even small details can be achieved with a CNC plasma cutter. There are some very finicky pieces so if you are a beginner, I would recommend making it out of wood if you have access to a laser cutter since some small details will have to be made by hand. The finished product can be painted or the materials can be left raw and it will be able to house a standard tea light either regular or electronic.
Supplies
For this project, you will need
- Fusion 360
- A CNC machine, whether that is a plasma, cutter or a laser
- ⅛ inch thick material I am using steel
- Various sizes of files
- A drill
- 1/16 drill bit 1/8 drill bit and 3/16 drill bit
- Palm sander with 120 and 220 grit sandpaper
- I used a TIG welder to assemble mine. However, if you’re making out of wood, you will need wood glue.
- 2 to 4 small hinges for your preferred look as well as two small screws for your preferred look of handles
- Spray paint of your choosing or acrylic paint
- Bina(optional)
Step 1: Prepare Model
First, you will have to arrange the pieces of the model in a way that fits your material and your machine's specifications. Since I was using scrap material the nesting of my pieces had to be very close together and very specific. I provided the model in a way that allows you to view and edit the pieces easily however I do not recommend cutting in this configuration because it would waste a significant amount of material.
Step 2: Cutting
Cut out the pieces on your chosen material and hopefully they look like these. Depending on your skill and the quality of your machine, some details might be better cut out or some details might be missing and we will have to go back and do those by hand.
Step 3: Prep Your Pieces
This is the most important step. If your pieces aren’t prepared properly things aren’t going to fit together as well and it’s going to be more difficult to weld. I spent several sessions on this step, and even then it still wasn’t enough. If you use aluminum this won’t be as big of a deal, but with steel we had to chisel off the buildup on the edges of the cuts. Afterwards, I would recommend sanding with 120 or 220 grit sandpaper just to make things a little bit more easy.
Step 4: Details by Hand
The plasma cutter that I used, unfortunately, did not cut out all of the small details that I needed, the most important ones being the notches that are used to put the outside of the wardrobe together. to fix that I marked out the size and shape of the notches on each piece and used a milling machine with a 1/8 drill bit to all the holes. You can do this by hand with a regular drill and a file however, with the number of notches you’ll have to make it will be quite tedious. This would also be a good time to go back and add any extra holes in the bubble layers. You can just go over the ones in the design or you can add more or change the placement of them. After fixing all of the holes in Misty’s tails, I’d recommend re-sanding just to get rid of any burs.
Step 5: Coloring the Layers
If you are planning on colouring the layers, this is the time to do it. I did 2 to 3 coats of spray paint on the front and back to protect them from rust since I won’t be able to access those areas afterwards. you will need to tape off the edge of each piece so that it doesn’t interfere with the weld. Do not clearcoat the layers yet because it will smell awful while welding and you do not need to inhale those fumes.
Step 6: Welding the Layers
Now, for the fun part will begin to weld the layers to the bottom of the wardrobe, which is the piece with all the notches, and the whole for the tea light starting from the back, which is the full slot across the piece will work our way to the front You want to make sure each piece is square before welding, but worst case scenario you can bend the pieces back into a squared position. After all the layers are welded onto the base plate you may want to touch up some of the paint that got burnt.
Step 7: Welding the Wardrobe
First, you want to clamp on the sides, and the back of the wardrobe, and begin tacking where it attaches to the bottom. Before tacking all the sides together, attach the top of the wardrobe and tack it to the back plate. Now you can begin filling in all of the notches if there is a significant gap in where the plates attach, use a filler rod so that when we grind down the weld bumps, it appears like one piece of metal. Once all of the sides of the box are fully secured the last piece to place on is the front we do this last because it’s thin and it’s easier to bend to fit into place you want to tack at the bottom corner first, and then you can continue with the rest of the notches, be careful not to burn a hole through the metal because it’s very difficult to fix with filler rod.
Step 8: Grinding
Before we put on the two detailed pieces, we need to make sure that the pumps are grind as flat as possible. The detail pieces will cover the notch holes for the most part but in some spots you may want to make sure it appears as one solid piece of metal. I did this at the end of one session and then came back the next morning and did more grinding because even though I thought I was done, it could still be better. Took this time to round out the top corners of the wardrobe just to give it a bit of a softer look.
Step 9: Detail Pieces
you will want to clamp the border piece as flush as possible, as well as offset it downwards by about an 8th inch. Then you need to weld along just the flat outside edge, making the two front panels and the two back panel edges one piece. You can use filler to fill in any holes and gaps and then afterwards grind it so that it’s nice and flat.
Step 10: Touch Ups
Before we attach the doors, this would be the time to go back and do any touch ups on the paint you can see that after this step, my paint colours completely changed, and that’s because I no longer had access to one of the main spray paint colours and instead of going out and buying more of that colour I just went over everything again with acrylic paint it’s really difficult to get full coverage at this step which is why you should try your best to stick to the same paints that you used at the beginning.
Step 11: The Doors
You will first want to mark and drill the holes for both the hinges and the handles. After that you can remove any burst, and if you’re going to use patina you can do that now and then clear coat. Next we need to prepare the hinges. you will want to cut off the plate of the hinge that connects to the barrel. We want to keep as much of the barrel intact to weld to the frame of the wardrobe. You want to attach the hinge to the door first to make sure that when we weld, the hinge barrel to the frame that it sits in the right spot you can grind down the worlds afterwards, so it’s a little less noticeable.
Step 12: Finishing Touches
If you’re wanting to use any patina on the outside, spray the surface and then rinse under water so that it doesn’t affect the paint and after everything‘s dry, give it a couple coats in a clear finish I went with a mat finish attach the handles and you’re all done.

Second Prize in the
CNC Student Design Challenge


