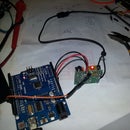
Introduction: Cat Feeder
The Cat wants to see the food getting out of the bag to eat it, or wake us up at 3:00am. Automatic cat feeder helps and make easier to have cat at home,
how it works
Ultrasonic sensor measures the distance of an object less than 17cm (have to be detected 9 times in a row to be valid) to avoid false detection.
if is valid detection happens, the 2 motor enter in a sequence to dispense an specific amount of flakes.
then system is blocked for 2 hours to avoid another dispense (our crazy cat come and go for a few times while eating)
right now is an open loop (means still no sensor to check if food was dispense or if the cat eat it all)
Step 1: Materials
- Arduino 101
- ultrasonic sensor HC-SR04
- Motor Drive 1A Dual TB6612FNG
-LM7806
- 3D printed parts
- Gear Motor DG01.
- Generic 6v DC motor
- Built metal frame.
- plastic container
- silicone glue
- wires
Step 2: DC Motor Driver Assembly
Assembly board DB6612FNG according schematic.
Voltage for DB6612FNG coming out of 9V power supply of the Arduino 101 throughout LM7806 voltage regulator.
Step 3: Ultrasonic Distance Sensor
Connect HC-SR04 ultrasonic sensor according schematic to Arduino 101 board
Step 4: 3D Print
STL files included, they were printed on a "Metal Printed Bot" machine which didn't have enough height, needed to resize everything to 0.93% to be able to print, STL files from www.tiguiverse.com except for the coupling for the motor.
Step 5: Container Cut
Drill was used to cut the base of the container, any other methodology work just fine
Step 6: Glue Printed Parts and Container
Duretan glue was used to join 3D printed parts together, waited one night for each join
Step 7: Building the Frame
this was done in metal, arc welding, but wood also should be good,
Step 8: Vibration Motor Added
- This motor was included due to problems of stuck food into the chamber,
- Right now weight is a nut attached with tape, need to improve it. but works ok for about one month now.
- 6v motor was extracted from old cassette recorder.
- Plastic was cut from a empty milk container.
Step 9: Loading Sketch
sharing cat feeding sketch, changes can be done to increase portion or to reduce or increase lock time (2hours) to not overfeed the cat,
truth is our cat get used to the noise and vibrations, actually likes to have new food when she arrives, so the 10 minutes delay was removed.
Arduino IDE required to download sketch can be downloaded from www.arduino.cc for free (open source)
Attachments

Participated in the
Maker Olympics Contest 2016


