

Introduction: Collapsable Walking Stick From Old Tripod


Walking sticks are very helpful for hiking, trekking, and even just walking. But they often have a big disadvantage: they are really tall and thus take up lots of space—and when not in use, they can fall over if they're not balanced well. To fix that problem, some companies have started selling a collapsable walking stick that can telescope into itself for easier storage when it's not in use.
But commercially-sold walking sticks can get expensive and often have to be ordered online and can take a while to ship, so if you have an old camera tripod with free-swinging legs* and some household materials, then this is a much cheaper and faster (and cooler!) way to get your hands on a collapsable walking stick!
And if you have a 3D printer, you can make a professional-grade handle for your walking stick in only a few hours of printing time!
*If your tripod has equilateral legs, you'll also need access to basic workshop tools. See Step 1 for information about free-swinging legs and equilateral legs.
Supplies
For the walking stick, you will need:
• An old tripod with telescoping legs
• Electric Handheld Drill and Standard-sized Drill Bit (only if you have a tripod with equilateral legs (see Step 1))
• Pliers (preferably slip-joint pliers or channel-lock pliers)
For a 3D printed handle and 3D printed ergonomic grip, you will need:
• A 3D Printer (with a build area of at least 120mm in height and at least 30mm in width)
• PLA Plastic 3D Filament
• 3D Slicer Software (I used Ultimaker Cura for this Instructable)
• Access to Tinkercad Web-based Software (in case you need to edit the 3D model that I have provided in Step 4)
• Electronic Calipers (with millimeter setting)
• Sandpaper (preferably 240-grit sandpaper)
• Scraper Tool (for removing the 3D printed handle from the 3D printer's build plate)
• Heat-resistant Gloves (for protection while using the 3D printer and using the hot-glue)
• Hot-glue Gun (any temperature works)
• Hot-glue Sticks (make sure they're the same temperature as the gun)
For a cardboard handle, you will need:
• Empty Toilet Paper Roll
• Paracord rope
• Pencil
• Scissors
• Hot-glue Gun (any temperature works)
• Hot-glue Sticks (make sure they're the same temperature as the gun)
Step 1: Taking the Leg Off of the Tripod
To remove the leg from the tripod, first check what type of leg system the tripod has:

• If your tripod has Free-Swing Legs (in blue), then you can skim past these next 2 photos.
• If your tripod has Equilateral Legs (in red), then you'll have to remove the triangular structure (made up of three 'balance arms') from the leg before you can proceed. To do this, lightly drill onto the crimped end of the rivet that holds the leg to the balance arm.

• Then you will be able to push the rivet out the other side, freeing the leg from the balance arm.

• Now, to unscrew the leg from the tripod body, firmly grasp the tripod body with one hand. With the other hand, firmly grasp the leg using pliers, and begin unscrewing the leg from the tripod body.

• Once the leg is fully unscrewed and is detached from the tripod body, you can put the rest of tripod aside.
—FOR THE 3D PRINTED HANDLE, SKIP DOWN TO STEP 3—
Step 2: (For Cardboard Handle) - Creating the Handle


While you can try to wrap a sheet of cardboard around the top of the tripod leg, it is much easier and more readily-accessible to use an empty toilet paper roll, so that is what I'll do in this Instructable.
• Using a pencil, draw a straight line down the side of the roll, and then use scissors to cut along that line.


Now you're ready to make the toilet paper roll into the handle.
Have your paracord readily accessible.
Heat up your hot-glue gun and put a hot-glue stick in it. Be sure to wear heat-resistant gloves.
• Then squeeze out a line of hot-glue along one of the edges of the roll, and press the roll onto the tripod leg.

• Wrap the roll around the tripod leg, gradually adding hot-glue every few inches, until the roll is fully wrapped around the tripod leg.

• At the base of the roll, apply a ring of hot-glue, and wrap the end of the paracord around it.


• Lightly glaze the roll with hot-glue, and then spiral the paracord around the roll until you reach the top.

• Leave an extra 12in (30.5cm) of paracord, and then cut off the access length of paracord.

• Using the extra 12in (30.5cm), tie a two-half hitch knot to make an adjustable wrist strap.

↳ Image Credit: Scout Handbook, Boy Scouts of America.

• If you don't want a wrist strap, then you can simply cut off the extra 12in (30.5cm) of paracord.
Step 3: (For 3D Printed Handle) - Measure the Tripod Threading

The threading and the pole diameter on your tripod leg may or may not have the same measurements as mine (my measurements are listed in Step 4). To check this, you will need to measure your tripod leg with electronic calipers as follows:
• Pole Diameter: Measure the diameter of the outermost rod of the tripod leg.

• Thread Diameter: Measure the diameter of the crevices of the threading.

• Thread Pitch: Measure the distance between the center of one thread to the center of the thread above it.

• Thread Scale: Measure the vertical thickness of a thread.
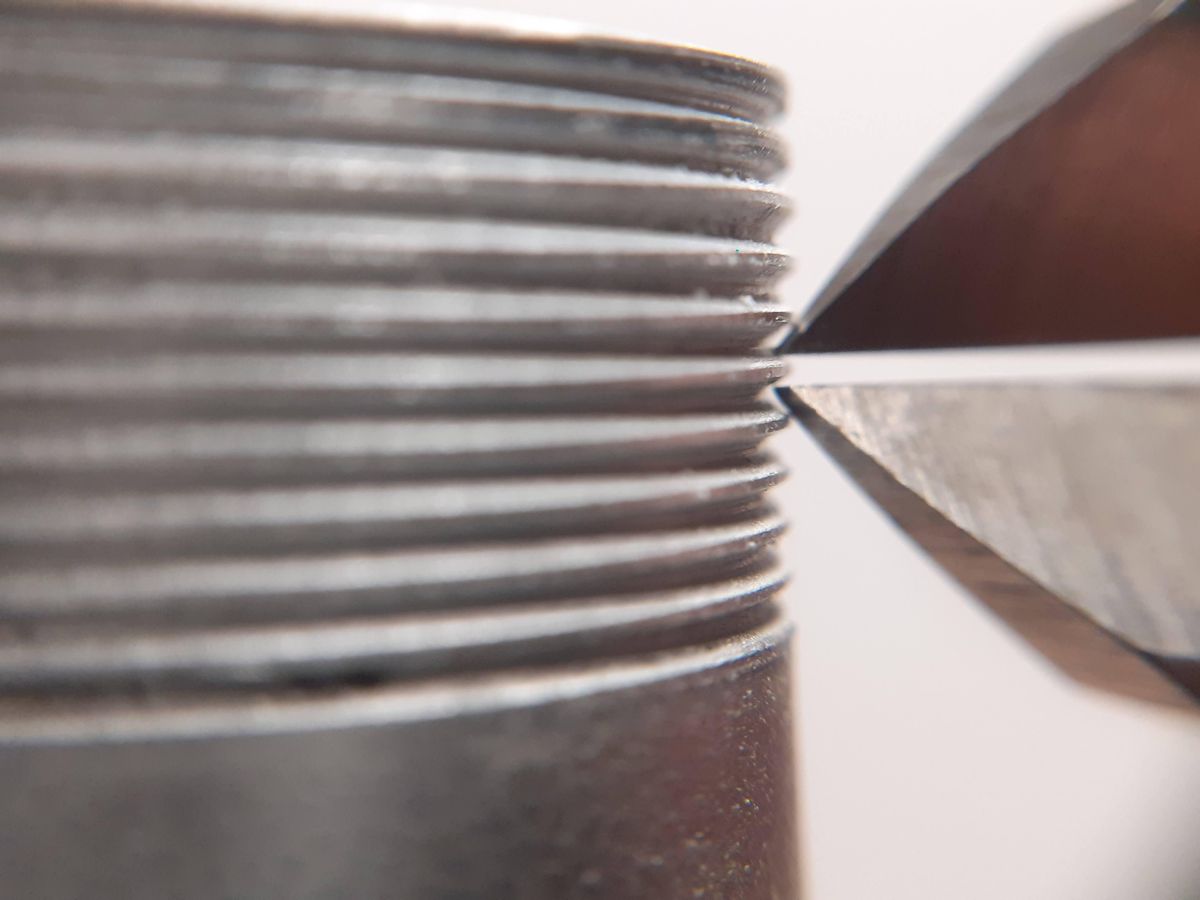
• Thread Rotations: Count how many threads there are.

• Thread Segments: Doesn't matter. [But if you are going to be adjusting the Tinkercad file, set the value to 16]

• Thread Tip Scale: Doesn't matter. [But if you are going to be adjusting the Tinkercad file, set the value to 0]

• Thread Tip Segments: Doesn't matter. [But if you are going to be adjusting the Tinkercad file, set the value to 3]

Step 4: (For 3D Printed Handle) - Download 3D File


The handle is custom-made to screw onto one of the legs of my tripod. Using electronic calipers, I measured the dimensions to be this:
• Pole
↳ Diameter: 21.31mm
• Thread
↳ Diameter: 21mm
↳ Pitch: 1.07mm
↳ Scale: 0.8mm
↳ Rotations: 10
↳ Segments: 16
↳ Tip Scale: 0
↳ Tip Segments: 3
If these dimensions match the measurements on your tripod leg, then download the STL file called "walking_stick_handle.stl" (attached to this step).
But if your tripod leg has different dimensions, you can edit the Tinkercad model* (listed below) and modify the dimensions to fit your tripod leg, or you can go back up to Step 2 to make a cardboard handle.
*Link to Tinkercad "walking_stick_handle_model" editor: https://www.tinkercad.com/things/i9XkuJivTTc
*In the Tinkercad editor, I have provided a smaller section of the handle (which I will call the 'test ring') so you can test your measurements without wasting lots of plastic. Just remember that once you get the threading adjustments correct on the test ring, remember to make those adjustments on the threading within the handle too.
Attachments

Step 5: (For 3D Printed Handle) - 3D Printer Settings

I use the Monoprice Mini Delta V2. This printer has, by default, the following specifications:
• 110ømm x 120mm build area
• 0.4mm nozzle
• Bowden Extruder
The plastic I use is PLA plastic from the brand Overture.
↳ Amazon link for Overture PLA plastic used in this Instructable: OVERTURE PLA Filament 1.75mm PLA 3D Printer Filament, 1kg Cardboard Spool (2.2lbs), Dimensional Accuracy +/- 0.03mm, Fit Most FDM Printer (White 1-Pack)
I use 3D slicer software called Ultimaker Cura for my printing settings.
For the walking stick handle, the settings are as follows:
• Profile: Fine - 0.1mm
• Quality
↳ Layer Height: 0.1mm
• Infill
↳ Infill Density: 30%
↳ Infill Pattern: Gyroid
• Material
↳ Printing Temperature: 220ºC
↳ Build Plate Temperature: 60ºC
• Speed
↳ Print Speed: 48mm/s
• Support
↳ Generate Support: Off
• Build Plate Adhesion
↳ Build Plate Adhesion Type: Raft
↳ Raft Extra Margin: 2mm
↳ Raft Air Gap: 0.25mm
Any settings not mentioned in that list can be left at the default settings.
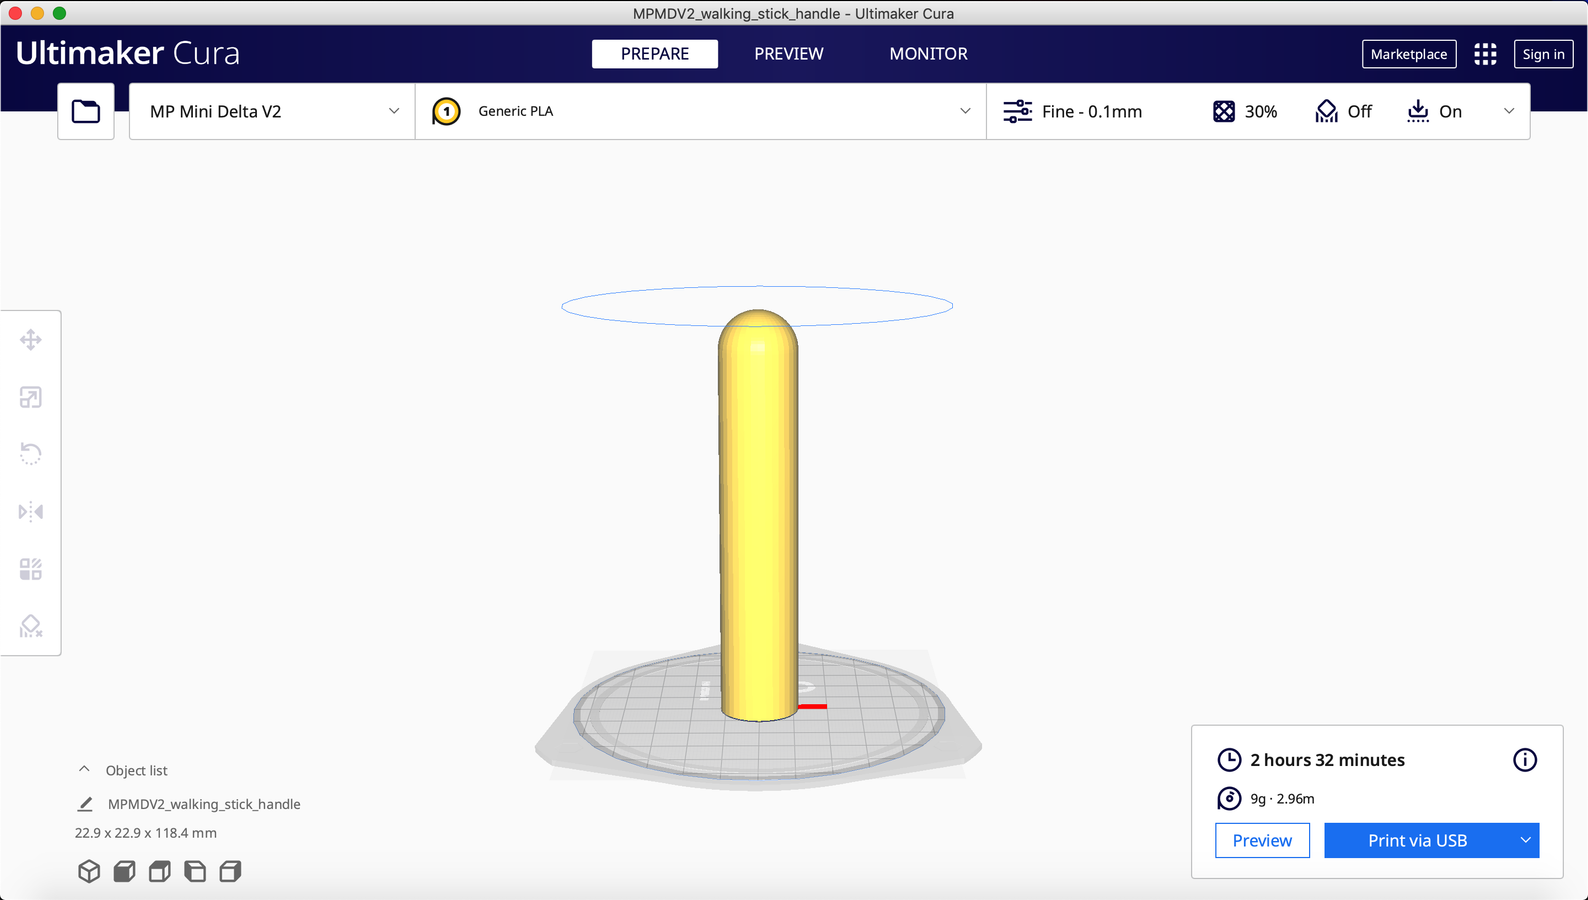
For your convenience, I provided a screenshot of the Print Settings menu (above).
Here are what the 'Prepare' and 'Preview' screens look like for me:
• Prepare:
• Preview:

Step 6: (For 3D Printed Handle) - Post-Printing

After the handle is fully printed, let the print cool down for about 5 minutes. Then, using the Pre-heat tool in Ultimaker Cura, pre-heat the build plate to 30ºC and wait for it to reach that temperature.

• Once the build plate has heated up, put on your heat-resistant gloves and use the scraper tool to gently pry off the printed handle from the build plate.

• Then gently peel off the raft from the bottom of the handle.


• Use the 240-grit sandpaper to sand the outer surface of the printed handle.


• Now screw the handle onto the tripod leg, to make sure that it fits the threading (and make sure that it can be a tight fit too).
Step 7: (OPTIONAL) (For 3D Printed Handle) - Ergonomic Grip


This step is OPTIONAL. If you want to make the 3D printed handle easier to hold onto, then follow this step. If you like the handle as-is, then you can skip this step.
First, download the 3D file called "walking_stick_grip.stl" which is attached to this step.
The print settings are the same as in Step 4, and the post-printing process is the same as in Step 5.
Once you have printed and sanded the grip, you can follow these instructions:
• Wear heat-resistant gloves.
• Heat up your hot-glue gun and put a hot-glue stick in it.
• Add a light layer of hot-glue onto the back (concave) side of the grip, and then stick the grip to the side the handle. Firmly grasp the handle and grip for about 5 to 10 seconds while the hot-glue dries.

Attachments

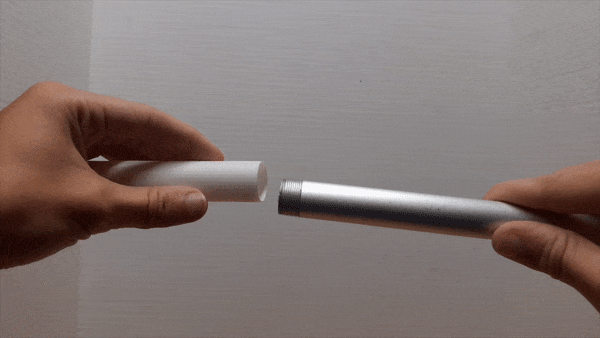
Step 8: Enjoy Your New Collapsable Walking Stick!


It's finished! You now have a DIY collapsable walking stick made from an old tripod leg!
And if you 3D printed the handle and/or grip, then here's a few ideas to try out:
• Use different colored filaments for the handle or grip (to add more vibrance or variation)
• Paint the handle or grip (if you don't want to buy different colored filaments)
• Print the grip using flexible/rubberized filament (like TPU filament or flexible PLA filament)
• Design your own custom handle (such as a design with a hole to tie a paracord wrist strap)
I hope this has been a helpful Instructable! Let me know in a comment if you have any suggestions or if you spot any errors. Happy crafting!

Second Prize in the
First Time Author Contest


