Introduction: ENERGY SAVER PROJECT–ARDUINO BASED


ENERGY SAVer PROJECT–ARDUINO BASED :
LINKS TO THE PROJECT: https://youtu.be/zM4O4bvU7cs AND https://youtu.be/pwgEM71mOd8
Overview
This ‘Energy Saver’ device will give you a lot of power / energy saving though a bit at a time. At present the device is connected with home fountain and it will be activated / de-activate based on the presence of some person in its vicinity (nearby). The range and duration for activation / de-activation can be programmed/ adjusted. This device may be used on various other home appliance also and for that imagination ‘Sky is the limit’. Some examples are ‘Bathroom Lights’, ‘Staircase Lights’, ‘Passage Lights’, ‘Exhaust fans’ installed in some basement or other confined places etc.
The main reason and inspiration I received for making this device / project is from the fact that the devices like fountains etc remained ‘turned on’ even after we move from the room, where they are running and this will not only waste energy in the form of power but also shorten the life of motors and other mechanism installed in that appliances / gadgets etc.
How it does the things
This device is using ‘Arduino’ and PIR Motion Sensor for detecting human presence in the room or the area for which it is installed and activates/ ‘turn on’ the appliances (fountain in the present case) when some one comes in the proximity of the device / fountain say 7 feet and ‘turns it off’ when the person leaves the area. This way the device will save spillage of energy / electricity and also saves the life of the motor / lights installed in the fountain. This device will save little bit energy each time and in long run it will save a lot of energy.
This device is prepared using ‘arduino board’. However, it can be designed without arduino also. I have made it separately and also posted it under other project head. The device can be made using ‘Atmega’ Chips also I have made using ‘Atmega8A’ and that device will be more power conservative as its own power consumption is far less that arduino based device(because arduino itself needs power to function, where as the Microcontroller- ATmega8A’s power consumption is lesser i.e. 3 to 11 mA against 42mA of Arduino board.
To function the device properly, it may be placed in the properly where no obstruction is between it and the open space of the room.
Step 1: Tools and Materials Collecting the Material (not Much)


1. Arduino Uno Board
2. PIR Motion Sensor
3. Single Channel Relay
Tools
· Screw driver for setting proximity range of the sensor and connecting relay.
Materials
· Jumper wire.
· 2 pair wire and 2 Pins- (2 Male and 1 Female).
· 5v power source for arduino board.
· 240v power for fountain.
· Female header pin
· Optional
· LED
Step 2: Circuit Design and Connection


Arduino connecting to Components
ARDUINO PIN 2 -----> PIR SENSOR OUT PIN
ARDUINO PIN 10 -----> RELAY IN PIN
ARDUINO GND1 -----> RELAY GND
ARDUINO GND2 -----> PIR SENSOR GND
ARDUINO 5V PIN -----> RELAY VCC PIN
ARDUINO 3.3V PIN -----> PIR SENSOR VCC PIN
Step 3: Code Design
Code Setup
We will need to setup Arduino to be able to use ARDUINO board.
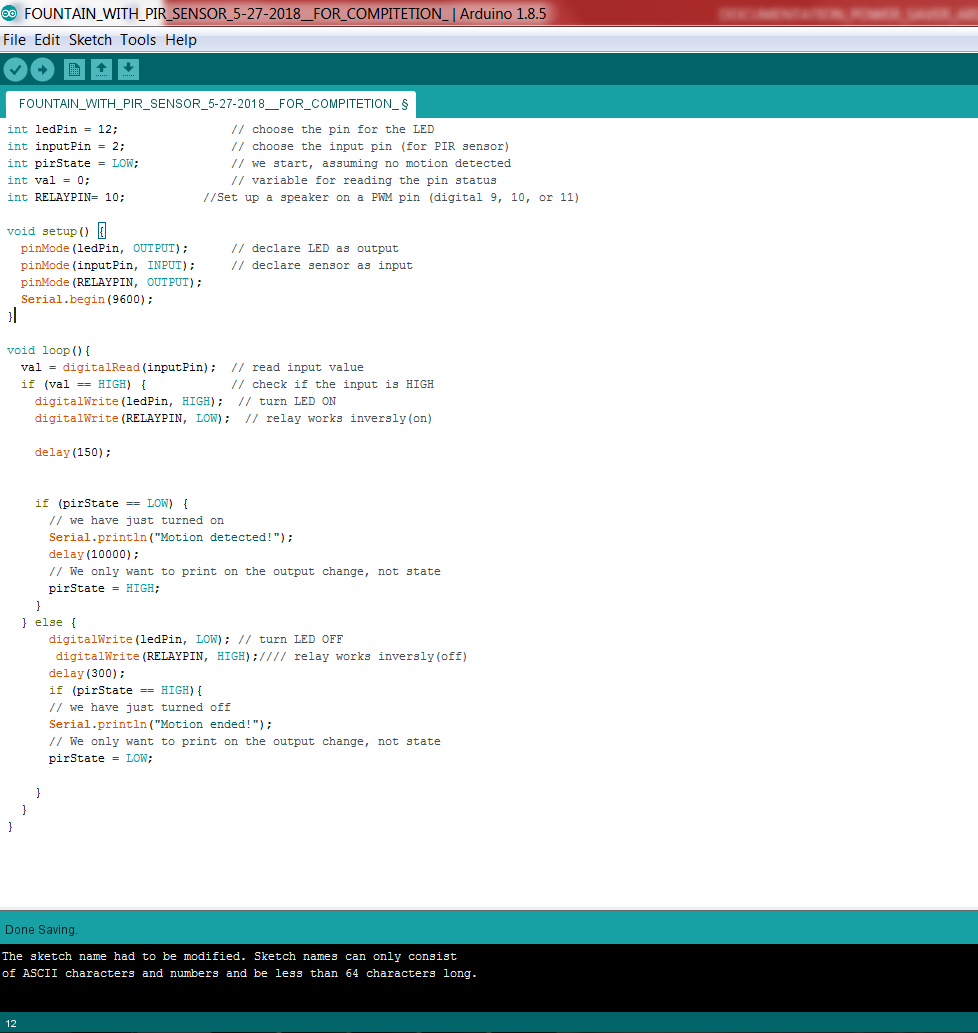
int ledPin = 12; // choose the pin for the LED
int inputPin = 2; // choose the input pin (for PIR sensor)
int pirState = LOW; // we start, assuming no motion detected
int val = 0; // variable for reading the pin status
int RELAYPIN= 10; //Set up a speaker on a PWM pin (digital 9, 10, or 11)
void setup() {
pinMode(ledPin, OUTPUT); // declare LED as output
pinMode(inputPin, INPUT); // declare sensor as input
pinMode(RELAYPIN, OUTPUT);
Serial.begin(9600);
}
void loop(){
val = digitalRead(inputPin); // read input value
if (val == HIGH) { // check if the input is HIGH
digitalWrite(ledPin, HIGH); // turn LED ON
digitalWrite(RELAYPIN, LOW); // relay works inversly(on)
delay(150);
if (pirState == LOW) {
// we have just turned on
Serial.println("Motion detected!");
delay(10000);
// We only want to print on the output change, not state
pirState = HIGH;
}
} else {
digitalWrite(ledPin, LOW); // turn LED OFF
digitalWrite(RELAYPIN, HIGH);//// relay works inversly(off)
delay(300);
if (pirState == HIGH){
// we have just turned off
Serial.println("Motion ended!");
// We only want to print on the output change, not state
pirState = LOW; } } }
HOW THIS CODE FUNCTIONS:
The code receives digital signals from the PIR Sensor. Depending on signals, the code turns on or off the fountain by signaling to Relay.
When any one enters the room or the proximity area, the PIR sesor senses the same and sends digital signals. Arduino Board continuously monitors the inputs received from the PIR Sensor and based on that runs the code that sends signal for either turning on or turning off to the Relay and this way fountain will be turned on if the some one comes near to it and turns off after that person leaves room or goes away from the fountain as per the range defined (here its 4 ft.).
Code for the above decision making part is reproduced below:
val = digitalRead(inputPin); // read input value
if (val == HIGH) { // check if the input is HIGH
digitalWrite(ledPin, HIGH); // turn LED ON
digitalWrite(RELAYPIN, LOW); // relay works inversly(on)
delay(150);
if (pirState == LOW) {
// we have just turned on
Serial.println("Motion detected!");
delay(10000);
// We only want to print on the output change, not state
pirState = HIGH; }
Step 4: FINAL PROJECT ASSEMBLED IMAGES


MADE BY : PRIYANSHU J UCHAT (INDIA)

Participated in the
Microcontroller Contest


