Introduction: Fairy Gemstone Pendant Necklace


Gemstones are a great base or accent to your polymer clay creations. When I received several agate gemstones from a trade with a fellow artist, I knew right away that I will be sculpting and layering clay around it and my theme is fairy art. I love sculpting faces so I do make them as realistic as I can but you can simply just paint on the face and it will look great as well.
Step 1: Materials

- Polymer clay (oven baked modelling clay) - I used Sculpey Living Doll for the face and a mix of Fimo and Premo for the hair and wings.
- Liquid Clay - I used Fimo DekoGel
- Gemstone and glass beads
- Tools: Knife, needle tool, ball stylus, paddle shaped tool, small paint brush, acrylic roller, wire cutter, pliers
- Wire ( The thicker one should be as thick or thicker than your leather cord, the thinner wire should be able to pass through your beads.)
- Acrylic or Heat set paints
- Paint brushes
- Leather cord
- 2 end caps
- 2 jump rings
- Extension chain
- Lobster clasp
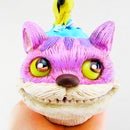
Step 2: Sculpting the Face


Start by making a flattened round shape for the face and lay it on the top part of the tear drop shaped gemstone. With a needle tool, mark the center lines vertically and horizontally. This will roughly guide you where you will put the eyes, nose and mouth.
Make an indentation on the horizontal line using a paddle shaped tool to demarcate the forehead from the cheeks. Then with a ball tool, make 2 indentations for the eye sockets. Fill the eye sockets with 2 small round pieces of clay and an elongated piece between the eyes for the nose and mouth.
Blend the seams to the rest of the face and mark with a needle tool the tip of the nose and the parting of the lips. (5th pic) With a paddle shaped tool, shape the nose by moving the clay towards the tip and bridge of the nose and slightly indenting the wings of the nostrils. You're aiming for a pyramid shape. Make the nostrils with the needle tool.
For the lips, round out the edges of the upper and lower lips and indent the corners of the mouth with a needle tool. Further define the mouth with a ball tool by indenting the cupids bow.
For the upper eyelids, draw it out with a needle tool then soften the lines with a small brush and paddle shaped tool.
For the lower eyelids, add 2 thin snakes under the eyes and blend the lower seams.
Step 3: Hair & Beads


Place the gemstone on a sheet of black clay about 3 mm thick. The gemstone will be kept in place by surrounding it with clay.
For the wings, make 2 shapes, a bigger and smaller flattened pieces and cut one end in a slant with a knife and place it on the black clay beside the side of the head. I used turquoise colored clay.
The hair is made by making several snakes of purple and magenta colored clay. Layer the clay from the bottom to the top, making sure it surrounds the gemstone.
To add more visual interest to the piece, I added some glass beads. To firmly attach these beads to the clay, insert a wire to each bead and twist the ends. The wire will anchor the bead in place. I also added coils of clay surrounding each bead. You can also texture the clay or add small balls of clay.
When you've completed designing the pendant, remove the excess black clay with a knife and bake the pendant in an oven based on your clay manufacturer's recommendation. I baked mine at 130 degrees celsius for 30 minutes.
Step 4: Making the Pendant's Bail


To make the Bail, cut a rectangular strip of clay from a flattened piece of black clay. Place some liquid clay to the upper back part of the pendant and place one end of the strip to the back. Take a thick piece of wire and place it on the strip horizontally then fold the strip over the wire and attach it to the back of the pendant. The wire will preserve an opening for your leather cord later on. Make a tiara to hide the bail by making tear drop shapes of turquoise clay and attach on top of the head.
If you're using acrylic paints to paint, bake the piece once again in the oven for 20 minutes. Once the clay is completely cooled, you can remove the wire and start painting the face.
Step 5: Painting and Making the Necklace


I'm using Genesis heat set paints for this project. The great thing about these paints are they are matte and I don't need to seal the paint with a varnish.
To paint the face, I used a peach color on the forehead, around the eyes, cheeks and chin. Then I use white for the eyes. Red for the iris and black paint for the pupil of the eyes. For the lashes, I used black and the eyebrow, burnt umber. For the lips, I used pink.
To add depth to the hair, I painted it with purple then removed the excess paint on the surface with a cotton ball with rubbing alcohol.
To make it into a necklace, I placed a 55 cm leather cord through the opening and placed end caps for each end and crimped them in place with a pair of pliers. Then I placed a jump ring on each end of the caps adding a lobster clasp on one end and an extension chain on the other end.
Happy Sculpting!