Introduction: Ford Edge Brake Booster Replacement


Ford has extended the warranty for brake booster replacement on some vehicles. The brake booster has been known to develop a rip in the diaphragm where the booster will fail intermittently. My mother's 2013 Ford Edge had the exact symptoms due to faulty parts, but did not qualify for the warranty extension. Always be careful when working with safety components on vehicles such as the brakes. Be sure you are comfortable with how the system works. I decided to do the repair myself in order to make sure everything was done right, and I wanted to replace the booster with genuine Ford parts.
I hope this helps if you decide to take on the task of fixing your Ford! This should be applicable to all first generation Edges (2007, 2008, 2009, 2010, 2011, 2012, 2013, and 2014 models).
Step 1: Gather Tools and Prepare Your Workspace

The tools required are quite simple. Attached is a picture of the tools I used, and below is a list. Make sure you have room to work around the front of the vehicle. Also make sure there is room to open the driver's door to access the bolts from the inside.
- Metric set of sockets
- Metric set of wrenches
- A couple flathead screwdrivers and a phillips screwdriver
- Pliers
- Rubber mallet
- Adjustable wrench
- Anti-seize for reassembly
Step 2: Remove Air Cleaner and Battery


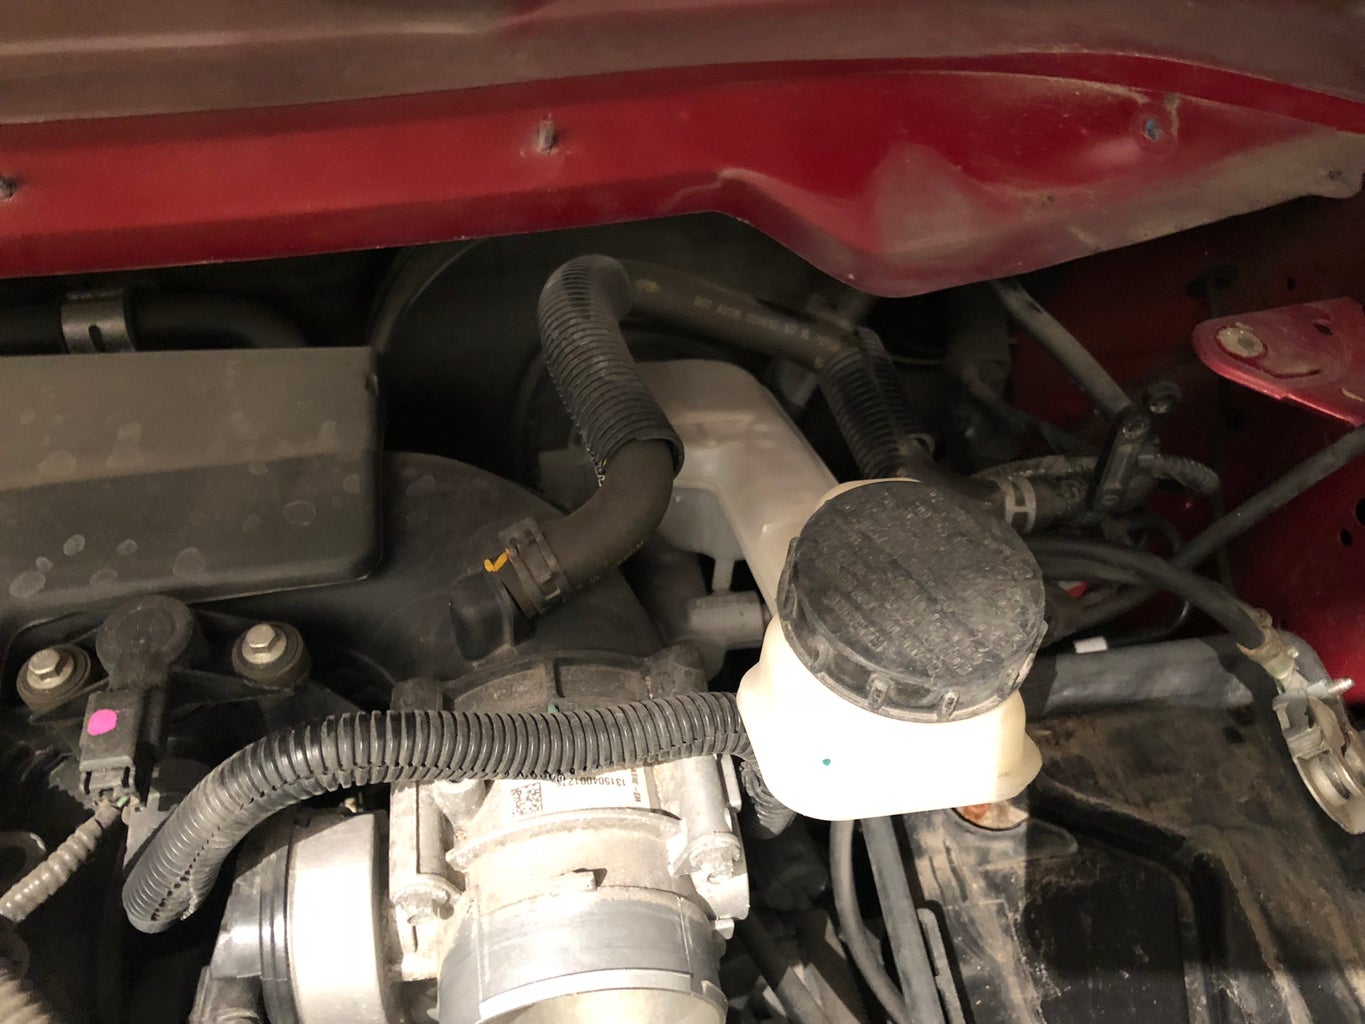
Start out by freeing up some room near the booster. It looks very challenging to get to, but once some of the accessories are removed it becomes easier to get to. The air cleaner is held on by a hose clamp at the intake. There are a couple of connectors you will have to remove as well. Two bolts hold the air cleaner inlet towards the front of the vehicle. Once these bolts are removed the air cleaner can be pulled out.
The battery is held on by one long bolt on the driver's side. Take this bolt out, and remove the connections on the battery terminals (be very careful when removing the positive red end). Slide the battery out and put it in a safe place.
Step 3: Remove Cowl Panel and Wipers


The cowl panel can look intimidating to remove, but it isn't too bad once you start tearing into it. I was surprised to find the engine computer under here. It seems to work quite well here, and makes things easy to work on. Below are the steps to remove the cowl panel.
- Remove rubber ends from each side of the cowl. These are the little pieces that go between the cowl and fenders. Gently pry these out on each end (they only clip on).
- Remove windshield wipers. Pry the covers off then remove the nuts. I then placed a block of wood under the wiper arm to pull up on it some then hit the bolt with the rubber mallet. This helps to knock the wiper arm loose.
- Remove the bolts/phillips clips off of the inside edge of the panel. Once these are removed, the large plastic piece can be carefully lifted off and slid forward.
- Remove the bolts holding the two plastic drain trays, and slide the trays out.
- Disconnect the computer wiring. Pull back on the tab on the top and slide each of the three connectors out.
- Disconnect any ground straps or wiring from the large metal panel.
- Remove the two 8mm bolts holding the wiper assembly in place. Tilt the assembly upwards and slide it out after disconnecting the wiring.
- Remove the nuts and bolts holding the lower metal panel on. Carefully lift this panel out. Frees up a lot of room in there!
Step 4: Remove Intake and Master Cylinder


If you haven't already, it helps to remove the battery tray to clean underneath it and coat the bolts in anti-seize later on. These tend to corrode really bad, so it is nice to do now to make life easier down the road.
Follow these steps to remove the intake manifold:
- Remove foam cover from intake (two clips in the middle, and don't miss the small 8mm nut on the front).
- Disconnect any vacuum hoses and connectors from the intake.
- Remove all bolts on the top side of the intake.
- There is a small bolt I pointed out on the backside of the intake. Took me a while to find out what was holding it in before I saw this little piece.
- Lift intake off, it should be fairly easy so if anything is tugging take a look around to see if you missed anything.
- I always cover the intake ports with paper towel so I cannot drop any bolts or contaminates in the cylinders.
Once the manifold is removed, you can take the two bolts out holding the master cylinder in. I left the brake lines connected to ensure the system stays bled. I turned the master cylinder 90 degrees and slid it ahead (it has flexible connections so it did not hurt the lines).
Step 5: Remove Brake Booster (Finally!)


Four nuts hold the booster in from the inside of the vehicle. Also remove the pin connecting the brake petal to the booster arm. It is quite hard to get pictures under the dash. To remove the connecting pin, pry the metal center out. Then pinch the wings of the plastic piece together as you slide it out. This part can take quite a bit of patience. Once you have the four nuts off and the pin out, you are done under the dash.
Slide the booster out the front. I had to rotate it upwards to get it to clear. Just try a few combinations and do not force it too hard (could break one of the lines or some wiring near the dash).
I took the time to compare the old booster to my new one. I measured the length of the arm on both ends of each to make sure everything will go nicely together. It helps I ordered a genuine Ford booster from online, and I was pleased to see the part number was one revision newer (hope they solved the issue).
Step 6: Reassemble


Put each of the pieces back on in the reverse order. It seems to go together a lot better than it comes apart! Probably because the clips are designed to be easy to install at the factory. I used anti-seize on all of the bolts in case I need to take things apart down the road for any other reason. It seems to work quite well, and helps save the stress of breaking corroded bolts later on. Trust me, it is worth the time.
To make things easier, I like to wash everything off while it's apart. Helps to make things look nicer, plus can't hurt while it is all in pieces! I wiped all of the oil and deposits off of the intake surface to ensure the rubber gasket would seal. If your Edge is older, I would suggest inspecting the shock towers and inner cowl for ANY signs of rust. This would be the perfect time to seal that rust up, and help your car last a little longer.
Step 7: Conclusion/Comments
Now your brakes should be like new! To test your booster, press your foot on the brake and start the car. The brakes should be very firm then as you start it the vacuum will pull the petal down some. You now know you have power brakes. Always test brakes before driving on the road and if anything feels odd, take the time to inspect it. Brakes are essential to your safety.
It is rewarding to do your own work on the vehicle. There is a peace of mind saving some money, and knowing exactly what was done on your car. Also you can ensure that the repairs are performed correctly and take the time to sort through issues. Professionals at shops do an amazing job, but I have had some issues in the past with them trying to oversell parts or overlook different issues. My first car is still on the road with over 255,000 miles on it (my brother is driving it). Plus, it never hurts to learn something new!

Participated in the
Fix It! Contest


