Introduction: Generic Linear Actuator With Built-in Tension Spring


1/24/2018 Update: The STL files have been updated with a stronger belt grip.
3/17/2018 Update: Added STL files for openBuilds 2020 rail (linearActuatorFor_2020_STL.zip).
4/18/2018 Update: For 1010 implementation, changed the smooth idler with a 20 tooth idler (making it wider). I adjusted the STL files accordingly. (linearActuatorFor_1010_STL.zip).
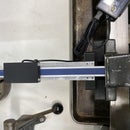
After building the Cantilever printer (instructable here: https://www.instructables.com/id/3D-Printer-Cantilever/) I decided to design a more generic linear actuator. Unlike the cantilever printer the belt would run entirely on the inside of the aluminum extrusion. Unlike the cantilever printer that uses belt tensioner clips, this actuator will have a tension spring inside the idler end.
The current design has the electronic end stop build in to the NemaEnd. The STL files will have a Nema End without end stop holder
The design was created in Fusion 360 and can be downloaded from GrabCad.com
The implementation in the attached video uses a nema 17 0.4A stepper and can reach 11000 mm/min before skipping. Adding a stronger stepper should get you more speed.

Step 1: Parts List
below is a list of all parts (non 3d printed) with Amazon links for download. I have to point out that shopping directly from China (i.e. AliExpress) could bring cost down.
8020 1003 series http://amzn.to/2BHoFEs
Belt tensioner spring http://amzn.to/2BueT6b
endstop http://amzn.to/2D180JZ
stepper nema 17 0.4A http://amzn.to/2AV0a32
GT2 Timing Belt Pulley 20 Teeth Bore 5mm Width 6mm (5 pack) (1x) $8.99 http://amzn.to/2BAHJQt
Linear Rail MGN12 250mm http://amzn.to/2BwF5x3
Square nut http://amzn.to/2BwF8ZL
hex socket screws:
- 25mm http://amzn.to/2CBIR7w
- 20mm http://amzn.to/2CYSy0N
- 6mm http://amzn.to/2CYZNpx
- 15mm http://amzn.to/2D2U7ek
Idler (20 theeth) 3mm bore:https://amzn.to/2r6cZ7x
2020 t-nut: https://amzn.to/2jhQ84B
GT2 timing belt:http://amzn.to/2CDd3yX
Step 2: Assembly


Once all parts are printed assembly speaks for itself.
Wire the End-stop prior to sliding into the Endstop case
Add Idler to Idler End with a 25mm hex socket screw
Add tension spring inside the Idler End and slide onto aluminum extrusion
Slide Nema End on opposite side of Aluminum extrusion
add nema stepper motor into Nema End but don't screw down yet as you will need to measure and attach belt
Wrap long piece of GT2 belt around idler and nema pully and mark were end meet at belt clip BUT before markign make sure there is tension on the spring (the spring is 20mm, I recommend pushing it in some 7-10mm when measuring belt).
Cut belt and insert ends into belt clip (meeting at the center)
remove nema stepper and loop belt all around the Aluminum extrusion.
Tension the spring (I use a long bar clamp to push in the tension spring) which will leave enough room to push through the Nema Pully.
Screw down nema and release tension.
Below is the assembly video I created for the use of this rail in the C3Dt/c 3D Printer:
Step 3:
Step 4: Test Actuator

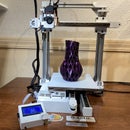
Once assembled you can test the actuator by connecting it to a RAMPS 1.4 setup connected to an application like Pronterface.
Make sure that the axis your using is configured within the boundaries of the actual actuator. You can configure the Marlin software accordingly.
In the video attached the Ramps is executing the print of a vase. The Linear Actuator represents the X-axis
Once you've build one or two of these connect them (with attached Slider Clamp) and have fun
If you liked this check out my other instructables or visit my website at https://core3d.tech
Step 5: Parts at Work
In case you're wondering what to do with it, check out this video


