Introduction: How to Check Blood Sugar and Take Insulin

In this instruction set I will demonstrate how to check blood sugar using a glucose monitor and how to take insulin using an insulin pen.
Step 1: Preparing the Materials

Place a testing strip into the blood sugar monitor. Make sure a clean lancet is in the lancing device. Also make sure the lancing device is calibrated correctly. I keep mine set on 5, but your doctor may instruct you differently. You just need to find the setting that allows you to get enough blood, but not too much. Like a lot of this process, it may be a trial and error situation.
Step 2: Choose and Sanitize a Finger to Prick

Choose the finger you are going to prick and use an alcohol swab or wash your hands to clean the area of the fingertip that you will prick. The finger may become tender or bruised after you prick it, especially if you are a newly diagnosed diabetic, so I have always found it best to prick the inside of the fingertip as opposed to the pad of the fingertip because you touch less with the inside of your fingers than you do with your fingertips. Once you have chosen your finger. Let the area dry or wipe it with a cotton swab before proceeding.
Step 3: Pricking the Finger


Line up the lancing device on the area of the finger you have swabbed. Press the button on the lancing device to prick yourself. Fingers that have been pricked often will begin to develop calluses in the areas that are constantly pricked, so they may not bleed easily. If this is the case, you may have to squeeze the fingertip. In some cases, particularly for newly diagnosed diabetics, squeezing the fingertip still might not cause the finger to bleed; if so, start from the base of the finger and squeeze upward towards the area that was picked. You may just have to squeeze the finger in multiple different spots to get enough blood to be tested. If you consistently have trouble getting enough blood, try running your fingers under warm water first or doing a quick exercise to encourage blood flow. Once you do have enough blood on your finger to fill the strip, hold your finger up to the strip. The strip is designed to collect the blood, so all you need to do is touch the blood to the strip and it will be collected with no difficulty or mess. You can use your cotton swab to stop the bleeding after you have put gotten the blood on the test strip.
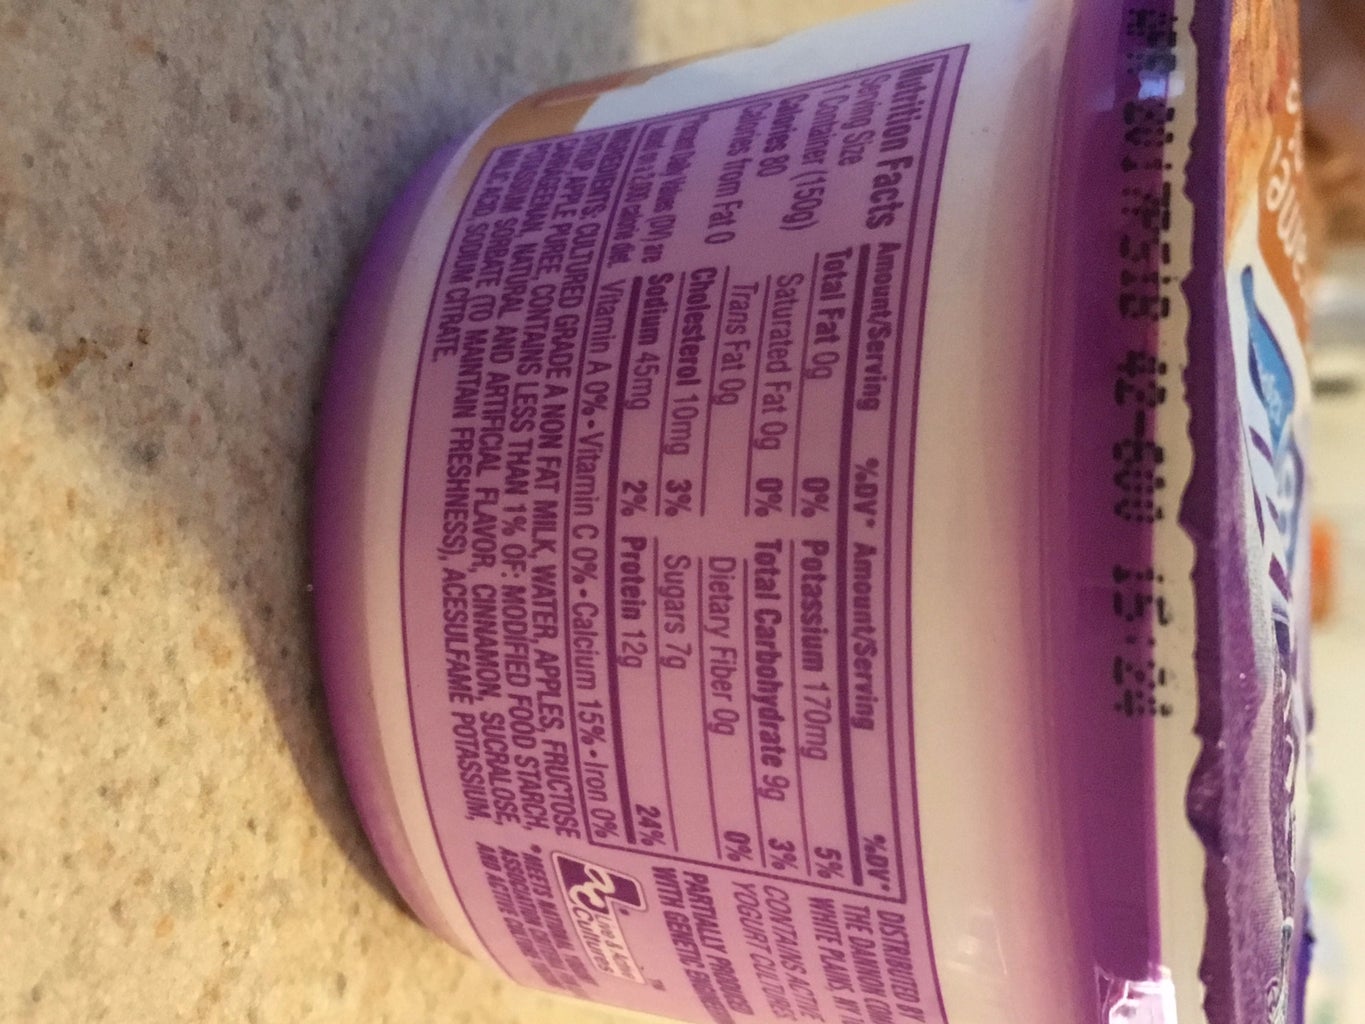
Step 4: Determining Correctional Units of Insulin

After about five seconds your meter will tell you what your blood sugar is. To determine how many units of insulin need to be taken, you must first determine your correction units. Your doctor will tell you the range that you should try to keep your blood sugar within, and they will tell you how to correct. Personally, my range is 100 to 140, and my correction ratio is one unit for every 30 that I am over. For instance, in this photo my blood sugar is 192, so I rounded up to 200, requiring 2 units of correctional insulin. The range and ratio will be different for each person based on age, weight, gender, type of diabetes, and so on, so you will need to know your range and correction ratio or that of the person you are injecting and do the math accordingly.
Step 5: Carb Counting to Determine Units of Insulin
After you know the amount of units you need to add to correct, if any, you can determine how many units you need to take based on what you are consuming. Some diabetics are told to use a base amount of units of insulin for every meal. If that is the case, you can skip this case. If you do not have a base amount, like me, you will need to count the carbs of what you plan on eating and/or drinking, which can be a bit difficult and time consuming at first, but it will get easier. All foods and beverages are required to have nutrition facts, so will just have to add up the carbs listed on the nutrition facts of everything you are consuming, and make sure the serving size on the nutrition facts label matches the serving size you are getting. If you are eating food at a restaurant this may be a bit trickier, but many restaurants have their nutrition facts online, and there are multiple apps and booklets that have nutrition facts for many foods, beverages, and restaurants. Once you know how many carbs you will be consuming, you can determine how many units of insulin you need to inject based on the carb to insulin ratio decided by your doctor. My ratio is one unit for every ten carbs, so if I were to eat this yogurt, which has nine carbs, I would round up to 10 carbs and take one unit of insulin, plus however many correctional units were previously determined. The math may be different for each person based on what his or her doctor determines is best. If the carbs do not come out evenly you will need to round. For instance, if my carb count only amounts to 47 carbs, I would still take 5 units of insulin. If your blood sugar is below your range before you eat you will need to take less insulin than normal. 15 carbs normally brings your blood sugar up about 50, so since my range is 100-140, if my blood sugar was 50 before I ate, I could have 15 carbs of food or drink that I do not count when I count my carbs to determine the units of insulin I would need to take, because those 15 will be extra carbs needed to bring my blood sugar back up to normal range.
Step 6: Determine the Injection Site

Before you inject the insulin, you need to determine what area you are going to be injecting. The most common area is the stomach, as it is less painful because of less muscle and fewer nerve endings, but you can also inject in the thigh or the back of the upper arm. It is important to remember to rotate your injection sites; if you choose to always inject in the stomach, for instance, always switch sides and just try to avoid injecting the same areas frequently. Also avoid injecting too close to the bellybutton or any other scars. Once you have chosen your injection site, clean the area with another alcohol swab and let it dry.
Step 7: Preparing for Insulin Injection


Twist the dial at the top of your insulin pen to show whatever number of units you previously determined was necessary based on your correction and carb count. Pinch the area you are injecting before inserting the needle. This will cut off certain nerve endings and will make the needle and the injection less painful. Be sure that you have a clean needle before you inject, as well; Diabetics vary in how often they change their needles, but it is important to note that when the needle has been used too much it becomes dull enough to be more painful. New needles usually hurt less because they are sharper so they go in more easily. Line up the needle at a 90 degree angle before you insert it. If you do put in a new needle before injecting, twist the dial to show two units and push it down over a paper towel to make sure the insulin comes out of the new needle properly before you attempt to use it on yourself.
Step 8: Injecting the Insulin

Insert the needle and push down the dial at the top of the insulin pen. This is easiest to do if you hold the pen so that your thumb is on the dial as opposed to your index finger. Once you have pushed the dial all the way down, continue to hold the pen steady for a full ten seconds to allow all of the necessary insulin to transfer from the needle. Then you can carefully pull the needle out, cap it, and go enjoy your meal!


