Introduction: How to Design and Laser Cut a Game Card Storage Box


In this Instructable I show how to design a card box from the inside out to fit your favorite card game. I do my design in Adobe Illustrator and I cut the parts on a laser cutter. My example is based on Arkham Horror the Card Game, but you could use the same process for any card game. I show both acrylic and wood versions of the box. The lids have mother of pearl and wood inlay, and the card dividers are color themed to match the card symbols.
Step 1: Tools and Materials


Tools:
Design software (I use Adobe Illustrator)
Access to a laser cutter
Extra Fine Sandpaper
Clamps and blocks for assembly supports
Materials:
1/4" and 3/16" acrylic (I use translucent ivory)
1/4" birch plywood
Shell and wood veneers
All purpose white glue (I use Aleene's Tacky Glue)
Wood glue
Weld-on Acrylic Solvent Cement (and application bottle)
Briwax
Step 2: Design Dividers


Since this box is designed from the inside out, to perfectly fit the cards I want to store, I began with references for the cards and card sleeves I will be storing.
Note: on my laser, cut lines are red, engraving lines are blue, and rastered shapes are black. Any references are drawn in green because the lines will show but the laser will ignore them.
I designed the basic divider shape first. I used the card sleeve reference and plussed it up to an even 3 inches, then I added tabs at the top that will fit into slotted rails. I added a curve that shows above the sleeve so the divider would always be visible, and a small green reference box which is where I will put the identifying icons for different classes of cards. These icons, along with color coding, will make it easy to locate cards in the box.
In a separate Illustrator file, I created drawings for 10 different icons. The only reference images I could find for these icons were small and low resolution, so I had to draw each from scratch, using the pen tool. I have an in-depth tutorial on how to create drawings in Illustrator here.
I then pulled these icons into the box drawing, putting each icon on a separate layer, and sized them to fit the reference box. When I cut these files I will print by turning on the layers for the divider and the appropriate icon; there is only one divider drawing on its own separate layer. Using only one copy of something is important because if changes are necessary, they only have to be done in one place!
Step 3: Design the Box Bottom


My next step was to create a reference drawing of the box itself. I knew the card rows needed to be 3" wide, but how many rows and how long should the rows be? I decided I wanted the box footprint to be similar to the actual game box -- that way the rule book would fit inside if necessary and I could easily store them together.
The Arkham Horror TCG box is 10" by 10", so I made the rows 10" long. Three rows would fit in about a 10" width. I compared this volume to the cardboard box I had the cards in at the time, and everything fit nicely, with room to grow.
I wanted to use clear acrylic for the divider rails, so I laid out the three rows with 1/4" rails in between (green in the drawing) and on either side. Since these rails will have slots to hold the dividers and I want solid box walls, I need four slotted rails with two held in the middle by tabs and two up against the box walls. Finally, I added the exterior walls of the box, with the sides abutting against the front and back. I had a basic plan, now I needed to draw the actual components.
I created two rail drawings: one for the tabbed center rails and one for the un-tabbed side rails. Since the dividers will be cut in 1/8" acrylic, I added a 1/8" slot every 3/8" along the rail. This gave me an asymmetric design with the first slot being at a different distance from each end. I will have to be very careful when installing these to put all four rails in the same way!
I created a side view of the tabbed rail, including the size and positioning of the tabs, because I will use this to position the slots on the front and back.
Then I drew the side of the box. The sides have tabs that fit into the front and back as well, so I created a side view of the side.
Then I drew a front/back panel, and pulled in the side views of the sides and rails, duplicated them and laid them out in the appropriate positions. I used the side views to size and position slots/notches that will fit perfectly with the tabs when cut. This virtual fitting process is the most important part of my design method; it almost guarantees a design works right the first time.
My final step is to measure the outer dimensions of the box on the layout diagram -- 10.47" by 10.32" -- and use these to create the box bottom. These unusual numbers are generated automatically by the virtual layout process, and guarantee a perfect fit while doing virtually no calculations.
Step 4: Design the Box Lid


I decided I wanted the lid to sit flush on the box, held in place by raised corners, so I added 3/4" long tabs to the top of the sides and front/back. I made the tabs 3/16" high because I had decided to cut the top and bottom out of 3/16" acrylic, to keep the weight down where possible. When loaded with cards, this box could get quite heavy!
I created a top-down view of these tabs, minding how they would come together based on the abutting of the sides, and used the pathfinder tool to 'minus the front' or subtract them from the lid rectangle.
Then I created the "AH" monogram by choosing a font, sizing it to fit the way I wanted on the lid, and then selecting Type > Create Outlines to convert it into a vector drawing.
I make the letters on the lid solid black with a blue outline so the laser will both raster and engrave the pocket. I create a separate layer that contains the letters alone, as a red outline, which I will use to cut the inlay.
The drawing is done!
Step 5: Laser Cut the Components


I left the paper on both sides of the acrylic, to minimize smoke damage. Since the plywood does not come with paper masking, I will need to lightly sand the wood pieces before assembly.
I did a manual override of the raster settings to 50% power and 50% speed, which cuts a deep pocket suitable for holding the inlay.
I always dry-fit all my components immediately after cutting so I can re-cut and correct any mistakes as I go. Sometimes that means I have to tape things together; masking tape can act like a second set of hands!
Because I only have one drawing of every part, I often use the multiples capability on the laser cutter to cut as many copies as I want. This lays out a matrix of the same item based on a row and column count you provide. I usually test one, to make sure it works, and then cut the rest. This is the approach I used on the dividers, cutting four copies of each.
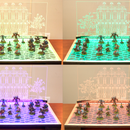
Five of my dividers are color coded to fit certain classes of cards; five are generic so I cut them out of gray acrylic but each has a unique icon to represent different game expansions.
Cutting thin inlay materials can be tricky because the laser cutter's ventilation system can suck away the cut pieces! I put the inlay to the front of the bed and tape it in place, and I put masking tape over the back vent. This doesn't interfere with the downward suction on the bed, which is essential to keeping the cut letters in place.
Just as I dry fit the pieces of the box, I tested the inlay fit in the pocket, and it fit perfectly. This is because the kerf of the laser is just enough that the same drawing that creates the pocket will create a perfect inlay without any adjustment in scale.
Step 6: Assemble the Acrylic Box


The first thing I did was glue the inlay monogram. I applied white glue carefully in the pocket with a stylus, dropped the inlay in place, and set it aside to dry.
Then I fused the left side to the bottom of the box, using solvent cement and a needle applicator bottle. I used 4" x 4" granite sample blocks to ensure the side was at a right angle to the base. I then fused the back and right sides to the base, using granite blocks for alignment and support.
At this point I inserted the two center rails, making sure both had the same orientation, and applied the front panel and fused it in place.
After a few minutes, which is all it takes for the fusing liquid to be totally dry, I set the box on its side and fused the four corners. Then I put in the side rails - once again checking their orientation - and fused them in place.
The acrylic box is done!
Step 7: Assemble the Wood Box


Once again, I began with the inlay, gluing the wood letters carefully into place.
I used wood glue to assemble the wood box, and unfortunately wood glue takes a lot longer to dry than acrylic solvent cement! This required I do things in a slightly different order.
I decided to assemble the sides of the box first, using a combination of granite blocks and wood clamps to hold things in place while they were dried.
Then I glued the sides to the bottom, using the blocks to hold them down firmly in place until dry.
I finished the box using Briwax. I have an Instructable that talks more about this wood finishing process here.
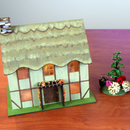
Step 8: The Finished Boxes


All that's left is to insert the dividers Now the fun begins: organizing your cards!