Introduction: How to Put Tabs in Thick Materials for Waterjet Cutting
Waterjet cutting is by far the easiest method when cutting thick materials, both in terms of setup and the kinds of material that can be cut. It works by focusing a tight beam of high-pressure water through a diamond orifice into a nozzle and adding an abrasive into the mix.
The abrasive (garnet) is carried by the water, which exits the nozzle faster than the speed of sound. This high-pressure, high-velocity stream hits the workpiece and the abrasive particles slowly chip away at the material. Since the cutting action is abrasion, very little cutting forces are put on the material and there are no changes to surface properties of the material by Heat.
The true power of waterjets comes with their ability to cut any hard material, to large thicknesses, be it metal, stone, composites, etc. Waterjets are primarily used as a roughing tool to get the base shape, which can then be finished by machining. As technology improves the cutting tolerances are coming down and the parts can be directly fabricated on the waterjet without additional machining operations.
Step 1: Problem With Cutting Thick Materials
With great power, comes great responsibility, in not losing your part into the dark abyss of the waterjet collection tank.
Though the material setup is easier with a waterjet, we need to make sure that the parts that are cut out do not fall into the collection tank to be lost forever.
The easiest way is to put tabs into the cutting path. Tabs are small portions of the path that are left uncut so that the cutout is still attached to the parent material. Tabs are trivial to accomplish in thin materials that are under the 3mm range and can be easily broken apart. But what happens if the material is thick and putting a tab means it would be near impossible to remove cleanly?
In milling machines, we have the ability to control the cutting depth of each cutting pass, which gives us the ability to put tabs at any height of our choosing. Controlling the height of the cut with waterjets are nontrivial, there are a myriad of variables to take into account to control the depth which we will leave humanity to solve at a later date.
If we cannot control the depth accurately and we cannot put full height tabs, then what can we do?
Step 2: One Small Step for Cutting, One Giant Leap for Tabbing.
Well, if we can't control the height and can't put full depth tabs. Then we won't fully cut through the material, leaving a small portion uncut. We can do this by making the waterjet race over the particular spot thereby not giving enough time to fully cut the material.
There's a method to this madness. The waterjet computes the parting feed rate for any material given the thickness and machinability. From there depending on the quality of cut we give the software computes the optimal feed rate to cut over the path.
Our objective is to make the jet jump over a specified distance in the path at a specified speed over the computed parting feed rate. Now the depth of the uncut portion depends on what factor above the parting feed we decide to give. Let's see how we can do that.
Step 3: Setting Up the Cut
We talked about making the waterjet cut a specified distance at a feed rate above the parting feed rate. In this step, we will explore how we can do all that in the software and let it compute the feed rates for us.
In our Super Fablab at Kochi, we have the OMAX 5555 waterjet cutter with an integrated tilt-a-jet for taper free cutting. The settings and screenshots correspond to the above, but the methodology remains the same in any cutting system.
1. Import the geometry into the cutting software, give the required cutting quality to all the lines.
2. Set up the lead I/O and give the cutting path.
3. In the geometry you want to tab, divide the line segment at a specified distance using the divide tool. I usually set them to 1mm, you can experiment and see what works with different material, the distance helps give consistency to the tabs and give predictable results.
4. Select the geometry you want to tab and then go to edit the Xdata for the selected items from the menu above. [X data is a fairly advanced topic, in short, it helps give custom commands to selected geometries in the cut file, like bevels, change Z height, etc]
5. From the dropdown menu, choose the force percent speed option. [we can also choose a force absolute speed but we need to know the exact parting speed of the material in order to do that] The percent speed option means the software will compute the parting speed depending on the material and thickness and will apply a multiplying factor given by us over the parting speed to the selected line.
6. In the Input box, give a value of about 125%. From experience, for harder materials like Stainless steel, it's best to start from 125% over the parting speed. For softer materials like aluminum, start at well over 150% as it will get cut much faster.
7. Depending on the thickness and the material, you will have to play with the values a bit to get the right tab height. Remember that the higher the force percent speed value, the larger the tab will be.
8. Once all the tabbing is done, resume normal cutting operations and cut out the part. The software computes all the feed rates and cuts out the part. Remember when the jet is not cutting through water will splash above, just a heads up to not get wet.
Step 4: Putting It All Together
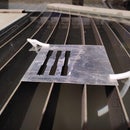
In a similar fashion, divide line segments and put Xdata on all the geometries you want to tab. Your end result should look something like the image. After cutting just hold the part and bend it back and forth the tab will break with little effort. It's best to leave just one tab in a part as more tabs mean you won't be able to bend the part and break the tab.
The percent speed trick is quite useful when you are cutting hard materials like Stainless steel, Mild steel, aluminum, all metals, etc. I haven't checked it with stone/granite or other brittle materials yet. Don't know how different it would be when cutting brittle materials, It's possible it could work/crack.
Play with the settings, like the tab width, speed settings, different materials etc. let me know in the comments and I will try them out as well.
Cheers, Happy cutting.

Participated in the
Anything Goes Contest


