

Introduction: How to Update the Firmware of Your Arduino Wi-Fi Shield (not 101)


You probably got an Arduino Wi-Fi shield (not 101) for Christmas, or you have bought one before or after that, but it gives you an errors and the "error" LED is glowing that means you should update its firmware in order to make your IoT project, so I am going to show you how to do it
To do it you gonna need the following things:
- PC or laptop
- A to mini B USB cable
- and few programs
- Arduino board
Step 1: Preparation


First prepare your PC by installing the following programs.
- Atmel Flip 3.4.7 or newer, download it from here
- Arduino IDE 1.6.7 or newer from here (Arduino's official site), if you don't have it.
- Java Runtime Evironement from here , you can download it with Flip.
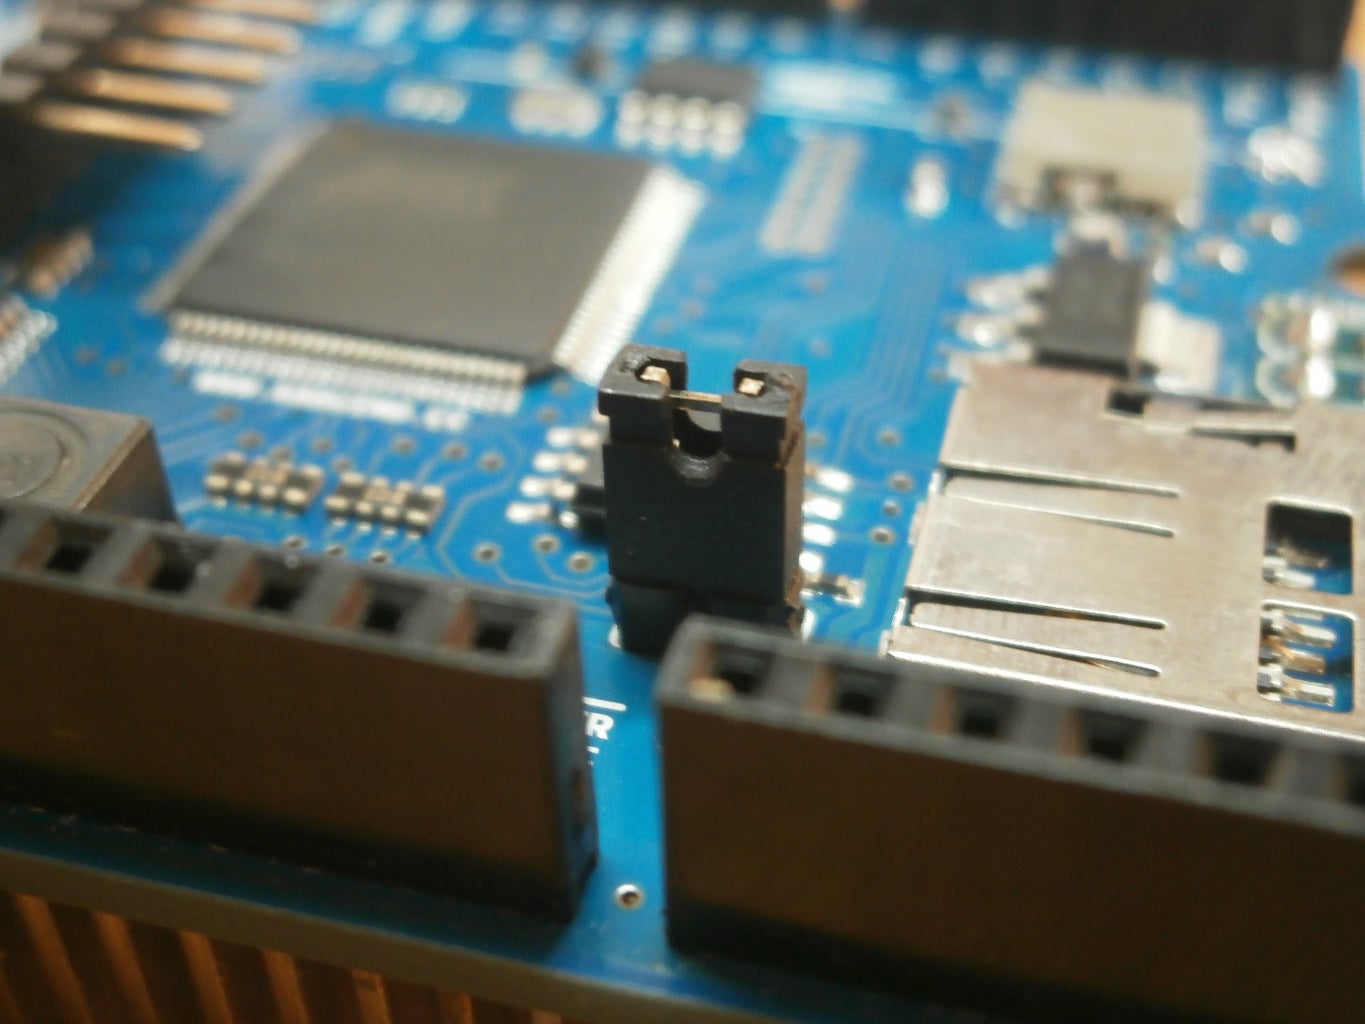
Now prepare the shield, by shorting the J3 pin (see the photos above)
NOTE:The Wi-Fi shield must not be connected to any Arduino board !!!
Step 2: Installing Driver for the Shield


Now connect the shield to your computer with the USB cable, then open the "Device manager". You should see ''AT32UC3A'' under ''Other devices''. Right click on it and then left click on ''Update Driver Software''. A new window will open click on "Browse my computer for driver software". Then click on the browse button and another window will open, navigate to C:\Program Files(x86)\Atmel\Flip 3.4.7\USB. Click on OK and then on Next. It will ask you "Would you like to install this device software ?" click on Install and you are done with the driver installation. Check the screenshots above for more info.
NOTE: You should install Atmel Flip 3.4.7 before installing the drive, cause the driver is in it !
Step 3: Updating the Firmware

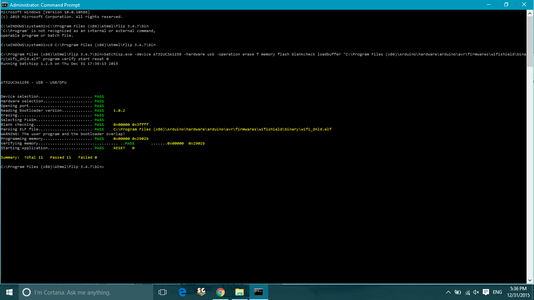

To update the firmware open the Command Prompt as an Administrator and execute the following commands by copy and paste them one by one in the command prompt, after you paste a command press enter to execute it.
First execute this command: cd C:\Program Files (x86)\Atmel\Flip 3.4.7\bin
Execute this command to upload "wifi_dnld.elf" on the shield's microcontroller and let it finish: batchisp.exe -device AT32UC3A1256 -hardware usb -operation erase f memory flash blankcheck loadbuffer "C:\Program Files (x86)\Arduino\hardware\arduino\avr\firmwares\wifishield\binary\wifi_dnld.elf" program verify start reset 0
When it finish the "Data" LED the blue one on the shield will glow, it means that everything is OK, wait for a few seconds and unplug the USB cable then plug it back and continue.
Execute this command to upload "wifiHD.elf" on the shield's microcontroller: batchisp.exe -device AT32UC3A1256 -hardware usb -operation erase f memory flash blankcheck loadbuffer "C:\Program Files (x86)\Arduino\hardware\arduino\avr\firmwares\wifishield\binary\wifiHD.elf" program verify start reset 0
NOTE: If you get this error: "atlibusbdfu.dll not found" go back to Step 3.
NOTE: THE ARDUINO IDE MUST BE INSTALLED AS DEFAULT - C:\Program Files(x86)\Arduino so the Flip can find the needed files !
Step 4: You Are Done !

Unplug the USB cable and unshort the J3 pin of the Wi-Fi shield. Then connect the shield with an Arduino board and upload the following code, which you can find in the examples of the IDE.
If everything is OK you should see the MAC address of the shield also every network in the area.
Now you can start with your Internet of Things project.
<p>#include <br>#include </p><p>void setup() {
  //Initialize serial and wait for port to open:
  Serial.begin(9600);
  while (!Serial) {
    ; // wait for serial port to connect. Needed for Leonardo only
  }</p><p>  // check for the presence of the shield:
  if (WiFi.status() == WL_NO_SHIELD) {
    Serial.println("WiFi shield not present");
    // don't continue:
    while (true);
  }</p><p>  String fv = WiFi.firmwareVersion();
  if ( fv != "1.1.0" )
    Serial.println("Please upgrade the firmware");</p><p>  // Print WiFi MAC address:
  printMacAddress();</p><p>  // scan for existing networks:
  Serial.println("Scanning available networks...");
  listNetworks();
}</p><p>void loop() {
  delay(10000);
  // scan for existing networks:
  Serial.println("Scanning available networks...");
  listNetworks();
}</p><p>void printMacAddress() {
  // the MAC address of your Wifi shield
  byte mac[6];</p><p>  // print your MAC address:
  WiFi.macAddress(mac);
  Serial.print("MAC: ");
  Serial.print(mac[5], HEX);
  Serial.print(":");
  Serial.print(mac[4], HEX);
  Serial.print(":");
  Serial.print(mac[3], HEX);
  Serial.print(":");
  Serial.print(mac[2], HEX);
  Serial.print(":");
  Serial.print(mac[1], HEX);
  Serial.print(":");
  Serial.println(mac[0], HEX);
}</p><p>void listNetworks() {
  // scan for nearby networks:
  Serial.println("** Scan Networks **");
  int numSsid = WiFi.scanNetworks();
  if (numSsid == -1)
  {
    Serial.println("Couldn't get a wifi connection");
    while (true);
  }</p><p>  // print the list of networks seen:
  Serial.print("number of available networks:");
  Serial.println(numSsid);</p><p>  // print the network number and name for each network found:
  for (int thisNet = 0; thisNet < numSsid; thisNet++) {
    Serial.print(thisNet);
    Serial.print(") ");
    Serial.print(WiFi.SSID(thisNet));
    Serial.print("\tSignal: ");
    Serial.print(WiFi.RSSI(thisNet));
    Serial.print(" dBm");
    Serial.print("\tEncryption: ");
    printEncryptionType(WiFi.encryptionType(thisNet));
  }
}</p><p>void printEncryptionType(int thisType) {
  // read the encryption type and print out the name:
  switch (thisType) {
    case ENC_TYPE_WEP:
      Serial.println("WEP");
      break;
    case ENC_TYPE_TKIP:
      Serial.println("WPA");
      break;
    case ENC_TYPE_CCMP:
      Serial.println("WPA2");
      break;
    case ENC_TYPE_NONE:
      Serial.println("None");
      break;
    case ENC_TYPE_AUTO:
      Serial.println("Auto");
      break;
  }
}</p>