Introduction: Interfacing Vibration Sensor Module With Arduino


The vibration sensor is needed to find out whether the machine or equipment is producing vibrations or not.
Supplies
Hardware Components
Arduino Uno
Vibration Sensor- SW 420
LED
Jumper Wires
USB Cable
Software Components
Arduino IDE
Step 1: About Project
There are several critical machines or expensive types of equipment which undergo damages due to vibrations. In such a case, a vibration sensor is needed to find out whether the machine or equipment is generating vibrations or not.
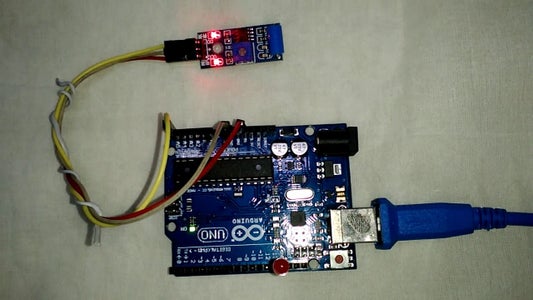
The vibration sensor module is interfaced with popular Arduino UNO and whenever the vibration sensor recognizes any vibration or jerk an LED will start blinking.
IoT Course will help you to know more about IoT Devices so that it will easy to build an End-to-End IoT Solutions.
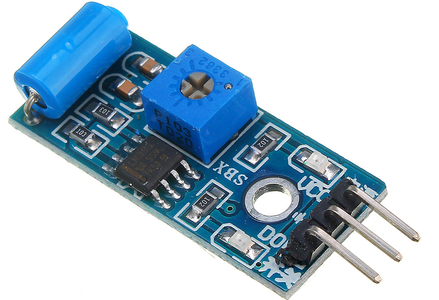
Vibration Sensor Module:
The SW-420 vibration module, which can work from 3.3V to 5V. The sensor uses the LM393 comparator to recognize the vibration over a threshold point and provide digital data, Logic Low or Logic High, 0 or 1.
There are three surroundings available in the module, two LEDs, one for the Power state and another for the sensor’s output. In this project, we have used 5V to power the module. The LED is connected to the D13 pin. The Ground and the 5V pin are used to power up the Arduino whereas the A5 pin is utilized to take the data from the vibration sensor. Learn more about IoT devices through the Internet of Things Course Training to build Industrial IoT Solutions.
Step 2: Run a Program
#include
#define ON 1
#define OFF 0
/* * Pin Description
*/
int vibration_Sensor = A5;
int LED = 13;
/*
* Program flow Description
*/
int present_condition = 0;
int previous_condition = 0;
/* * Pin mode setup
*/
void setup() {
pinMode(vibration_Sensor, INPUT);
pinMode(LED, OUTPUT);
}
/*
* Led blink
*/
void led_blink(void);
/*
* main_loop
*/
void loop() {
previous_condition = present_condition;
present_condition = digitalRead(A5); // Reading digital data from the A5 Pin of the Arduino.
if (previous_condition != present_condition) {
led_blink();
} else {
digitalWrite(LED, OFF);
}
}
void led_blink(void) {
digitalWrite(LED, ON);
delay(250);
digitalWrite(LED, OFF);
delay(250);
digitalWrite(LED, ON);
delay(250);
digitalWrite(LED, OFF);
delay(250);
}
Step 3: Implementing Vibration Sensor With Arduino