Introduction: IoT Project : SATLINE
SATLINE is an innovative safe with a variety of smart security system features. Clear camera quality and a loud alarm sound are among these qualities, which you may use as evidence to determine who opened the safe from SATLINE mobile application. This project was created by:
- 2501988560 – Andrew Arvianto Tjokro Hananda
- 2501971370 – Jason
- 2540128266 – Stefanus Nahar
Here's our link for the demo project: https://drive.google.com/file/d/1NlOdscoiYSTcyMHYs9pDH6AdOgm5Ju8V/view
Supplies
Hardware Supplies:
- 1x ESP32-CAM AI THINKER + Camera OV2640 2MP
*Micro USB Cable + Dev Board USB to TTL CH340 for uploading the code to ESP*
- 1x MT3608 Adjustable Step-Up Boost DC-DC Converter 2A
- 1x Passive Buzzer Module 5V Pasif Module
- 1x MC-38 Magnetic Door Sensor
- 1x LED Red
- 1x Resistor 1K Ohm 0.25 W 5%
- 1x TP4056 Charger Battery Micro USB Charging Modul 1A 5V (Protection Included)
- 1x Double Layer Trough Hole 3x7cm PCB
- 1x Plain PCB
- 1x Rocker Switch 2-pin
- 1x Any Solid Briefcase
- 2x Battery AA Holder
- 2x Rechargeable Battery Sony VTC4 2100mAh 3.7V
- 2x Terminal Block 2-pin
- 2x Long Stackable Header 8 Pin 2.54mm Pitch
- Sufficient Jumper Cable Male-to-Male
Software Supplies:
- Visual Studio Code (Platform.io, C++ & Flutter/Dart extension included)
- MinGW C++ Compiler
- Google Firebase RTDB & Storage
Step 1: Design the Battery Circuit
Starting from the battery circuit, we parallel the two battery case holders by connecting the same VCC to B+ and the same ground to B- so that the voltage that comes out of the battery remains 3.7v and the battery capacity becomes larger.
P.S. The battery circuit and the esp32-cam circuit are made separately on the PCB. Also, the picture above is just an illustration of how to connect the battery to the charger module and the output to the PCB.
Step 2: Design the ESP32-CAM Circuit
Connect the line from terminal block U2 which is the VCC input from the output + Battery charger module to terminal block U3 which is a switch as a connector and breaker of electricity from the battery and connects ground fellow. Then, connect to the input + step-up module as a voltage amplifier from 3.7v to 5v and connect the line from the output + step-up to 5v on the ESP32-CAM and connect the same ground. Next, connect the VCC output on the esp32-cam to VCC on the buzzer, ground to ground, and I/O buzzer to IO15 on the esp. Next, because the magnetic sensor has no polarity, one of the pins connects to IO13 and one of them goes to the ground. Finally, connect IO2 to the anode on the LED, and the cathode is connected to a 1k resistor then connect it to the ground.
Step 3: Convert the Circuit Into PCB
We just convert the esp32-cam circuit to PCB and the battery circuit will be made with Double Layer Trough Hole PCB. To convert the circuit that we made previously into PCB, we use EasyEDA software to convert it. Then, make the size of the PCB around 7x7cm. Arrange all the components efficiently and set the PCB track width to 1.5 mm as the PCB track will be the bottom layer. You can route by yourself or auto-routing the components from the software. To prevent short circuits (VCC line colliding with the ground), ensure that the PCB lines are spaced widely apart. Lastly, adjust the options when exporting to PDF in accordance with the example shown above.
Here's an example of the esp32-cam PCB circuit below:
Attachments
Step 4: Create the PCB
Here's how to etch the PCB:
- Print the results of the pdf file using glossy photo paper and make sure the glossy side is affected by the print.
- Cut the PCB according to the size of the PCB design and grease the PCB with thinner.
- Attach the PCB paper to the PCB and rub it with an iron for 10-15 minutes.
- Soak the ironed PCB with water then remove the PCB paper.
- Pay attention to the ink path attached to the PCB, use a PCB cutter to peel off the PCB holes, and blacken the PCB path that lacks ink using a permanent marker.
- Etching the PCB using a measure of 20 ml of HCl, 20 ml of H202, and 80 ml of water, and soaking the PCB until the copper side other than the one with the ink is gone, then remove the PCB and wash it with water.
- Dry the PCB and grease the PCB using thinner then rub it to remove the ink on the PCB.
After we etch the PCB, make sure to check the continuity on the PCB whether the path short circuits or not. Next, we drill the PCB hole. Other than the terminal block, all holes are drilled with a 1mm diameter, whereas the terminal block uses a 1.5mm diameter. Here you go, the PCB is done.
Step 5: Assemble Components & Soldering the PCB
Assemble the essential components, including the esp32-cam, step-up module, buzzer module, terminal blocks, LED, resistor, and two cable jumpers (for extending the reed switch), in the order shown on the PCB. Following that, we solder the key components at the bottom layer, taking care to solder the components properly. We also solder the battery circuit with the use of two cable jumpers at output+ and output- at the charger module. Then, we solder the cable from the battery case holder and make it parallel like as I told you in Step 1. Lastly, we solder the switch with two cable jumpers to connect and disconnect the electric current.
Step 6: Setup Google Firebase
Make sure to connect your selected email to google firebase and then,
- Login to the Firebase console.
- Create a new project and enter a name.
- Create a database, initialize data, and set rules to true.
- Create storage, create an images folder, and set rules to true.
Here you go, the setup is done.
Step 7: Creating & Uploading the Code
For the code, we use platform.io in Visual Studio Code and C++ language.
Here's a brief explanation of the code:
In the void setup section, set all the esp32-cam pins to be used. Next, Initialize wifi and NTP client to take time off the capture. Next, initialize SPIFFS as memory and format SPIFFS to ensure data is not corrupted. Then, initialize the camera and test take pictures. Lastly, initialize the firebase with the stream path "Receive."
In the void loop section, read the reed switch state and enter data into 'doorState'.
In the taskTakePhoto Section, read 'doorState' and make sure the value is HIGH and the 'lockState' value is 0 then run the code in it. If the criteria are met, it will kill the RTDB process including streams (because upload storage cannot be at the same time as RTDB) and take photos. In taking photos there is a process for turning on the flash, saving the image in memory, taking the date and time of the photo, and checking that the image has been taken and stored correctly, then turning off the flash. Furthermore, the upload process will ensure that the upload has not been completed and has finished taking pictures and Firebase is ready to use. If fulfilled, the date and time of the photo for the firebase upload path will be taken and will try to upload if it fails, the process will repeat if it is successful, the RTDB and stream data upload process can be continued, and send buzzerState = true to turn on the buzzer.
In the taskBuzzer Section, checking buzzerState == true if true will turn on the buzzer, and checking doorState == LOW or lockState == 1 to turn off the buzzer and change buzzerState = false then the buzzer will turn off in 5 seconds.
In the taskSendDoorState Section, check that the current 'doorState' is not the same as the previous doorState and whether is it possible to upload data. If met, it will send 'doorState' now Open or Close.
Now, let's build and upload the code to esp32-cam with Dev Board USB to TTL CH340 through a micro USB cable then unplugged from Dev Board and plug in PCB. Here's our link code:
https://github.com/JasonJason1/espcamtofirebase.git
Step 8: Create 3D Printing Case
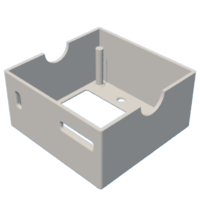
For the PCB case, we use fusion360, and here's our case file:
Step 9: Finishing the Briefcase
For the finishing, we Insert the esp32-cam PCB into a 3D printing case. After that, connect the cable to the terminal block. We also made holes in the base cover of the briefcase to place the 3D printing case and the side of the briefcase base cover to attach the magnetic sensor. Then we also made holes in the side of the briefcase for the charger hole. Then we attached the battery PCB using hot glue, then attached the battery case holder and 3d printing using double-sided tape. Don't forget to attach the magnet to the side of the briefcase cover and adjust its location with the magnetic sensor. Here you go, the briefcase is done.
Step 10: Create App
To create our app, we use Flutter in Visual Studio Code, and here's our link code:
https://github.com/JasonJason1/SATLINEMADE.git


![Tim's Mechanical Spider Leg [LU9685-20CU]](https://content.instructables.com/FFB/5R4I/LVKZ6G6R/FFB5R4ILVKZ6G6R.png?auto=webp&crop=1.2%3A1&frame=1&width=306)


