Introduction: Light Saber T-Shirt


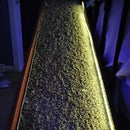

The company I work for had these Jedi t-shirts created as an inside joke. Overall, they are pretty bland. Wanting to jazz it up, I added an illumination effect by placing EL tape atop the lightsaber blade. Since the blade design is very simple, just a straight length, this project is not complicated. The build time only took about 2 hours or so.
Step 1: Materials
* t-shirt to light up
* EL tape
* EL inverter w/ battery pack
* clear nail polish
* Velcro strip
* hot glue
Since the t-shirt I modified was custom, I can't say where to get one. Here's one that is similar and even looks much nicer. In general, any t-shirt can probably be illuminated as long as the EL material can be put in place properly.
The GrayBean EL tape is high enough to cover the height of the lightsaber. Even though it is much too long for what is needed, the waste can be reused in another project. It has an inverter that plugs into the wall, but that won't get used. Instead, it is replaced by the GrayBean battery pack inverter which has compatible connector and 3 effects modes: constant on, quick strobe, slow strobe.
The velcro has to be no higher than the EL tape. I'm not sure if the self-adhesive backing version would work. I happened to have the sew-on version in my workshop.
Step 2: Cutting


Cut a slit just shy of the height of the EL tape at the point where blade connects with the grip. It needs to be not as high as the EL tape because the fabric will undoubtedly tear a bit. To slow the tearing, apply the clear fingernail polish to the edges of slit. Let it dry before continuing.
Lay the EL tape on the blade graphic positioning the black power connector left of the slit opening. Cut the EL tape just a bit longer than the blade graphic. Shape the tip of the EL tape so that it looks like a lightsaber tip.
Cut a length of Velcro smaller than the length of the EL tape.
Lay the EL tape on the blade graphic positioning the black power connector left of the slit opening. Cut the EL tape just a bit longer than the blade graphic. Shape the tip of the EL tape so that it looks like a lightsaber tip.
Cut a length of Velcro smaller than the length of the EL tape.
Step 3: Gluing

Hot glue the loop part of the Velcro onto the shirt. Hot glue the hook part of the Velcro onto the *BACK SIDE* of the EL tape. In order to know which side is the back side, turn it on, and then mark it with a pen.
As shown in the image, I used too much glue on the loop Velcro strip. It squeezed out the sides. But because the height of the Velcro is smaller than the height of the EL tape, most of it is hidden in the end. I used standard size hot glue, because that is all I had. Maybe the mini hot glue would have been better.
After everything has dried and cooled, feed the EL tape from inside the shirt through the slit and attach it to the blade graphic.
Step 4: Sewing

The last step is to sew a pocket on the inside of the t-shirt so that the battery pack has a place to sit. I happened to have had a spare t-shirt which I cut up to create a pocket. It doesn't really matter what material is used since it won't been seen. The important thing is to use thread that is the same color as the shirt.
And that's it. Pretty simple.
And that's it. Pretty simple.

Participated in the
Weekend Projects Contest


