Introduction: Make Your 3D Printer Play Music
If you own or have used a 3D printer, you doubtless know that, unless your's is equipped with "silent" stepper drivers, 3D printers make a whole range of... interesting... noises while they operate.
Well, in this Instructable, we will make all those random noises serve a higher purpose. By making use of acoustic science and clever timing, we will make your 3D printer play a little tune. The cool thing is that we will perform this upgrade without adding any hardware to your printer - no speakers even!
We will make use of an age-old hack to play music using stepper motors by making them vibrate at specific frequencies. With a couple modifications to the Marlin firmware, your 3D printer can play a lovely song before your print begins.
Supplies
Quite a bit of the work we will be doing in this Instructable is in the code of the firmware (Marlin) that runs on the 3D printer's controller. Therefore, the list of supplies you will need to make this amazing upgrade to your printer is fairly modest.
A Creality Ender 3 3D printer
In this Instructable, I am using a Creality Ender 3. However, you can adapt the techniques used in this Instructable to make just about any 3D printer play music for you, as long as it runs Marlin firmware. The details on flashing the new musically-enhanced firmware onto your printer's controller might differ from the steps in this Instructable though.

A USBasp AVR programmer
The USBasp programmer is a tool used, in this Instructable, to flash a bootloader onto the Ender 3 control board. If you don't have one of these on hand, you can also use an Arduino Uno to flash the bootloader. I wrote some instructions for this in Step 7 of this Instructable.

Typically, USBasp programmers have a ten-pin (2x5) header onboard. The Ender 3 control board uses a six-pin (2x3) ISP header for programming. So you will also need a ten-pin to six-pin adapter with your USBasp programmer. Thankfully, many vendors include this adapter with the programmer.

Step 1: Access the Ender 3 Controller
Alright, let's dive in. To kick off this project, we will need to open up the Ender 3 control box to expose the controller board inside. First and foremost, you must unplug your 3D printer before opening the controller box. There are a couple screw terminals on the control board that are basically exposed lines from the power supply and you really don't want to begin this project with a nasty shock. It is supposed to be a fun time.

There are a total of three screws securing the cover to the controller box. We will need to slide the build platform back and forth a bit to access all three screws. First, after unplugging the printer, slowly slide the build platform all the way to the back of the machine so it does not block the two screws on the front of the control box underneath. Using a hex key, remove the two screws on the front of the lid.

Then, slowly slide the platform all the way to the front of the machine. This will allow you to access the third and final screw on the back of the box.

With this last screw removed, lift the cover off the top of the control box and set it aside for now. Don’t lift the cover off with too much haste though because there is a fan on the underside of the cover and the wire connecting it to the control board is not all that long.

Controller Wiring for Reference
We will not actually be unplugging anything from the controller board. But, just in case something gets accidentally unplugged while we are programming the board, here is some reference material so you can put everything back from whence it came.

Step 2: Flash a Bootloader Onto the Control Board
The control board inside the Creality Ender 3 does not ship with a bootloader so the Arduino IDE will not be able to program the board. Therefore, before we will be able to use the Arduino IDE to flash new firmware, we need to flash a bootloader onto the board. The bootloader is a bit of software that tells the control board how to communicate with the Arduino IDE.
Connect the USBasp Programmer
The first thing to do is connect the USBasp programmer to the Ender 3 controller. The Ender 3 control board has an onboard ISP header which is how the board is likely programmed in the factory. If you take a look at the front of the board, you will find the 2x3 pin ISP header right next to the USB port.

The orientation of the ISP header is important. It is not as if your printer will explode if you get it wrong, but flashing the firmware will not work if the USBasp programer is plugged in the wrong way. If you take a look at the ten-pin to six-pin adapter, you will find one of the corner pins labled as GND.

The GND pin on the ISP header is the one closest to the edge of the board and closest to the EXP1 header (the one with the colorful cable). The image below is probably more useful than a written description for locating the ground pin on the ISP header.

With knowledge of where both GND pins are, use these pins as datum points to plug the USBasp programmer into the Ender 3 control board.

Flash the Bootloader
With the USBasp programmer connected, jump over into the Arduino IDE. First we will need to tell the IDE what type of programmer we are using. Go to Tools > Programmer and select USBasp.

Next we need to tell the Arduino IDE what type of board we are dealing with. In this case, the Ender 3 control board is based on the Sanguino board. This type of board is not one that predefined in the Arduino IDE so we will need to install it into the board manager first. Start by going to File > Preferences. Then, in the Additional Boards Manager URLs field, input the URL below:
https://raw.githubusercontent.com/Lauszus/Sanguino/master/package_lauszus_sanguino_index.json

Press OK to dismiss the preferences dialog box. Then, go to Tools > Board > Boards Manager.
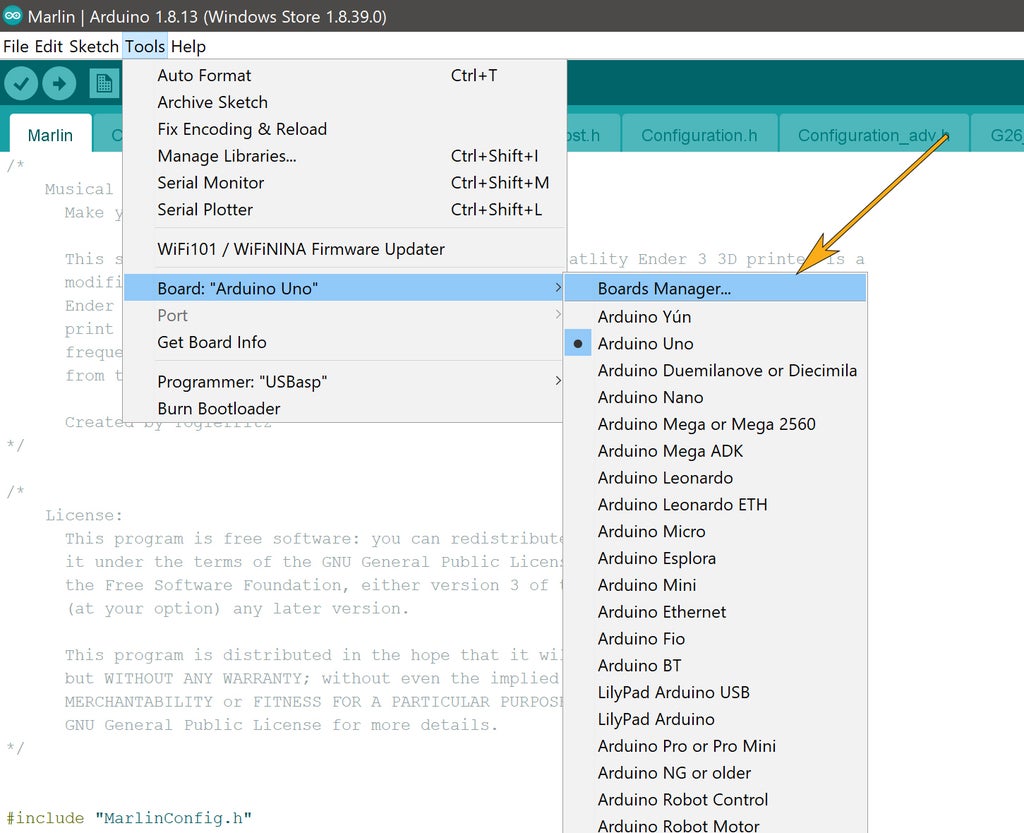
Then, search for “Sanguino” and install the board.

Now that the Sanguino board is installed, backtrack to Tools > Board and select the Sanguino, which will now be in the list.

The final bit of information we will need to provide the Arduino IDE is the type of processor used by the Ender 3 control board. To do this, go to Tools > Processor and select ATmega1284 or ATmega128P (16MHz).

Now, at long last, we can finally flash the bootloader onto the Ender 3 controller. Go to Tools > Burn Bootloader. You should see a confirmation message at the bottom of the display when the process is successful.

Step 3: Flash the Musical Marlin Firmware
Alrighty! The bootloader we just flashed onto the Ender 3 controller will enable us to flash new firmware from the Arduino IDE onto the board. For this project, we are using a modified version of the Marlin firmware. You can download the firmware from the GitHub repository for this project:
https://github.com/Toglefritz/Musical_Marlin
After downloading the repository from GitHub, open up Marlin.ino in the Arduino IDE. The IDE will automatically open the remaining Musical_Marlin firmware files (there are a whole bunch of files).
Because we will be flashing firmware using the USBasp programmer rather than a USB port, we will need to upload the firmware in a slightly different way than you might be used to with the Arduino IDE. Go to Sketch > Upload Using Programmer. This command will tell the Arduino IDE to use the USBasp programmer to flash the code onto the controller rather than the USB port, which is what the arrow button on the toolbar does.

After that, the code will upload and the Arduino IDE will present status updates at the bottom of the window the same way it does when uploading firmware via USB.
Understanding the Code
If you just want to move on and hear your Ender 3 play a beautiful song, you can jump to the next section, which explains how to use the custom LCD menu added by the firmware to play a tune.

Translating Music to G-code
Here's the thing: 3D printers are not, as it turns out, built to play music. The controller inside the Ender 3 3D printer is, in essence, just a G-code interpreter. Therefore, the crux of this project is to translate musical notes to G-code.
What is a Note?
To begin the explanation of how musical notation can be translated to into G-code, we first need to understand what a musical note represents. Musical notes encode two pieces of information: a frequency and a duration.
First, musical notes express a tonal frequency. Each letter in music (A, B, C, D, E, F, G, plus their various flats/sharps) is defined as a frequency of sound in Hz. There is a spreadsheet in this repository that lists the frequencies for three octaves of a musical scale.
Second, musical notes express the duration to play each tone. Different types of notes, like quarter notes, eighth notes, half notes, and so on, is a different duration based on the tempo for the song. Tempos are expressed in beats per minute. For example, the Song of Storms from Zelda Ocarina of Time has a tempo of 160 beats per minute. Although musicians do not think of notes this way (because they are not machines), the tempo gives the absolute length of time to play each note. In the Song of Storms example, each beat lasts 0.00625 minutes.
Translating Music to G-code
The G-code in question that we are looking to generate from music is the G0 command for a linear move. This command takes two main arguments. First, a distance to move one (or mroe but in this case just one) axis and a feedrate. So, for examnple, G0 X5 F100 means "move the X axis +5mm at a speed of 100 mm/min." Our goal is to map a note frequency to a feedrate and a note duration to a distance.
Note Frequency to Feedrate
The first challenge is to convert a frequency (in Hz) to a feedrate (in mm/min) given the steps per millimeter for an axis. For the Ender 3, The X-axis has a steps per millimeter value of 80; this is a fixed value based on the design of the 3D printer.
First, the note's frequency in Hz is equal to the target step rate for the stepper in steps per second. For example, the note C4 (middle C) has a frequency of 261.6256 Hz. If the stepper does 261.6256 steps per second, it will vibrate in a way that makes the C4 tone. We can easily convert this step frequecy to steps per minute to match the time scale of the freedrate (millimeters per minte). 261.6256 steps/s * 60 s/min = 15697.536 steps/min.
Second, for that steps/min value we can calcualte how much distance the axis will cover in a minute based on the steps per millimeter value of 80 for the X-axis. In other words, if the stepper "plays" a note of C4, how much distance will be covered in a minute. 1597.536 steps/min ÷ 80 steps/mm = 196.2192 mm/min. So, while the X-stepper is "playing" C4, it moves at 196.2192 mm/minute. This is the feedrate for C4 then!
Note Duration to Distance
Creating the G-code
So, bringing together the frequency to feedrate and duration to distance calculations, we can create a G-code command that will make the stepper motor make a C4 quarter note. The only little caveat is that we round the feedrate so it does not have a decimal value.
G0 X1.22637 F196
There is one additional G-code needed to string a bunch of notes together. We will need to set the printer to use relative positioning rather than absolute so it will keep moving along as we issue more commands. We can set relative positioning using the "M305 X1" command.
Adding Songs to Marlin
So, the above sections, which are quite far into the weeds, describe translating music into G-code. How do we add this to Marlin? The way I've chosen to do it for this project is to add custom commands to the LCD interface to play songs. This is actually quite easy. In the Marlin firmware code, custom LCD commands can be created in the configuration_adv.h file. In there, there is a secion for #define CUSTOM_USER_MENUS. By commenting out the different lines, like #define USER_DESC_1 "Play a scale", we can add additional items to the LCD menus.
Each menu item has two parts. The name is listed in the lines like #define USER_DESC_1 "Play a scale". Each menu item performs a custom set of G-code commands. These are listed in the lines right below the names. So, we will take the cutsom G-code representing the songs we want the printer to play and add those to the custom menu items. For example, the G-code below will play Song of Storms from Zelda. THe tralsation of this song into G-code is described in a spreadsheet in this repository.
#define USER_GCODE_2 "G17 \nM350 X1 \nG91 \nG0 X0.6875 F220\nG0 X0.81875 F262\nG0 X1.6375 F131\nG0 X0.6875 F220<br>\nG0 X0.81875 F262\nG0 X1.6375 F131\nG0 X4.63125 F494\nG0 X1.6375 F524\nG0 X1.54375 F494\nG0 X1.6375 F524<br>\nG0 X1.54375 F494\nG0 X1.225 F392\nG0 X4.125 F330\nG0 X2.0625 F330\nG0 X1.375 F220\nG0 X0.81875 F262<br>\nG0 X0.91875 F294\nG0 X6.1875 F330\nG0 X2.0625 F330\nG0 X1.375 F220\nG0 X0.81875 F262\nG0 X0.91875 F294<br>\nG0 X4.63125 F247\nG0 X0.6875 F220\nG0 X0.81875 F262\nG0 X5.5 F440\nG0 X0.6875 F220\nG0 X0.81875 F262<br>\nG0 X5.5 F440\nG0 X4.63125 F494\nG0 X1.6375 F524\nG0 X1.54375 F494\nG0 X1.6375 F524\nG0 X1.54375 F494<br>\nG0 X1.225 F392\nG0 X4.125 F330\nG0 X2.0625 F330\nG0 X1.375 F220\nG0 X0.81875 F262\nG0 X0.91875 F294<br>\nG0 X4.125 F330\nG0 X2.0625 F330\nG0 X4.125 F220"
When we select that custom command, the printer will "play" Song of Storms.
Step 4: Put the Cover Back On
Now that we’ve finished programming the Ender 3 controller, we can put the cover back in place. This is quite easy since we will just be doing the opposite of the procedure in Step 1. First slide the build platform all the way to the front so you can reinsert the single screw on the back of the cover. Second, push the build platform all the way to the back and reinsert the two screws on the front.
Alright, job done.
Step 5: Play Some Music
The custom version of Marlin we just finished flashing to the control board enables a set of custom commands on the LCD display that will play songs. To access the menu, simply press the dial on the LCD controller and navigate to Custom Commands.

Then, you can select one of the songs to play. There are three songs included in the custom Marlin firmware (at the time of this writing). Since I’ve been having a bunch of fun lately playing Breath of the Wild, I decided to go for a few songs from the Zelda franchise. I’ve included documentation for creating your own music in a later step in this Instructable.
- Play a scale
This one isn’t really a song. It plays a major scale for testing purposes. - Song of Storms from Zelda Ocarina of Time
- Gerudo Valley from Zelda Ocarina of Time
- Lost Woods from Zelda Ocarina of Time

Note
These three songs, plus the scale, take up just about all of the available storage on the controller so if you want to add other songs, you will need to remove one of the ones already in place.

Step 6: Appendix A: Programming Ender 3 Controller With an Arduino Uno
In case you don’t have or don’t want to purchase a USBasp programmer, you can also use an Arduino Uno (or just about any other Arduino board as long as you adapt the pins accordingly) to flash the bootloader and firmware to the Ender 3 controller.
Connect the Arduino Uno to the Ender 3 Controller
We already learned that, in order to flash a bootloader onto the Ender 3 control board, we need to use the six-pin ISP header located next to the USB port. If you take a look at the Arduino Uno, you will find an identical ISP header, this time located on the opposite side of the board from the USB port, next to the text that says “Arduino.org.” In order to program the Ender 3 controller using the Arduino Uno, we will need to wire these two ISP headers together. The table and diagram below shows the connections that need to be made.


| Ender 3 ISP Pin | Arduino Uno ISP Pin |
|---|---|
| MISO | MISO |
| 5V | 5V |
| SCK | SCK |
| MOSI | MOSI |
| RESET | 10 |
| GND | GND |
Flash the Bootloader
Then, connect the Arduino Uno to your computer as you normally would. The Arduino IDE ships with an example sketch that allows the Arduino to act as an ISP programmer. To find this example sketch, navigate to File > Examples > 11.ArduinoISP > ArduinoISP.

Then, with the ArduinoISP sketch uploaded to the Arduino Uno, open up the Musical Marlin firmware.
Next up, we will need to tell the Arduino IDE that we are using an Arduino as a programmer. To do this, go to Tools > Programmer: > Arduino as ISP.
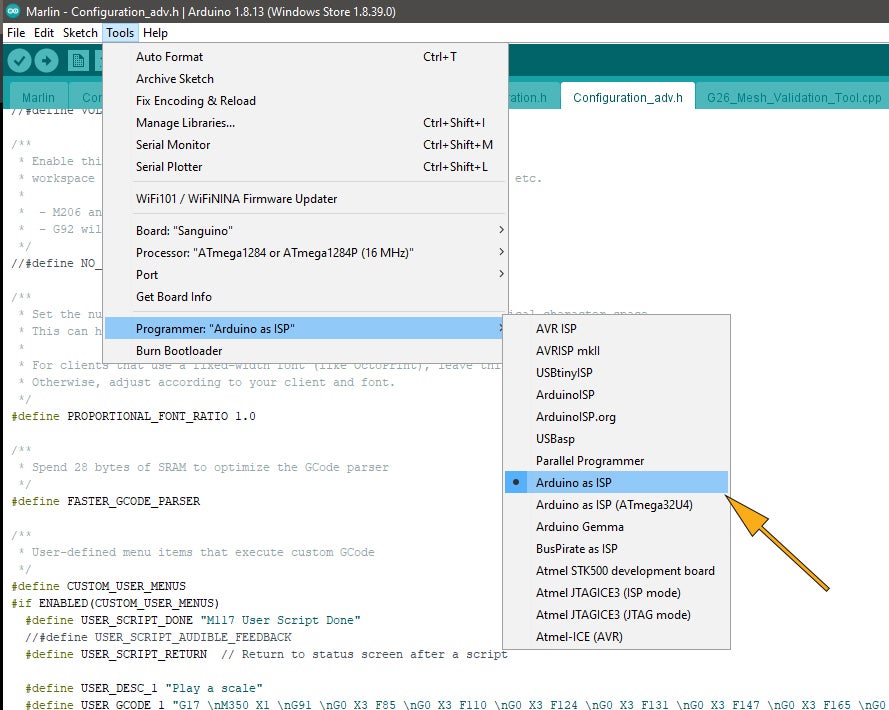
Lastly, to burn the bootloader, go to Tools > Burn Bootloader. This will flash the bootloader onto the Ender 3 controller.

After this, you can follow the rest of this Instructable to flash the Musical Marlin firmware onto the control board.
Step 7: Appendix B: Write Your Own Music Translations
I’ve created a set of Zelda songs for this Instructable because I was inspired by all the fun I’ve been having lately with Breath of the Wild and because the Zelda Ocarina of Time soundtrack is highly recognizable. But, you can also write your own G-code music.
The repository for this project (https://github.com/Toglefritz/Musical_Marlin) contains a directory that houses a couple spreadsheets used to translate notes into G-code. The easiest way to write your own G-code music is to start by copying one of these files.

1) Set the Tempo
The first bit of information to enter is the tempo for the song in beats per minute. You can typically find this information by searching on Google.

2) Input Notes
The “Note Tone” column contains a list of the notes making up the song in sequence. This column is fairly straightforward. Simply fill in the notes from your sheet music.

For rests, enter “R.”
3) Enter Note Durations
Finally, in the “Note Duration” column, we will ender decimal values that denote the duration for each note:
- Sixteenth note = 0.25
- Eight note = 0.5
- Quarter Note = 1
- Half Note = 2
- Whole Note = 4 (for 4/4 time signature)
dsf

4) Copy G-code into Firmware (or a separate G-code file)
With all of the notes and durations input for playing the song you want on your Ender 3, there is a cell (F5) that takes all of the individual G-code notes and builds them into a list with new lines in between. There are also two commands added to the front of the list:
- M17: enable stepper motor power
- M350 X1: set X-axis microstepping resolution to full steps (this makes the motor louder which, for playing music with your 3D printer, is a good thing)
- G91: set relative positioning

Then, copy the list of G-code commands into the Marlin firmware under the CUSTOM_USER_MENUs section:
/** <br> * User-defined menu items that execute custom GCode <br> */ <br>#define CUSTOM_USER_MENUS
Step 8: Appendix C: Load Music From the SD Card
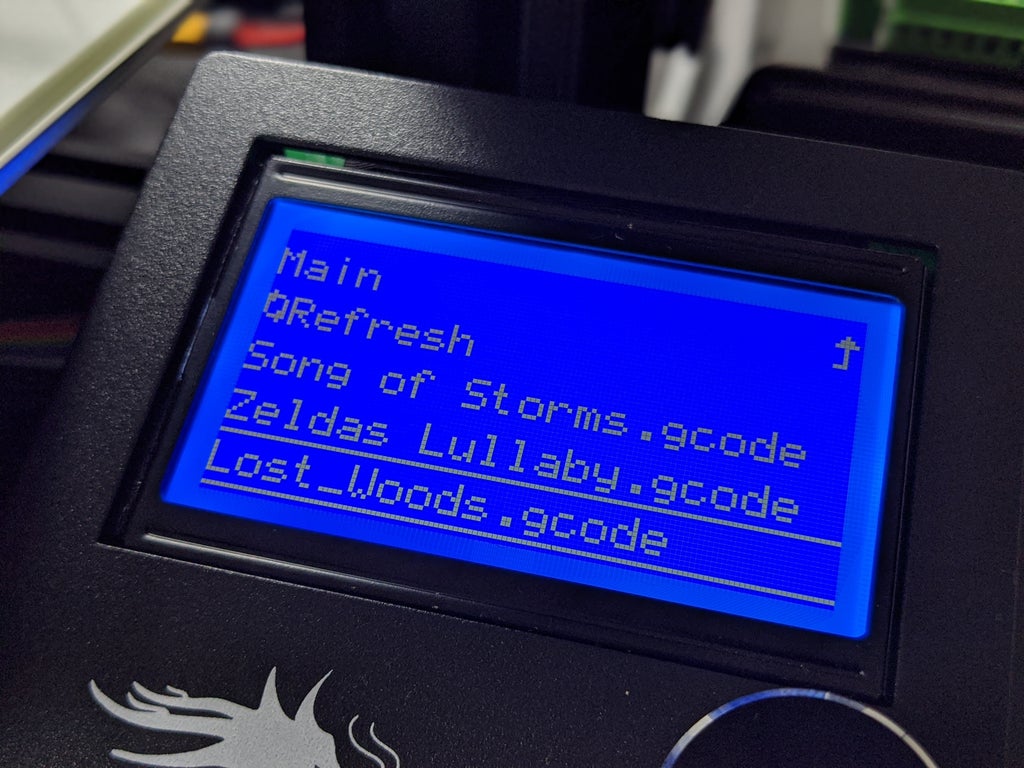
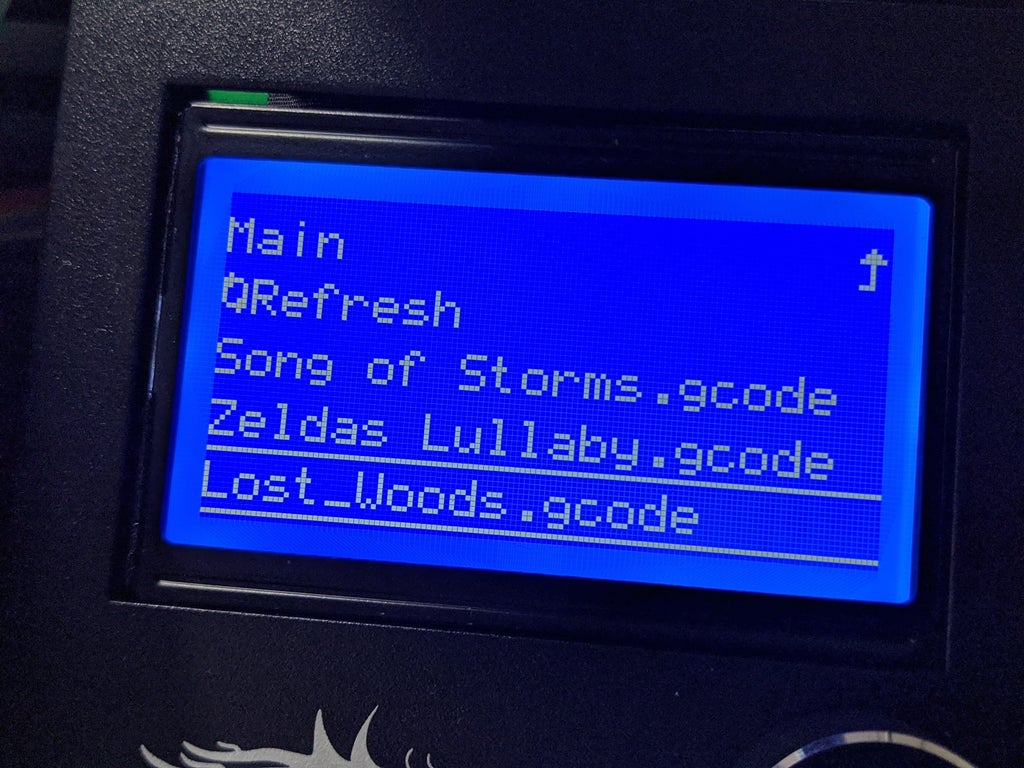
For this project, I thought it would be fun to write custom Ender 3 firmware to make the song selection appear on the LCD display. However, this is certainly not the only way to load G-code music onto the printer. It is also possible to put the songs on the printer's SD card and load them like you would a normal print job.
Add G-Code Syntax Support to VS Code
When writing G-code by hand (or at least copying and pasting G-code by hand) it is useful to have an environment that enables things like syntax highlighting to help avoid errors. There are numerous text editors you could use for this purpose, but here we will be using Visual Studio Code.
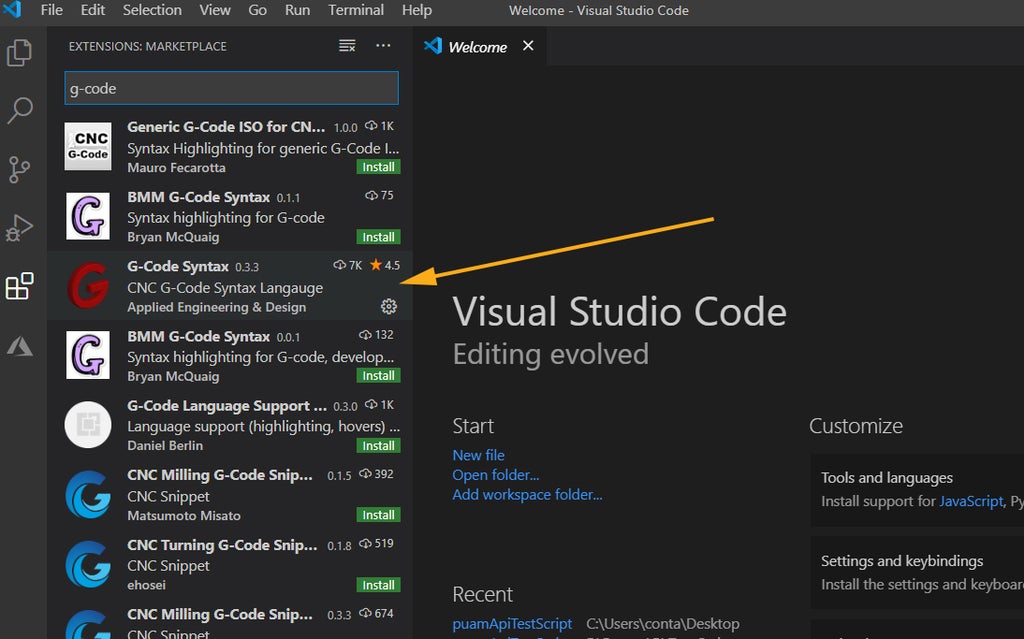
To enable VS Code to recognize and highlight G-code, first head over to the extension store.
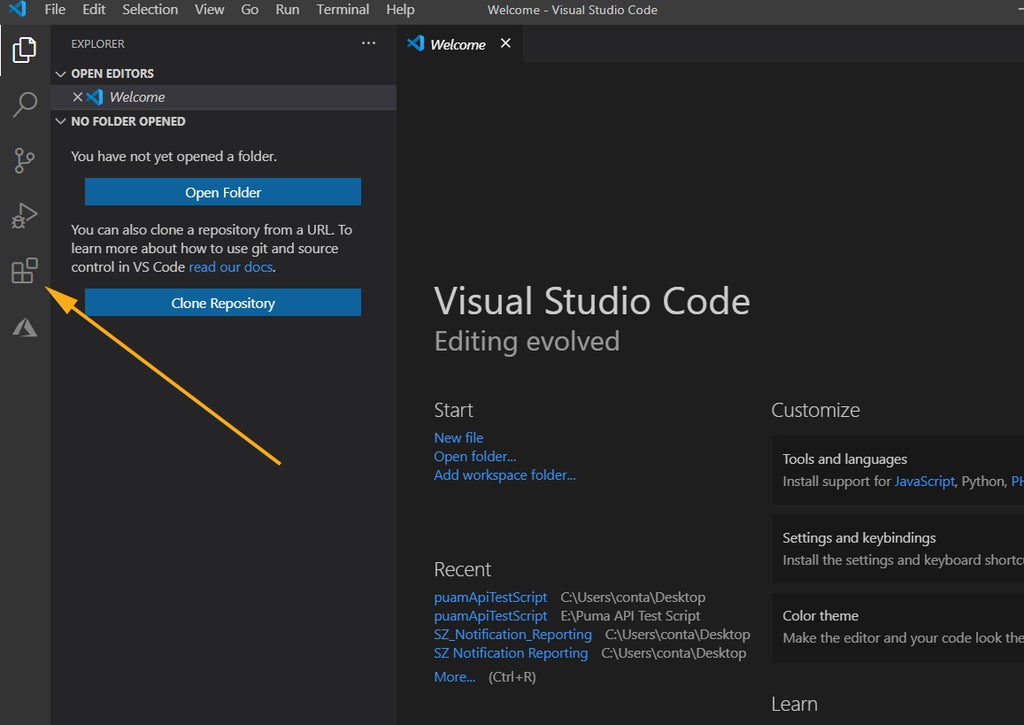
Then, download the G-Code Syntax extension by Applied Engineering & Design.
Create G-Code File
With support for G-code added to VS Code, jump over to the spreadsheet for the song you want to translate to G-code for your 3D printer to play. Copy the stringified G-code from cell F5.

Then, paste this G-code into Visual Studio Code.
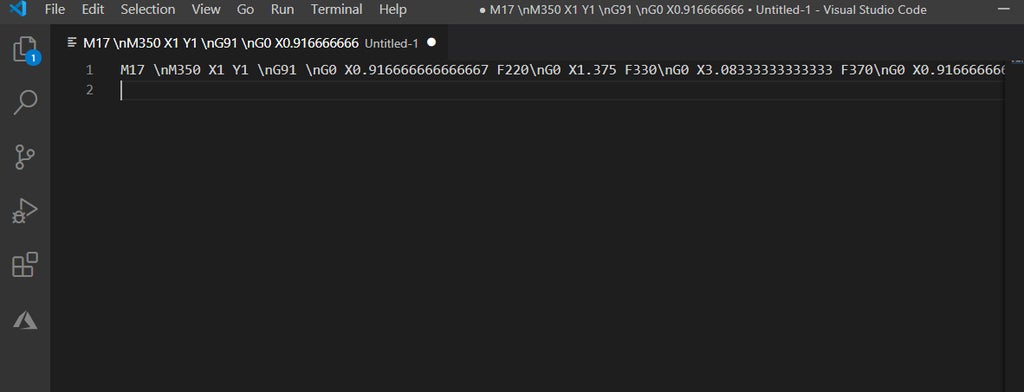
For translation into the Marlin firmware, the G-code has /n line breaks in it. In VS Code, do a find and replace for these line breaks to swap them out for new lines (like you pressed enter).
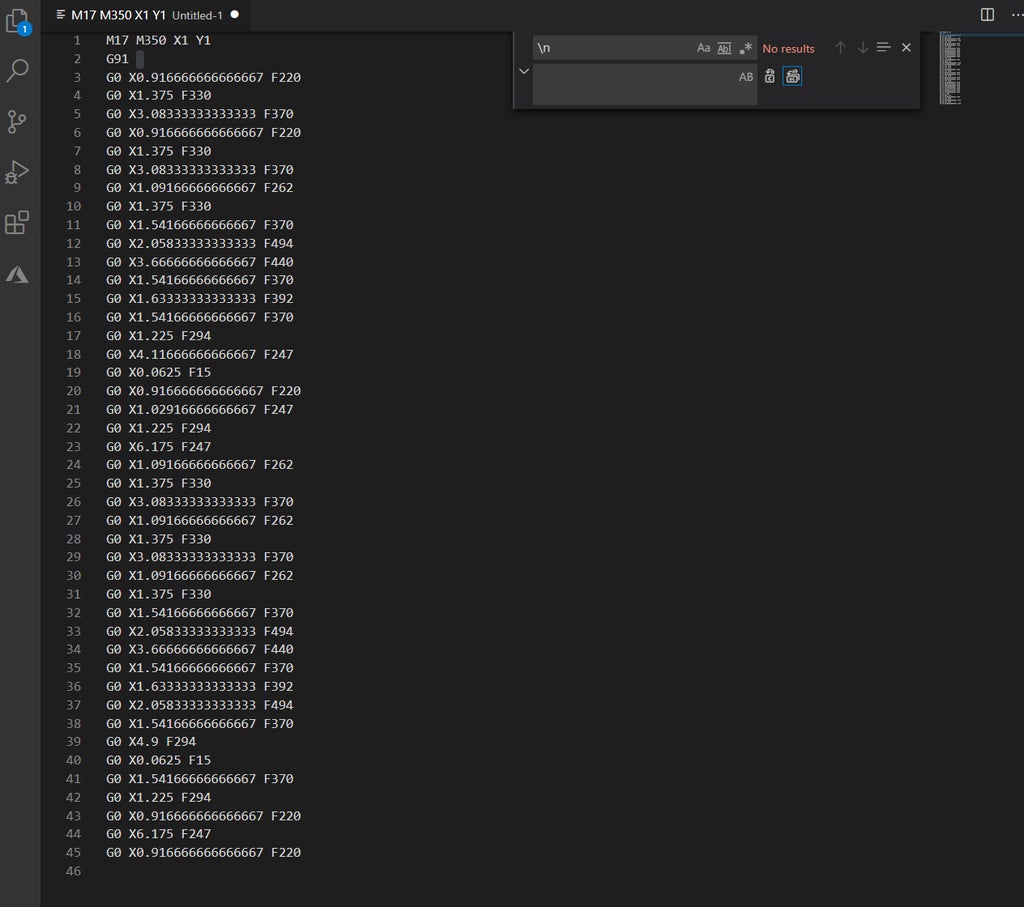
To enter a new line into the find and replace interface, press CTRL + Enter.
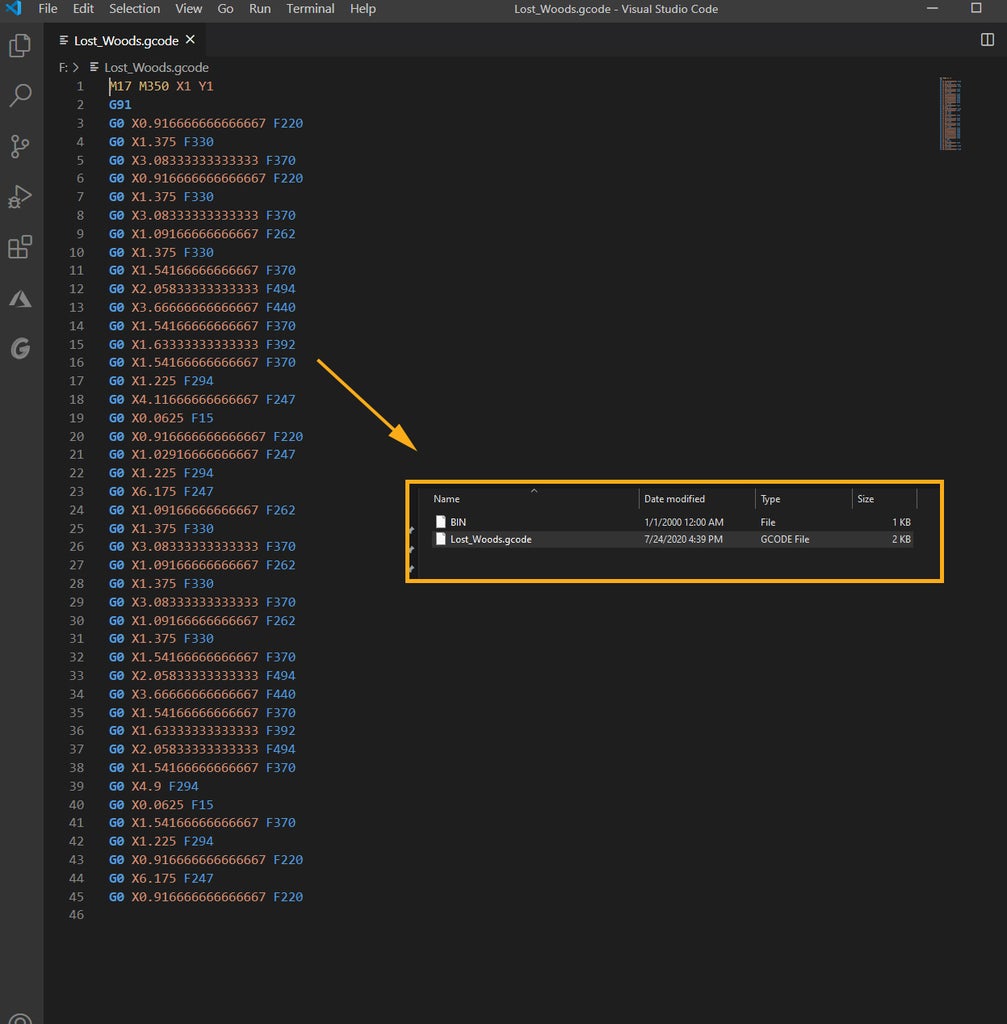
Save the G-Code
Then, with your Ender 3's SD card inserted in your computer in some way, save the file onto it from VS Code with the .gcode file extension.
Play the Music
Now that your musical G-code has been loaded onto the SD card, you can play it the same way you would run a print job off the SD card (after all, the print jobs are just G-code files too). Just select the song you want to play from the list of files on the SD card.

Runner Up in the
Audio Challenge 2020


