

Introduction: Make a Package Notification System With Particle Argon

Have you ever had a package stolen? Have you ever wanted a device that would notify you within minutes that you've received a package at your front door? If you have a basic level of programming skills and electrical engineering experience with microcontrollers, you could build a simple package sensor following these steps.
To receive a notification when a package arrives, I created a "digital tripwire" that includes a laser pointer and a light sensor. A laser's beam is projected onto the sensor, resulting in the light sensor returning high values; when something blocks the beam, the "wire" is "tripped," and the sensor will return low values. If the values returned from the light sensor are low for an extended period of time, which signifies that there is something in the door, the program will update a variable's data signifying that there is something there.
Additional technical details are provided below:
I encountered some restrictions I encountered some restrictions when I tried to achieve the desired results with free, non-subscription services. For example, I realized too deep into the project that pushing data from the Particle Argon to the Google Apps Script was better suited for my needs than the Google Apps Script pulling data every minute from the Particle Argon. Because of this, there is only a 1-second window in which the Google Sheet will pull the data on the status of the package. However, this is not a fatal flaw; there will be a maximum 1-minute delay between package drop-off and mobile notification.
On the topic of mobile notification, IFTTT (available at https://ifttt.com) is the best free notification service that allows for integration across various applications. To receive notifications, you must sign up with an account and download the app on a mobile device of your choosing.
Potential Malfunctions:
If your packages are placed outside of the beam, your package WILL NOT be detected. This works best if your packages are placed between a security door and the front door (see example in title image). If you have a porch where delivery people drop off your packages on your steps or outside of the door, then this device will not work.
Additional note: The microcontroller that I used to program and wire my device is an Argon microcontroller manufactured by Particle; if you use a different microcontroller (eg, an Arduino microcontroller), it will still work, but you will have to make adjustments.
Supplies

Required Materials:
- 1 - Particle Argon Microcontroller
- 1 - Photoresistor (light sensor)
- 1 - Breadboard
- 1 - USB-C and USB-A ended wires
- 1 - Resistor (220-1000 Ohm)
Note: If you purchased the Particle Argon, all of the above is provided
- 1 - USB-A Power Plug
- 1 - Laser Diode
- 3 - AA Rechargeable Batteries
Step 1: Wiring the Microcontroller


The following steps will tell you how to wire the microcontroller:
- Plug the microcontroller into the breadboard
- Run your resistor from a rail to the microcontroller's ground pin labeled "GND"
- Plug your photoresistor into the breadboard
- Grab a 4-inch solid core wire and run it from the pin labeled "3V3" to the short (positive) end of the photoresistor
- Grab another 4-inch solid core wire and run it from the long (negative) end of the photoresistor to the rail that you grounded with the resistor
- Grab a third 4-inch solid core wire and run it from the long (negative) end of the photoresistor to the analog pin labeled "A0"
Note: The following explanation is NOT a required step:
To make sure that natural light will not register on the photoresistor, I created a cardboard housing for the microcontroller to shelter the photoresistor from light, and I cut a window only on the side where the laser beam must pass through.
Step 2: Programming the Microcontroller
All of the wiring and sensors are useless to us unless we program the Particle Argon to give us the values from the photoresistor and create a variable that tells us whether or not there is a package at the front door.
DISCLAIMER: The current delay in the loop function can be infinite causing your Argon to disconnect from the Particle Cloud, better solutions will be made in the future.
Open your microcontroller's IDE and copy and paste the following code:
const pin_t photoresistor = A0;
unsigned long currentMillis;
unsigned long startMillis = 0;
const unsigned long timer = 60000;
int packstat = 0;
int count = 0;
int analogvalue = 500;
int threshold = 10; //may have to adjust based on your photoresistor's output

void setup() {
  Serial.begin(9600);
  Particle.variable("packstat", packstat);
}

void loop() {
  analogvalue = analogRead(photoresistor);
  Serial.println("Package Status: " + String(packstat) );
  Serial.println("Photoresistor: " + String(analogvalue) );

  if(analogvalue <= threshold){
    count++;
    if(count == 10){
      Serial.println("Package Arrived!");
      packstat = 1;
      startMillis = millis();
      currentMillis = millis();
      while(currentMillis - startMillis <= timer){
        currentMillis = millis();
        Serial.println("Package Status: " + String(packstat) );
        delay(1000);
      }
      Serial.println("Reset!");
      packstat = 0;
      while(analogvalue <= threshold){
        delay(1000);
      }
    }
  }
  else{
    count = 0;
  }
  delay(1000);
}
Step 3: Programming a Google Sheet


The data that the microcontroller reads from the photoresistor will not be captured unless we write another program to store the output data on package status. In this case, a Google Apps Script will read the data from the microcontroller and update a Google Sheet.
- In Google Drive, create a new folder named "IFTTT integration" (this will be important later) and open a Google Sheet within the folder and name it "Pulling Data from Particle Argon"
- In the Google Sheet, go to the header at the top of the page named "Extensions" and open up the sheet's "Apps Script"
- When you open the Apps Script, rename the file "Pulling Data from Particle Argon"
- Within the code window, replace "function myFunction(){}" with the code located below the steps
- At the left side of the Apps Script page, navigate to the "Triggers" tab
- In the "Triggers" window, at the bottom of the page, press the blue "Add Trigger" button
- Within the trigger setup window, move to "Select Even Source" and select "Time-Driven"
- This will create a new drop-down menu: "Select type of time based trigger", select "Minutes timer"
- Under "Select minute interval," select "Every minute"
- Because you are pulling data from the Particle Argon, you need to grab your own Argon's unique Device ID and Access token that only you have access to.
- Navigate back to your code window and look at the left side of the page
- Select the "Devices" tab and select your active Argon, and you will find your Device ID
- Copy the Device ID and return to the Apps Script
- Back in the code window, paste the Device ID into the sixth line of code within the quotations where it says, "REPLACE DEVICE ID"
- Open a new window and copy and paste the following link: https://docs.particle.io/reference/cloud-apis/access-tokens/
- Change the expiration date to 90 days and generate the access token (do not share this access token with anyone)
- Again, return to the Apps Script and paste the access token within the quotations on the ninth line where it is listed as: "REPLACE ACCESS TOKEN"
- From here, you are finished, save and execute the code within the Apps Script code window (if you return to the Google Sheet, you should start to see it update if your Particle Argon is plugged in and set up correctly)
Programming referred to in step 4:
function collectCurrent() {
  "use strict";
  try
  {
    //Replace the device ID below with your Argon's unique device ID
    var deviceID = "REPLACE DEVICDE ID";

    //Replace the access token below with your Argon's unique access token
    var accessToken = "REPLACE ACCESS TOKEN";

    var sheet = SpreadsheetApp.getActiveSheet();

    // Fetch the value of the testValue variable from the Spark Cloud API.
    // The name of your variable in Particle's cloud must match the variable in the URL below.
    var response = UrlFetchApp.fetch("https://api.particle.io/v1/devices/" + deviceID + "/packstat?access_token=" + accessToken);

    // Parse the JSON and extract the testValue.
    var jsonResponse = JSON.parse(response.getContentText());
    var packstat = jsonResponse.result;

    // Create a timestamp.
    var timeStamp = new Date();

    if(packstat == 1){
      sheet.appendRow(["Package Arrived", timeStamp]);
    }

  } catch (e)
  {
    // If something doesn't work, log it, then rethrow the error.
  Logger.log(e.name + ": " + e.message);
  throw (e);
  }
}
Step 4: IFTTT Setup


A Google Sheet will be able to send notifications by itself; however, there is an integration application called "IFTTT" that will allow you to receive a notification when a new row is added to the Google Sheet you just created.
- Copy and paste the following link in a new tab: https://ifttt.com/developers
- Create an account
- Navigate to the "Create" tab at the top of the screen
- Under "If This," press add
- Inside "Search services," type: "google sheets" and select the sheets service
- Select the "New row added to spreadsheet" Trigger
- Enter the folder location of the sheet, enter the name of the sheet, and enter your Google Sheet's URL into input boxes and press the "Create Trigger" button
- Now add a "Then That" service
- In the search bar, type "Notifications" and select IFTTT's standard notification service
- Select "Send notification from the IFTTT app" and modify the notification to say whatever you would like it to say and then press "Create Action" when you are done; press "Continue," review the applet, and press "Finish"
Step 5: Creating Laser Diode Battery Pack


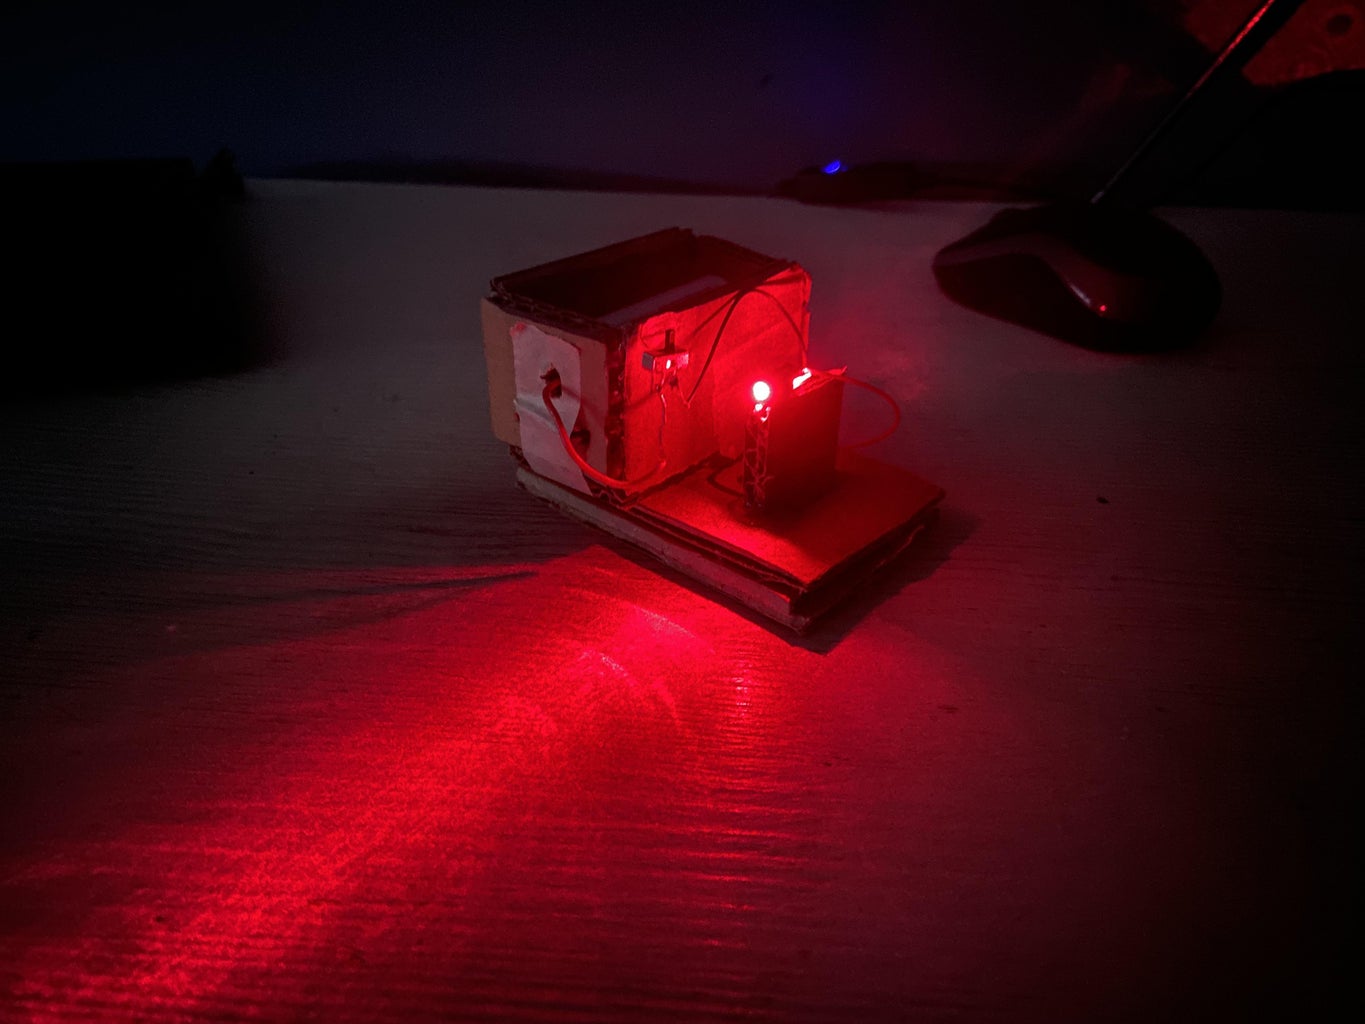


To create a working laser that operates independently from the microcontroller, you must create a battery pack. To achieve the desired result, I used 3 AA rechargeable 1.2-V batteries to power my laser diode. This provided me with the best range and accuracy for my needs. I wanted to have easy access to recharge the batteries, so I created a cardboard box with an opening on top where there would be wires that would properly run a current and a laser diode that I soldered to a switch where I could toggle the laser on and off.


![Tim's Mechanical Spider Leg [LU9685-20CU]](https://content.instructables.com/FFB/5R4I/LVKZ6G6R/FFB5R4ILVKZ6G6R.png?auto=webp&crop=1.2%3A1&frame=1&width=306)


