

Introduction: Make a ThinkPad Keyboard USB Adapter With Arduino


Among the business class laptops, ThinkPads have the best keyboards. Even with the change to island style keyboards, I would say that ThinkPad keyboards still beat all its laptop competitors hands down in the keyboard department. Unlike others, ThinkPad keyboard keys are curved to fit your fingers, they have roughly the same surface area as a desktop full-size keyboard and well spaced so you wouldn't miss a key or have to reach far to get to one.
ThinkPad laptops are well built. However, they are also very expensive, compared to competitors with the same spec. So what do you do if you only like the keyboards? You either buy the official USB or Bluetooth Lenovo ThinkPad keyboards with TrackPoint or make your own adapter for the keyboard that you hold dear.
In this Instructable, I will show you the general steps I took to make a USB adapter for the T60 keyboard and its compatible keyboards, ie. if your keyboard shares the same receptacle as the T60. See step 1.
Let's get started!
UPDATE: A kit with all the components required (excluding Arduino) is now available at https://www.tindie.com/products/rampadc/arduino-thinkpad-usb-keyboard-adapter/
Step 1: Get Your Receptacle
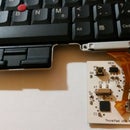
Before diving into the easier part, ie. programming and designing the adapter board, you need to find a way to connect your keyboard to the PCB.
Most classic ThinkPad keyboards use board to board connectors. According to eBay, if you search for T60 keyboards, you will find that ThinkPad T60, T60p, Z61p, Z61t, Z60, T61, R400, R500, T400, T500, X41... shares the same keyboard and their keyboard matrix may also be interchangeable.
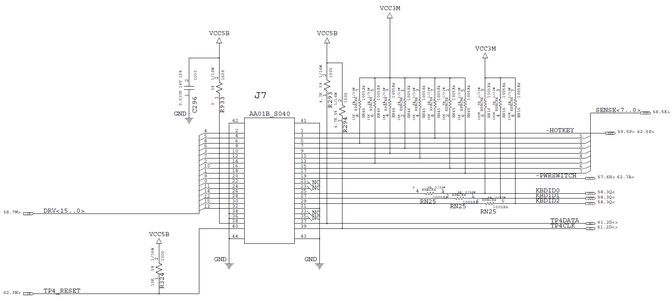
From ThinkPad T60's schematics that floats around on the internet (see picture), I found that the T60 uses JAE AA01B-S040VA1-R3000. There aren't a lot of vendors who sell these as they are proprietary. Most of those who do sell, sell with minimum order quantity of 100. At about $4.90 each plus shipping, it's awfully expensive. So if you're interested in getting some of those, message me.
For more information regarding ThinkPad T60 receptacle, have a look at Felix's photos and measurements: http://electronics.stackexchange.com/questions/64112/how-to-find-socket-for-keyboard-connector
Step 2: Working With the Keyboard Schematic
From the previous step's schematic, T60 keyboard matrix uses 8 rows and 16 columns, 1 for the hotkey (FN), TrackPoint uses a clock line, data line and a reset line. In total, it needs 28 digital pins while Arduino Micro/Leonardo only have 20.
Using a decade counter like CD4017 to cycle through the rows and a SPI 16-bit input IC, such as MCP23S17, to read 16 columns inputs, the total number of pins on the Arduino side reduces to 10 lines.
In general, keyboard matrix are passive - they do not specify whether row or column has to be inputs or outputs. For this project, however, 16 columns outputs will require more external ICs, passive components and complicates the design. Therefore, I chose to have 8 outputs and 16 inputs.
So far, the part list has come to:
- Arduino Micro: ~$32 for official module, ~$13 for clones (clone on eBay)
- CD4017
- MCP23S17
- 16 x 10k resistors as pull-up resistors for the MCP23S17
- for Arduino mounting board and receptacle board (next few steps)
- AA01B-S040VA1 receptacle
Step 3: Design the Schematic and PCB


As the T60's receptacle is a surface mount component with 0.5mm pitch, I decided to use SMDs for other components as well.
In this project, I decided to split the board into 2 boards:
- Arduino Micro mounting board
- Receptacle board with resistors and supporting ICs.
This allows future revisions of the boards to be more modular and may prove to be cheaper in the long run. For example, if I decide to add Bluetooth connectivity, I wouldn't have to use Arduino Micro for its USB capability anymore. I can use an Arduino Nano instead and only have to design the PCB on the Arduino side, knowing full well my receptacle board will work the same way regardless what microcontroller I decide to use.
I have included examples of my PCB layout, schematic and fabricated boards from Elecrow. The boards are double sided and fits within 50x50mm.
Step 4: Code It!
This project was simple enough to code with Arduino's huge community. I wrote a quick sketch. The code is available on GitHub: https://github.com/rampadc/arduino-thinkpadkb-usb.
The code can use some optimization to speed up the matrix scanning. FN + NumLock functionality, keypad keys and custom keyboard combinations functions were removed from the code as it slows down the scanning significantly.
Step 5: Result & Conclusion


Arduino platform makes it very easy to build a USB adapter. However it has some serious weaknesses:
• Limited keycodes supports: no definitions for keypad keys, Print Screen, Scroll Lock, Pause, Break and many more
• Awkward implementation of Keyboard.press() and Keyboard.release(). Instead of accepting and sending keycodes unmodified, Arduino API forces user to send printable characters instead.
• No remote wake-up: if the computer go into standby, pressing a key on the keyboard or move the mouse will not wake it up.
• Low pin count
• Slow. There can be code optimizations and improvements but using Arduino's abstraction from direct port manipulation increases the latency significantly, adding the low pin count forcing user to use expansion ICs reducing speed a bit further.
For testing purposes, I used jumper cables to connect the two boards together. For the final product, I would use some much thinner wires soldered directly onto the boards and run underneath the keyboard.
Here's a video of the keyboard in action: http://youtu.be/gDHS0D_EtOc
Suggestions for design improvements and code optimizations welcomed!

Participated in the
Arduino Contest

Participated in the
Green Electronics Challenge

Participated in the
Gadget Hacking and Accessories Contest

Participated in the
Full Spectrum Laser Contest


